Nintex Workflow 2013 Help

Last updated: Tuesday, October 18, 2016

1 Workflow Actions
        1.1 Action Set
        1.2 Add User To AD Group
        1.3 Assign Flexi Task
        1.4 Assign To-Do Task
        1.5 Build String
        1.6 Calculate Date
        1.7 Call web service
        1.8 Capture document set version
        1.9 Change State
        1.10 Check in item
        1.11 Check Out Item
        1.12 Collection Operation
        1.13 Commit pending changes
        1.14 Compile Audience
        1.15 Complete Workflow Task
        1.16 Convert Document
        1.17 Convert Value
        1.18 Copy item
        1.19 Copy to file share
        1.20 Copy to SharePoint
        1.21 Create AD Group
        1.22 Create AD User
        1.23 Create appointment
        1.24 Create Audience
        1.25 Create CRM Record
        1.26 Create item
        1.27 Create item in another site
        1.28 Create list
        1.29 Create Site
        1.30 Create Site Collection
        1.31 Create task
        1.32 Declare as record
        1.33 Decommission AD User
        1.34 Decommission Site Collection
        1.35 Delegate Workflow Task
        1.36 Delete / Disable CRM Record
        1.37 Delete AD Group
        1.38 Delete Audience
        1.39 Delete drafts
        1.40 Delete Item
        1.41 Delete multiple items
        1.42 Delete previous versions
        1.43 Delete site
        1.44 Discard check out
        1.45 Enable Lync / OCS
        1.46 End workflow
        1.47 Execute SQL
        1.48 Filter
        1.49 Find users by status
        1.50 For Each
        1.51 Get meeting suggestions
        1.52 Get user status
        1.53 Log in the History List
        1.54 Loop
        1.55 Math operation
        1.56 Pause for
        1.57 Pause Until
        1.58 Provision User In Exchange
        1.59 Publish Workflow
        1.60 Query BCS
        1.61 Query CRM
        1.62 Query Excel Services
        1.63 Query LDAP
        1.64 Query List
        1.65 Query User Profile
        1.66 Query XML
        1.67 Read Document
        1.68 Regular Expression
        1.69 Remove User From AD Group
        1.70 Request Approval
        1.71 Request Data
        1.72 Request Review
        1.73 Retrieve data
        1.74 Run If
        1.75 Run parallel actions
        1.76 Search Query
        1.77 Send / Receive Biztalk
        1.78 Send document set to repository
        1.79 Send document to repository
        1.80 Send notification
        1.81 Set a condition
        1.82 Set a variable
        1.83 Set approval status
        1.84 Set document set approval status
        1.85 Set field value
        1.86 Set item permissions
        1.87 Set workflow status
        1.88 Start workflow
        1.89 State Machine
        1.90 Store data
        1.91 Submit Record
        1.92 Switch
        1.93 Task reminder
        1.94 Terminate workflow
        1.95 Undeclare as record
        1.96 Update AD User
        1.97 Update CRM record
        1.98 Update document
        1.99 Update item
        1.100 Update multiple items
        1.101 Update User Profile
        1.102 Update XML
        1.103 Wait for an item update
        1.104 Wait for check out status change
        1.105 Web Request
2 Using Nintex Live Connector for Nintex Workflow 2013
        2.1 Access Management
        2.2 Adding and removing services
        2.3 Catalog Settings
        2.4 Nintex Live Workflow Settings
        2.5 Using the Nintex Live Catalog
3 Workflow Interaction with SharePoint
        3.1 About LazyApproval
        3.2 Approving, Rejecting and Reviewing Items
        3.3 Configuring the Chart Viewer Webpart
        3.4 Configuring the Report Viewer Webpart
        3.5 Delegating Approval Tasks
        3.6 InfoPath Forms
        3.7 Managing Workflow Change Approval
        3.8 Managing workflow history lists
        3.9 My Workflow Tasks web part
        3.10 NintexWorkflows library
        3.11 Reusable Workflows
        3.12 Scheduling a workflow
        3.13 Set Title and Description for Reusable Workflow Template
        3.14 Site Workflows
        3.15 Starting a workflow
        3.16 Updating User Defined Action in Published Workflows
        3.17 User Defined Action Parameters
        3.18 User Defined Action Settings
        3.19 User Defined Actions
        3.20 Viewing workflow history
        3.21 Viewing workflow status
        3.22 Workflow Change Approval
        3.23 Workflows I have started web part
4 Administration and Configuration
        4.1 Creating support packages
        4.2 Preventing excessive looping iterations
        4.3 Monitoring workflow errors
        4.4 Support packages
        4.5 SharePoint IDs for Nintex Features
        4.6 External Start URLs page
        4.7 Nintex Workflow Management page
        4.8 Managing External Start settings
        4.9 Manage the configuration database
        4.10 Workflow inventory
        4.11 Licensing settings
        4.12 Database settings
        4.13 Manage content databases
        4.14 Web Application activation settings
        4.15 Managing workflow actions
        4.16 Global Settings
        4.17 Managing LazyApproval settings
        4.18 Defining message templates
        4.19 Activating Nintex Workflow
        4.20 Configuring user preferences
        4.21 Security Settings
        4.22 Manage Context Data
        4.23 Purge workflow data
        4.24 Managing workflow error notification settings
5 Using the Workflow Designer
        5.1 Getting started with the Nintex Workflow designer
        5.2 About connections
        5.3 Association columns
        5.4 Connection Manager dialog box
        5.5 Create Connection dialog box
        5.6 Error Handling
        5.7 Importing and exporting workflows
        5.8 Inline functions
        5.9 Inserting reference fields
        5.10 LDAP Picker
        5.11 Manage External Start configuration page
        5.12 Manage External Start page
        5.13 Managing connections to external providers
        5.14 Managing Start Variable Order
        5.15 Managing workflows
        5.16 Opening and saving workflows
        5.17 Printing
        5.18 Publishing a workflow
        5.19 Run Now
        5.20 Set action labels
        5.21 Using External Start
        5.22 Using lookups
        5.23 Verbose logging
        5.24 Viewing workflow inventories
        5.25 Workflow Action Common Settings
        5.26 Workflow Constants
        5.27 Workflow Settings
        5.28 Workflow Snippets
        5.29 Workflow start data
        5.30 Workflow templates
        5.31 Workflow variables
        5.32 XPath Query Builder

1 Workflow Actions

1.1 Action Set

This workflow action bundles a collection of actions in a container that can be collapsed and expanded to make workflow designing more convenient.

To use the workflow action:
  • Locate the action in Workflow Actions Toolbox (located on the left hand-side);
    • Click on the Category listings to reveal the actions; OR
    • Search for the action using a keyword.
  • Select the action, drag it onto the design canvas and drop it onto a design pearl.
Alternatively
  • Left-clicking the pearl, mouse-over Insert Action and then the Categories to reveal the actions, click the required action from the list.  
 

 Options for this action

This action does not require any configuration. It has a border that contains a pearl, when actions are added to the pearl inside the border, they become part of the Action set.


The action set can be minimized by activating the title bar's drop down menu and clicking Minimize.

Saving as a snippet

To save an action set as a snippet, activate the drop down menu on the action title bar and click Save as Snippet. For more information, please refer to the Workflow Snippets.

1.2 Add User To AD Group

* This topic applies to Nintex Workflow Enterprise Edition only

This workflow action will add a user to an Active Directory security group.

To use the workflow action:

  • Locate the action in Workflow Actions Toolbox (located on the left hand-side);
    • Click on the Category listings to reveal the actions; OR
    • Search for the action using a keyword.
  • Select the action, drag it onto the design canvas and drop it onto a design pearl.

Alternatively

To change the settings used by the action:

For more information on the other options in the drop-down, please refer to the Getting started with the Nintex Workflow designer.

Options within this action

Active Directory Details

LDAP Path

To configure the LDAP Path, refer to the LDAP Picker for more information.

Add User to AD Group

User

The username (sAMAccountName) of the Active Directory entry.

Group

The name of an existing Group to which the user will be added. E.g. "Backup Operators". Multiple groups can be separated with semi-colons (;). 

Error the workflow if the user already exists in the group

Selecting this option will cause the workflow to error if the user already exists in the group. By default this option is checked.

1.3 Assign Flexi Task

​This workflow action will allow the assignment of a task to one or more users and request a specific outcome. The list of possible outcomes is determined by the person designing the workflow.

To use the workflow action:

  • Locate the action in Workflow Actions Toolbox (located on the left hand-side);
    • Click on the Category listings to reveal the actions; OR
    • Search for the action using a keyword.
  • Select the action, drag it onto the design canvas and drop it onto a design pearl.

Alternatively

To change the settings used by the action:

For more information on the other options in the drop-down, please refer to the Getting started with the Nintex Workflow designer.


Options within this action

Ribbon Option: Action

Assignees

The assignees list contains all users or groups that will be assigned the task when the workflow is run.

Users can be: 

      • Entered directly using their username, email address or full name and will be resolved where possible against the SharePoint user list or Active Directory.
      • Searched for: click on the address book icon on the right. 

 
Please note that users that are external to the SharePoint environment can be added as Assignees by specifying their email address.  However, the only way that they can respond to the Task is through LazyApproval, as they will have no access to the SharePoint site.   

Select People and Groups

To search for users, click on the address book icon on the right.


The configuration dialog allows the workflow designer to search for and/or add users to the Assignees list by one or more of the following methods:

  • Internal Search: Entering a partial display name, email address or user account name and clicking on the magnifying glass will provide a list of matching users and groups from SharePoint as well as Active Directory.
  • External email address: Enter an external email address manually. Where possible Nintex Workflow will resolve this to an actual user account.
  • Lookup: Provides the option of adding a dynamic reference as an approver. e.g. Workflow variable, list field.

Click the title bar to expand or collapse each option.
 

Create individual tasks for all group members

In the case where a group is assigned the task and Create individual tasks for all group members checkbox is:

  • Not selected - all users in that group will receive the task notification. However, the first respondent will represent the entire group.
  • Selected - an individual task will be assigned to every member of the group. 

Groups will only be expanded to one level. Groups within groups will not be expanded.

Allow delegation

When this option is selected, the assignee at runtime can delegate the task to another user. For more information, please refer to Delegating Approval Tasks. Changing the 'Allow delegation' option on the 'Action' screen is the same as changing the 'Allow delegation' option for all assignees on the 'Task Notification' ribbon option. See the 'Task Notification' ribbon option section below for more information.

Allow LazyApproval

If LazyApproval has been enabled, the workflow can permit the assignees to use LazyApproval. Lazy Approval means that a task response can be registered when the assignee replies to a notification email or an automated OCS / Lync conversation with a recognized word or phrase. An administrator can edit or add to the list of acceptable terms. For more information, please refer to the Managing LazyApproval settings.  Changing the allow LazyApproval option on the 'Action' ribbon option is the same as changing the 'Allow LazyApproval' option for all assignees on the 'Task Notification' ribbon option. See the 'Task Notification' ribbon option section below for more information.

Task description

Allows entry of dynamic text that will display on the task response form. This can be used to communicate additional information about the task to the responding user. References can also be inserted using the Inserting reference fields feature.  

Outcomes

The Outcomes define all the possible responses to the task. When completing the task, assignees must choose from one of the listed outcomes.

New Outcomes can be added by clicking Add outcome or removing/editing existing outcomes using the icons.

Each outcome is configured with a name and an optional description, which is displayed on the task response form and can be used to provide instructions and more detail. Whether or not the assignee must provide comments for the outcome can be configured as optional, required or none. 

Behaviour

There are five behavioural alternatives to instruct Nintex Workflow how to handle tasks with multiple assignees. These are:  

  • First response applies: The first response received will be used for the overall outcome. All other pending tasks will be set to 'not required'.
  • Majority must choose a specific outcome: The majority of assignees must agree on the same outcome. If a majority is not reached, the 'outcome achieved' variable will be set to 'no' and the overall task outcome will be blank. As soon as Nintex Workflow determines that a majority cannot be reached, the action will complete and all pending tasks will be set to 'not required'.
  • All must agree on a specific outcome: All assignees must select the outcome specified in the 'Outcome' drop down list. If any assignee chooses an alternative outcome, all pending tasks will be set to 'not required', the 'outcome achieved' variable will be set to 'no' and the overall task outcome will be blank.
  • Majority decides: The outcome variable will be set to the most popular outcome. If Nintex Workflow can determine the most popular outcome before all assignees have completed the task, all pending tasks will be set to 'not required'. If two or more outcomes have the same number of responses after all tasks are completed, the 'outcome achieved' variable will be set to 'no' and the overall outcome will be blank.
  • All must agree: All assignees must agree on the same outcome. If an assignee responds with an outcome which differs to a previous respondent, all pending tasks will be set to 'not required', the outcome achieved variable will be set to 'no' and the overall task outcome will be blank.
     

Store outcome in

After an outcome is reached, this workflow variable will be populated with the chosen outcome. See the 'Behaviour' section above for more detail on how outcomes are determined. 

Store outcome achieved in

In some circumstances, it is possible that an outcome is not reached. After this action is completed, this workflow variable will be populated to indicate whether or not an outcome has been reached. See the Behaviour section for more detail on how outcomes are determined. 

Task name

Allows the title of the task to be defined. This is the title that appears in a SharePoint task list. If left blank, the action's title will be used by default.

References can also be inserted using the Inserting reference fields feature.   

Task content type

Allows a task content type other than the default to be used. This option will only display if an alternative content type is available on the site. Alternative content types are primarily used to enable custom task response forms. 

Priority

Specifies the value that should be assigned to the priority flag for the task.  References can also be inserted using the Inserting reference fields feature.  

Due Date

Set a date for the task to be completed by. Note: When tasks appear in Nintex Mobile Apps, the tasks list will be sorted by this due date.

Form type

Choose which form type is presented to Assignees.

Store task IDs in

When the workflow runs, the ID given to each task that is created will be stored into an Integer, List Item ID or Collection workflow variable.

Item Permissions

Set user permissions to: Sets the user permission on the item.

When task is complete, set user permissions to: Sets the user permission on the item after the task has been completed.

Note: Setting the item permissions could be useful when the task is delegated, this will give the delegated user the necessary permissions to view the item.

Advanced Options: Complete tasks for all assignees when an outcome has been achieved​

When an outcome is achieved, sets the % Complete value for "Not Required" tasks to 100%. 

​Ribbon Option: Task Notification

Sent when the task is assigned to a user, also used when the task is delegated by one user to another.


Edit settings for

Changing this setting from the default All Assignees allows the configuration of unique notification options for a particular Assignee in the list.

Unless specifically configured, assignees will use the All Assignees settings. To override settings for a specific Assignee, select their name from the drop down list.

Changes to All Assignees will not affect users who are given custom settings.


Allow delegation

When this option is selected, the assignee at runtime can delegate the task to another user. For more information, please refer to Delegating Approval Tasks.

Allow LazyApproval

If LazyApproval has been enabled on the server, the workflow can permit the assignees to use About LazyApproval. Lazy Approval means that an approval or rejection task response can be registered when the assignee replies to a notification email or an automated OCS / Lync conversation with a recognized word or phrase. An administrator can edit or add to the list of acceptable terms. For more information, please refer to Managing LazyApproval settings

Delivery type

Delivery type is the method of delivering the notification to the recipients.

Available delivery options; None, Email, User preference or Instant Message (if enabled on the server). For information on User preference, please refer to Configuring user preferences.

Please note: Nintex does not provide support for troubleshooting email, SMS or OCS / Lync systems.

If Allow LazyApproval is checked and Delivery type selected is IM. The option Send a conversation request to confirm if the user is available to respond will be available. Checking this option will ask the assignee if they are available to respond, if the assignee responds with "No", the Delivery type will be switched to Email and the assignee will receive a notification email instead.

If at anytime the assignee does not respond within 5 minutes to the automated OCS / Lync conversation, the conversation will end and a notification email to complete the tasks will be sent instead.

CC

The CC field sets read-only users who will receive the notification.  CC recipients are not able to respond to the tasks.

To set the CC field click on to open the Select People and Groups configuration dialog.


BCC


The BCC field sets read only users who will receive the email. BCC recipitants are not able to respond to the tasks. Other users addressed in the email via the To, CC and BCC fields will not be able to see any addresses in the BCC field. To set the BCC field, enter the account name, or alternatively, select the address book icon for additional options.


From

The From field sets the user or domain group that will appear as the sender of the message. This setting applies to emails only. If no From user or domain group is specified, the From address configured in Global Settings will be used. 

Importance

The priority of the notification. This is only applicable when using email notifications.

Subject

The Subject is the title of the notification being sent.  If an Instant Message is being sent it will be pre-pended to the body of the notification.

 It can be added manually or by clicking on , to use Insert reference fields from within the runtime instance of the workflow.

Attachments

Allows file attachments to be added to the notification. You can specify multiple URLs by separating each URL with a semicolon. You can also specify multiple URLs by referencing a collection variable.

Files will not be received by a user when SMS or IM is selected as the delivery method.  For information on User preference, please refer to Configuring user preferences.

Format

This sets the format of the email.

Selecting:

  • Rich Text enables italicize, bold, underline and indent information within the email using simple HTML styles provided by the SharePoint rich text tool bar.
  • Plain Text is simply the text without any stylized formatting.

Notification body

The body of the notification will adapt depending on whether the Rich Text or Plain Text format is selected. Within the space provided, enter the content for the notification as straight text.  Also available are Insert reference fields from within the workflow. 

Ribbon Option: Not Required Notification

Sent when the user no longer needs to respond to the task. This can occur when:

  • A task is assigned to multiple users but only one is required to respond.
  • The workflow is terminated prior to the task being processed.
  • An error occurs in the workflow at runtime.
 
 
See Ribbon Option: Task Notification above for field descriptions.  

Ribbon Option: Reminders

Optional notification Reminders can be configured to be sent to each assignee who has not yet completed the task.
 

Number of reminders

The number of reminders to be sent.

Time between reminders

The delay before sending each reminder in days, hours and minutes.

The total time is calculated by summing all fields, regardless of the Time calculation option selected. For example, 4 days and 4 minutes will be calculated as 96 (24x4) hours and 4 minutes.

Time calculation

Specifies whether or not hours outside the work week should be included when counting down to send a reminder.  

During business days only 

The During business days only option will specify that weekends or holidays are not included in the countdown, but after hours on a business day are. 
 
Example:
  • The task is assigned Friday morning and is configured to wait 1 day before sending a reminder (the work week is defined as Monday to Friday).
    • A reminder will be sent Monday morning: weekends are not included in the countdown. 

During business hours only

The During business hours only option specifies that only business hours are used in the count down.
 
Example:
  • The task is assigned Wednesday at 4pm and is configured to wait 4 hours before sending a reminder (the work day is defined as Monday to Friday, 8am to 5pm).
    • A reminder will be sent at 11am on Thursday: after-business hours are not included in the countdown.  

Neither option

If neither option is selected, all hours will be included in the count down.  
Examples:  
  • The task is assigned Friday morning and is configured to wait 1 day before sending a reminder.
    • A reminder will be sent Saturday morning: weekends are included in the countdown.
  • The task is assigned Wednesday at 4pm and is configured to wait 4 hours before sending a reminder.
    • A reminder will be sent at 8pm on Wednesday: after-business hours are included in the countdown.
 
Public holidays and any other special occasions are set using the "Site Settings > Nintex Workflow > Manage Holidays" page.
  
See Ribbon Option: Task Notification above for additional field descriptions.  

Ribbon Option: Escalation

Escalation is optional, there are two possible escalation paths:
  • Delegate task will re-assign all pending tasks to the nominated user after the specified time.
  • Complete task will auto-respond to all pending tasks and set the overall outcome of the action to the indicated outcome after the specified time.
  • The specified outcome does not have to be one of the configured possible Outcomes set in the Action.

Escalation occurs after all reminders have been sent and the specified "Time to escalation" has elapsed. 


 See Ribbon Option: Reminders above for additional field descriptions.


1.4 Assign To-Do Task

​This workflow action will assign a SharePoint task to one or more users.

To use the workflow action:

  • Locate the action in Workflow Actions Toolbox (located on the left hand-side);
    • Click on the Category listings to reveal the actions; OR
    • Search for the action using a keyword.
  • Select the action, drag it onto the design canvas and drop it onto a design pearl.

Alternatively

To change the settings used by the action:

For more information on the other options in the drop-down, please refer to the Getting started with the Nintex Workflow designer.


Options within this action


Ribbon Option: Action
 

Assignees

The Assignees list contains all users or groups that will be assigned the task when the workflow is runs. 

Users can be:  

  • Entered directly using their username, email address or full name and will be resolved where possible against the SharePoint user list or Active Directory.
  • Search for users, click on the address book icon on the right.  

 
Select People and Groups

To search for users, click on the address book icon on the right.


The configuration dialog allows the workflow designer to search for and/or add users to the Assignees list by one or more of the following methods: 
  • Internal Search: Entering a partial display name, email or user account name and clicking on the magnifying glass will provide a list of matching users and groups from SharePoint as well as Active Directory.
  • External email address: Enter an external email address manually. Where possible Nintex Workflow will resolve this to an actual user account.
  • Lookup: Provides the option of adding a dynamic reference as an approver. e.g. Workflow variable, list field.
Click the title bar to expand or collapse each option.
 

Create individual tasks for all group members

In the case when a group is assigned the task and Create individual tasks for all group members checkbox is:
  • not selected, all users in that group will receive the task notification. The first respondent will represent the entire group.
  • selected, an individual task will be assigned to every member of the group. 
Groups will only be expanded to one level. Groups within groups will not be expanded.
 
Users can be entered directly using their username, email address or full name and will be resolved where possible against the SharePoint user list or Active Directory.   

Allow delegation

When this option is selected, if the assignee field of the task is changed, Nintex Workflow will record the change as a task delegation and the new assignee will receive the Response Required Notification. If this option is not selected, Nintex Workflow will not track the change to the assignee and Nintex Workflow reports and web parts will not reflect the new assignee. 

Task description

Allows entry of dynamic text that will display on the task response form. This can be used to communicate additional information about the task to the responding user. References can also be inserted using the Inserting reference fields feature.   

Task options

There are two behavioural alternatives in this action to instruct Nintex Workflow how to handle tasks with multiple assignees. These are:


  • All must respond: All assignees must complete the task before the workflow will continue.
  • First response applies: After the first response is received, all other tasks will be set to 'not required'. 

Content type

Choose to use an existing, or instruct Nintex Workflow to create a new content type.

If using an existing content type, select any content type that inherits from 'Workflow Task' but does not inherit from 'Nintex Workflow Task'. The 'Nintex Workflow Task' content type is reserved for request approval and request review actions. Also if selecting an existing content type, specify the value to assign to each field when the task is created.

Due Date

Set a date for the task to be completed by. Note: When tasks appear in Nintex Mobile Apps, the tasks list will be sorted by this due date.

Store task Ids in

When the workflow runs, the ID given to each task that is created will be stored into the selected collection variable.

Advanced Options: Complete tasks for all assignees when an outcome has been achieved​

When an outcome is achieved, sets the % Complete value for "Not Required" tasks to 100%. ​

Ribbon Option: Task Notification

Sent when the task is assigned to a user, also used when the task is delegated by one user to another.
 
 
Edit settings for
Changing this setting from the default All Assignees, allows the configuration of unique notification options for each Assignee in the list.
Unless specifically configured, assignees will use the All Assignees settings. To override settings for a specific Assignee, select their name from the drop down list.
Changes to All Assignees will not affect users who are given custom settings.
 

Delegate task when 'Assigned To' changes

When this option is selected, if the assignee field of the task is changed, Nintex Workflow will record the change as a task delegation and the new assignee will receive the Response Required Notification. If this option is not selected, Nintex Workflow will not track the change to the assignee and Nintex Workflow reports and web parts will not reflect the new assignee. 

Delivery type

Delivery type is the method of delivering the notification to the recipients.

Available delivery options; None, Email, User preference or Instant Message (if enable on the server). For information on User preference, please refer to the Configuring user preferences.

Please note: Nintex does not provide support for troubleshooting email, SMS or LCS systems.

CC

The CC field sets read only users who will receive the notification.  CC recipients are not able to respond to the tasks.

To set the CC field click on to open the Select People and Groups configuration dialog.


BCC


The BCC field sets read only users who will receive the email. BCC recipitants are not able to respond to the tasks. Other users addressed in the email via the To, CC and BCC fields will not be able to see any addresses in the BCC field. To set the BCC field, enter the account name, or alternatively, select the address book icon for additional options.


From

The From field sets the user or domain group that will appear as the sender of the message. This setting applies to emails only. If no From user or domain group is specified, the From address configured in Global Settings will be used. 

Importance

The priority of the notification. This is only applicable when using email notifications.

Subject

The Subject is the title of the notification being sent. If an OCS/LCS message is being sent it will be pre-pended to the body of the notification. 

Added manually or by clicking on , to use Insert reference fields from within the runtime instance of the workflow.

Attachments

Allows file attachments to be added to the notification. You can specify multiple URLs by separating each URL with a semicolon. You can also specify multiple URLs by referencing a collection variable.

Files will not be received by a user when SMS or IM is selected as the delivery method.  For information on User preference, please refer to the Configuring user preferences.

Format

This sets the format of the email.

Selecting: 

  • Rich Text enables italicize, bold, underline and indent information within the email using simple HTML styles provided by the SharePoint rich text tool bar
  • Plain Text is simply the text without any stylized formatting.

Notification body

The body of the notification will adapt depending on whether the Rich Text or Plain Text format is selected. Within the space provided enter the content for the notification as straight text, also available are Insert reference fields from within the workflow.

Ribbon Option: Not Required Notification

Sent when the user no longer needs to respond to the task. This can occur when: 

  • A task is assigned to multiple users but only one is required to respond.
  • The workflow is terminated prior to the task being processed.
  • An error occurs in the workflow at runtime.


See above Ribbon Option: Task Notification above for field descriptions. 

Ribbon Option: Reminders

Optional notification Reminders can be configured to be sent to each assignee who has not yet completed the task.


Number of reminders

The number of reminders to be sent.

Time between reminders

The delay before sending each reminder in days, hours and minutes.

The total time is calculated by summing all fields, regardless of the Time calculation option selected. For example, 4 days and 4 minutes will be calculated as 96 (24x4) hours and 4 minutes.

Time calculation

Specifies whether or not hours outside the work week should be included when counting down to send a reminder.  

During business days only 

The During business days only option will specify that weekends or holidays are not included in the count down, but after hours on a business day are.   

Example:  

  • The task is assigned Friday morning and is configured to wait 1 day before sending a reminder (the work week is defined as Monday to Friday)
    • A reminder will be sent Monday morning, weekends are not included in the count down. 


During business hours only

The During business hours only option specifies that only business hours are used in the count down.  

Example:  

  • The task is assigned Wednesday at 4pm and is configured to wait 4 hours before sending a reminder (the work day is defined as Monday to Friday, 8am to 5pm).
    • A reminder will be sent at 11am on Thursday, after business hours are not included in the count down.  


Neither option

If neither option is selected, all hours will be included in the count down.  

Examples:   

  • The task is assigned Friday morning and is configured to wait 1 day before sending a reminder.
    • A reminder will be sent Saturday morning, weekends are included in the count down. 
  • The task is assigned Wednesday at 4pm and is configured to wait 4 hours before sending a reminder.
    • A reminder will be sent at 8pm on Wednesday, after business hours are included in the count down.  


Public holidays and any other special occasions are set using the "Site Settings > Nintex Workflow > Manage Holidays" page.
 
 
See Ribbon Option: Task Notification above for additional field descriptions. 
 

Ribbon Option: Escalation

Escalation is optional, there are two possible escalation paths: 


Escalation occurs after all reminders have been sent and the specified "Time to escalation" has elapsed.
 
 
See Ribbon Option: Reminders above for additional field descriptions.
  

1.5 Build String

This action allows the workflow to perform basic string concatenations for use within other actions at runtime.

To use the workflow action:

  • Locate the action in Workflow Actions Toolbox (located on the left hand-side);
    • Click on the Category listings to reveal the actions; OR
    • Search for the action using a keyword.
  • Select the action, drag it onto the design canvas and drop it onto a design pearl.

Alternatively

  • Left-clicking the pearl, mouse-over Insert Action and then the Categories to reveal the actions, click the required action from the list.

To change the settings used by the action:

  • On the action’s title click the down arrow to activate a drop-down
  • Select Configure; OR
  • Double-click the action's icon.

For more information on the other options in the drop-down, please refer to the Getting started with the Nintex Workflow designer.

Options within the action

Build string

Allows the combination of straight text with Insert reference fields from within the workflow and site at runtime.

Parse for tokens twice

When this option is selected, tokens will be searched for twice. For example, if a token called {WorkflowVariable:EmailTemplate} is inserted into the text area, and the resulting value contains the text {ItemProperty:Title}, the title token will also be replaced when this option is selected.

Store result in

The result of the string that is built at runtime will be stored in a text Workflow variable that is selected from this list.

1.6 Calculate Date

This workflow action allows a time period to be added or subtracted from a date to create a new date.

To use the workflow action:

  • Locate the action in Workflow Actions Toolbox (located on the left hand-side);
    • Click on the Category listings to reveal the actions; OR
    • Search for the action using a keyword.
  • Select the action, drag it onto the design canvas and drop it onto a design pearl.

Alternatively

To change the settings used by the action:

For more information on the other options in the drop-down, please refer to the Getting started with the Nintex Workflow designer.

Options within the action

Date

The date to use as a base for the calculation can be:

  • A specific date
  • A lookup from a variable or list
  • The current date.

The time period change will be applied to this date.

Timeframe

The number of:

  • years
  • months
  • days
  • hours
  • minutes

to add to the date.

The value can be:

Note: a negative value can be used for a subtraction operation. 

For more information on lookups, see Using Lookups.

Time is

Specify whether the date is being specified according to the server's locale settings time zone or UTC time. 

Store Date in

A date/time workflow variable in which to store the result of the calculation.

Store ISO 8601 Date string

A text variable that contains the date in the XML friendly ISO 8601 format.

1.7 Call web service

​The Call web service workflow action allows the workflow to make a call to a SOAP web service method.

To use the workflow action:

  • Locate the action in Workflow Actions Toolbox (located on the left hand-side);
    • Click on the Category listings to reveal the actions; OR
    • Search for the action using a keyword.
  • Select the action, drag it onto the design canvas and drop it onto a design pearl.

Alternatively

To change the settings used by the action:

For more information on the other options in the drop-down, please refer to the Getting started with the Nintex Workflow designer.

Action Settings

URL

A mandatory field that represents the full 'URL to the WSDL definition of the SOAP web service to call'. Once a URL has been entered, click the Refresh button on the Web method to select from the available Web methods. References can also be inserted using the Inserting reference fields feature.

Username

The username (including domain) used when authenticating against the web service. This is an optional setting, however if left blank the web service must be open to anonymous access.

Password

The password for the username above when authenticating against the web service. If left blank, the web service must be open to anonymous access.

Web Method

The web methods that are available for the web service.

Editor mode

The Editor mode defines the values to be sent to the web service. The message configuration depends on the parameters required by the selected web service method.

To pass the byte array of the document under workflow, type [FileData] into any input field. At runtime Nintex Workflow will base64 encode the file and pass that as the value.

For more information on the SOAP standard please refer to http://www.w3.org/TR/soap12-part0.

Web service input

Encode inserted tokens

Specifies whether inserted tokens (workflow variables, list item properties, etc) should be encoded to ensure they are valid for sending to the web service.

Web service output

Default value

The default value can be used for a single return value from a web service method.

Specify elements

Allow the workflow to store specific values from a web service response.

To specify an element:

1. Click on Select element to browse the response format and select a value. Click Apply.

2. Specify a workflow variable to store the value of the element selected.

1.8 Capture document set version

* This action requires Microsoft SharePoint Server

This workflow action saves a version of the current properties and documents in a document set.

To use the workflow action:

  • Locate the action in Workflow Actions Toolbox (located on the left hand-side);
    • Click on the Category listings to reveal the actions; OR
    • Search for the action using a keyword.
  • Select the action, drag it onto the design canvas and drop it onto a design pearl.

Alternatively

  • Left-clicking the pearl, mouse-over Insert Action and then the Categories to reveal the actions, click the required action from the list.

To change the settings used by the action:

  • On the action’s title click the down arrow to activate a drop-down
  • Select Configure; OR
  • Double-click the action's icon.

For more information on the other options in the drop-down, please refer to the Getting started with the Nintex Workflow designer.


Options for this action 

File versions to include

Specify whether the Document Set should include only major versions of the items in the set or the minor versions. Select the versions of the items in the set to include in the document set:

  • Latest major versions only: Includes the latest major versions of items within the document set.
  • Latest major or minor versions: Includes the latest major or minor versions of items depending on the version of the item within the document set.

Comments

The comments describing what has changed in this version. Either specify a value or use the lookups feature to build the comments dynamically at run time.

For details on using Insert Reference, please refer to Inserting reference fields.

1.9 Change State

​​

This action instructs a parent State Machine action which state it should run when the current state has finished. Change state actions can only be dragged on to the designer when used in a State Machine action. 

To prevent repeated loops through states in a state machine, ensure that each state branch in the state machine has a Change state action. If a workflow completes a state branch without running a Change state action, then the workflow loops through that state again, possibly indefinitely.

If the state named in the Change state action does not exist in the state machine, then the following workflow error occurs: "Selected value '[name]' is not recognized as a known state value."​

To use the workflow action:

  • Locate the action in Workflow Actions Toolbox (located on the left hand-side);
    • Click on the Category listings to reveal the actions; OR
    • Search for the action using a keyword.
  • Select the action, drag it onto the design canvas and drop it onto a design pearl.

Alternatively

  • Left-clicking the pearl, mouse-over Insert Action and then the Categories to reveal the actions, click the required action from the list.

To change the settings used by the action:

  • On the action’s title click the down arrow to activate a drop-down
  • Select Configure; OR
  • Double-click the action's icon.

For more information on the other options in the drop-down, please refer to the Getting started with the Nintex Workflow designer.


Action Settings

Next state

The state to run when the current state has finished. Selecting End State Machine exits the state machine when the current state has finished. 

Note: The state change does not occur until the current state has finished. If a state contains multiple Change state actions, then only the last one takes effect.

Related topics

State Machine

1.10 Check in item

This action allows the workflow to check-in an item that was checked out with the Check out item action.

The workflow will error if checking in an item that was checked out by a different user.

To use the workflow action:

  • Locate the action in Workflow Actions Toolbox (located on the left hand-side);
    • Click on the Category listings to reveal the actions; OR
    • Search for the action using a keyword.
  • Select the action, drag it onto the design canvas and drop it onto a design pearl.

Alternatively

To change the settings used by the action:

For more information on the other options in the drop-down, please refer to the Getting started with the Nintex Workflow designer.

Options within the action 

Check in from 

List and Site Workflows: Check in an item from somewhere else in the current site.  
 
Document Library: There are two options when checking in a document:
 
  • Check in for the item currently in the workflow.
  • Check in an item somewhere else in the current site. 
From the drop-down list select the current item or the required location. If it is the current item, no filters need to be selected.
 
In the case of checking in an item from elsewhere in the site, a filter will need to be selected in order for Nintex Workflow to establish which item to check in.  
  • Select the column that needs to be matched; and then.
  • Compare the selected column with a value, workflow variable or list lookups to identify the specific item.

For more details on using List lookups, please refer to the Using lookups.

Comments

The comments entered will be stored with that items meta data as the check in comments.

Allows the combination of straight text with Inserting reference fields from within the workflow and site at runtime.

The comments are not stored in the Workflow History. 

Check in type

The type of check in to be performed. Options are:

The target document library version settings must match what is chosen in the configuration dialog.

Troubleshooting

Action not executing

The work load for this action is added to a job queue. The workflow executes jobs in the queue as a batch when it reaches a "commit" point. For more information, see the Nintex article "Designing your Workflow - Commit Pending Changes Action NW2010 & NW2013." 

1.11 Check Out Item

This action allows the workflow to check out an item in a selected location to the initiator of the workflow. If a library is configured to require check outs, this action must be used to check out the item before an Update item action is used.

To use the workflow action:

  • Locate the action in Workflow Actions Toolbox (located on the left hand-side);
    • Click on the Category listings to reveal the actions; OR
    • Search for the action using a keyword.
  • Select the action, drag it onto the design canvas and drop it onto a design pearl.

Alternatively

  • Left-clicking the pearl, mouse-over Insert Action and then the Categories to reveal the actions, click the required action from the list.

To change the settings used by the action:

  • On the action’s title click the down arrow to activate a drop-down
  • Select Configure; OR
  • Double-click the action's icon.

For more information on the other options in the drop-down, please refer to the Getting started with the Nintex Workflow designer.

Options within the action 

Check out from 

Select either the Current item that the workflow is running on, or one of the available libraries.

If selecting a library location, the Where selector will appear.

Where

If not selecting the Current item, use this section to specify the filter criteria to identify which document should be checked out. Manually enter the value, or select a workflow variable to evaluate at run time. For more information on lookups, see Using Lookups.
 
Note: If the filter criteria returns more than one item, only the first item in the collection will be applied.

Troubleshooting

Action not executing

The work load for this action is added to a job queue. The workflow executes jobs in the queue as a batch when it reaches a "commit" point. For more information, see the Nintex article "Designing your Workflow - Commit Pending Changes Action NW2010 & NW2013." 

1.12 Collection Operation

This action provides direct access to the values in a collection variable.

To use the workflow action:

  • Locate the action in Workflow Actions Toolbox (located on the left hand-side);
    • Click on the Category listings to reveal the actions; OR
    • Search for the action using a keyword.
  • Select the action, drag it onto the design canvas and drop it onto a design pearl.

Alternatively

  • Left-clicking the pearl, mouse-over Insert Action and then the Categories to reveal the actions, click the required action from the list.

To change the settings used by the action:

  • On the action’s title click the down arrow to activate a drop-down
  • Select Configure; OR
  • Double-click the action's icon.

For more information on the other options in the drop-down, please refer to the Getting started with the Nintex Workflow designer.


Options within the action

Target collection

The Target Collection parameter is required for each operation. This specifies the collection variable that the operation applies to. 

Add

Adds a new item to the collection with the value specified in the 'value' parameter. Optionally, a variable storing the index of what position to insert the item into the collection at can be used. If no index variable is selected, the item will be added to the end of the collection. If the index value is larger than the size of the collection, the workflow will error.

Remove

Removes the item stored in the collection at the specified index. This will cause the collection size to decrease by one.

Count

Outputs a number indicating how many items are currently stored in the collection. The result is stored in a number variable specified at Store result in.

Get

Retrieves a value at a specified index and stores the value in the variable specified at Store result in. The output variable must be compatible with the value being retrieved from the collection.

Exists

Outputs a Yes / No value into the variable specified at Store result in to indicate whether or not an item matching the specified value is currently stored in the collection. The comparison is done by comparing the text representation of the 'value' parameter with the text representation of each item in the collection.

Sort

Sorts the values in the collection and stores the sorted collection in another collection variable specified in Store result in. Store result in can specify the same variable as the Target collection.

Pop

Retrieves the value at the end position of the collection and stores it in the Store result in variable. After this operation, the retrieved item will no longer exist in the collection variable therefore the collection will be one item shorter.

Join

Concatenates every value in the collection into a string which is stored in the Store result in variable. Each value is separated by the specified Delimiter value.

Clear

Removes all the items from the collection.

Remove duplicates

Searches for and removes any values that exist more than once in the collection, leaving only one instance of each value. For text values, duplicate matching is case sensitive.

Remove by value

Removes all items from the collection that equal the specified value.


For details on using Insert Reference, please refer to Inserting reference fields.


1.13 Commit pending changes

This workflow action forces all existing batched operations to be committed. Batched operations are operations performed by workflow actions that do not commit immediately. For example, the "Update list item" action doesn’t actually update an item immediately, it waits until the workflow commits. The workflow commits at a delay action, a task action or the end of the workflow. So when the update list item action runs, it just registers that it needs to update the item, the item actually updates on commit.

The SharePoint workflow engine doesn’t necessarily commit batched operations in the order they are displayed on the designer. For example, if the following actions are in this order:

Set item permissions action (Nintex)Update list item action (Microsoft SharePoint)Set permissions action (Nintex)

These would actually execute in this order:

  • Set item permissions action (Nintex)
  • Set item permissions action (Nintex)
  • Update list item action (Microsoft SharePoint)


It executes it in this order, because there are actually two batches, the Microsoft batch and the Nintex batch (any other third party has their own batch). This is because third parties cannot add operations to the Microsoft batch. In addition, all items in a single batch are executed before actions in another batch. The batch that is executed first depends on the first activity: If the Microsoft SharePoint action was encountered first, then all the Microsoft actions would run before the Nintex actions.

The "Commit pending changes" workflow action: The "Commit pending changes" action is another point where a workflow will execute all its batch operations.

So, modifying the above example:

  • Set item permissions action (Nintex)
  • Update list item action (Microsoft SharePoint)
  • Commit pending changes
  • Set item permissions action (Nintex)


In this case everything will run in order. The Nintex batch will run first because the Nintex action is first encountered, but in this scenario there is only one action in this batch. The "Update item" action will run. Then the workflow will commit, and the final "Set item permissions" action is in a new batch.


To use the workflow action:

  • Locate the action in Workflow Actions Toolbox (located on the left hand-side);
    • Click on the Category listings to reveal the actions; OR
    • Search for the action using a keyword.
  • Select the action, drag it onto the design canvas and drop it onto a design pearl.

Alternatively

  • Left-clicking the pearl, mouse-over Insert Action and then the Categories to reveal the actions, click the required action from the list.

To change the settings used by the action:

  • On the action’s title click the down arrow to activate a drop-down
  • Select Configure; OR
  • Double-click the action's icon.

For more information on the other options in the drop-down, please refer to the Getting started with the Nintex Workflow designer.


Options within the action

This action has no settings to configure.

1.14 Compile Audience

* This topic applies to Nintex Workflow Enterprise Edition only

* This action requires Microsoft Office SharePoint Server

This workflow action will compile an existing audience in the environment.

To use the workflow action:

  • Locate the action in Workflow Actions Toolbox (located on the left hand-side);
    • Click on the Category listings to reveal the actions; OR
    • Search for the action using a keyword.
  • Select the action, drag it onto the design canvas and drop it onto a design pearl.

Alternatively

  • Left-clicking the pearl, mouse-over Insert Action and then the Categories to reveal the actions, click the required action from the list.

To change the settings used by the action:

  • On the action’s title click the down arrow to activate a drop-down
  • Select Configure; OR
  • Double-click the action's icon.

For more information on the other options in the drop-down, please refer to the Getting started with the Nintex Workflow designer.

Options within this action

Audience name

The name of the audience to compile.

For details on using Insert Reference, please refer to Inserting reference fields

Credentials

An account with permissions to compile an audience. In Central Administration, this account will need to be explicitly added as the administrator of the User Profile Service with the permission to Manage Audiences.

Compile type

Specifies whether to perform a complete or incremental compilation.

1.15 Complete Workflow Task

This workflow action will complete any outstanding workflow tasks. It will process enough individual tasks to achieve the selected outcome, the workflow engine will then process the remaining individual tasks in accordance with the task settings.

To use the workflow action:

  • Locate the action in Workflow Actions Toolbox (located on the left hand-side);
    • Click on the Category listings to reveal the actions; OR
    • Search for the action using a keyword.
  • Select the action, drag it onto the design canvas and drop it onto a design pearl.

Alternatively

  • Left-clicking the pearl, mouse-over Insert Action and then the Categories to reveal the actions, click the required action from the list.

To change the settings used by the action:

  • On the action’s title click the down arrow to activate a drop-down
  • Select Configure; OR
  • Double-click the action's icon.

For more information on the other options in the drop-down, please refer to the Getting started with the Nintex Workflow designer.


Options within this action

Action ID

Specify this workflow variable to nominate which task action to complete.

When configuring other task actions, nominate a workflow variable of type Action ID to store the assigned workflow action ID.

Complete after

Specifies how long to wait before the task is completed. If the task is completed manually in this period, the complete action will finish without performing any change to the task.

If the task is set to complete immediately, the action will always wait at least a minute before processing.

The total time is calculated by summing all fields, regardless of the Time Calculation option selected. For example, 4 days and 4 minutes will be calculated as 96(24x4) hours and 4 minutes.

For details on using Insert Reference, please refer to Inserting reference fields.

Time calculation

Specifies whether or not hours outside the work week should be included when counting down to send a reminder. 

During business days only

The During business days only option will specify that weekends or holidays are not included in the count down, but after hours on a business day are. 
 
Example:
  • The task is assigned Friday morning and is configured to wait 1 day before sending a reminder (the work week is defined as Monday to Friday).
  • A reminder will be sent Monday morning, weekends are not included in the count down. 

During business hours only

The During business hours only option specifies that only business hours are used in the count down.
 
Example:
  • The task is assigned Wednesday at 4pm and is configured to wait 4 hours before sending a reminder (the work day is defined as Monday to Friday, 8am to 5pm).
  • A reminder will be sent at 11am on Thursday, after business hours are not included in the count down.  

Neither option

If neither option is selected, all hours will be included in the count down.
 
Examples:  
  • The task is assigned Friday morning and is configured to wait 1 day before sending a reminder.
    • A reminder will be sent Saturday morning, weekends are included in the count down.
  • The task is assigned Wednesday at 4pm and is configured to wait 4 hours before sending a reminder.
    • A reminder will be sent at 8pm on Wednesday, after business hours are included in the count down.  

Task outcome

The value to set outstanding tasks to. Use 'Approved' or 'Rejected' for approval tasks, and 'Continue' for other task types.

Send 'response not required' message

When selected, pending approvers for the completed task will receive an email informing them that their input is no longer required.

Comments

Comments to be recorded when the task is automatically completed. The comments will be added against each individual task that the Complete task action must process to achieve the desired outcome.

Allows the combination of straight text with Inserting reference fields from within the workflow and site at runtime.

Please note that there can be a delay between when the task is processed and when the workflow continues.

1.16 Convert Document

* This topic applies to Nintex Workflow Enterprise Edition only

* This action requires Microsoft SharePoint Server
 
This workflow action converts a specified document from its current file type to a specified file type and sends a copy of the document in a specified URL location.

Note: We only support the conversions supported by Word services.

To use the workflow action:

  • Locate the action in Workflow Actions Toolbox (located on the left hand-side);
    • Click on the Category listings to reveal the actions; OR
    • Search for the action using a keyword.
  • Select the action, drag it onto the design canvas and drop it onto a design pearl.

Alternatively

To change the settings used by the action:

For more information on the other options in the drop-down, please refer to the Getting started with the Nintex Workflow designer.

Options for this action 

Source

The document which is to be converted. Select either:

  • The Current item; OR
  • Source URL. In the Source URL field, the full URL including the filename and type will need to be provided. E.g. 'http://mycompany.com/sales/Shared%20Documents/WordDocument.docx'

File type

The list of available file types that the source can be converted to.

Output URL

The URL to place the converted document. Either specify a valid URL or use the Insert Reference fields feature to build a valid URL. E.g. 'http://mycompany.com/sales/Shared%20Documents/PDFDocument.PDF'

Note: The following settings will result in an unknown file type and the 'Windows can't open this file:' dialog will appear when a user clicks on a converted document:

Overwrite existing item

If the Converted document should overwrite an existing item if it already exist in the Output URL specified. Select either:


1.17 Convert Value

​​

This workflow action will interpret a provided text value, and store it into a workflow variable of a different type. For example, if a text variable contains a number, this action will store the value as a numeric value in a number variable.

A common scenario for using this action is using it with an Inline function or the result of a query that returns a text string that contains a number, and that number needs to be stored into a number field of a SharePoint list. The value cannot be stored into a number field while the value is stored in a text variable.  The example in the screenshot demonstrates processing a text variable by using an Inline function to extract the first 4 characters (maybe the variable contains 1234-XXAB). These first 4 characters will then be interpreted and stored into a number variable.

To use the workflow action:

  • Locate the action in Workflow Actions Toolbox (located on the left hand-side);
    • Click on the Category listings to reveal the actions; OR
    • Search for the action using a keyword.
  • Select the action, drag it onto the design canvas and drop it onto a design pearl.

Alternatively

  • Left-clicking the pearl, mouse-over Insert Action and then the Categories to reveal the actions, click the required action from the list.

To change the settings used by the action:

  • On the action’s title click the down arrow to activate a drop-down
  • Select Configure; OR
  • Double-click the action's icon.

For more information on the other options in the drop-down, please refer to the Getting started with the Nintex Workflow designer.


Options within the action

Input

The value that is to be interpreted.

Store result in

This option specifies the variable in which the resulting value will be stored. If the input text cannot be converted into a value that is compatible with the selected variable, the workflow will error.

Date format

This option only appears when the 'Store result in' variable is a date time variable. This option allows the exact formatting of the input date to be specified. When a date format is specified, the input date will only be recognized if it is an exact match to the format. This URL lists the recognized date formatting values: http://msdn.microsoft.com/en-us/library/8kb3ddd4.aspx.

Culture (Advanced)

The culture code to use for conversion of the input string into another variable type. For example, if the provided input string contains a number in a European format, specify a European culture (such as “de-DE” for German) to ensure that the value of the input string is interpreted correctly. Specify “Invariant” for an invariant culture. For a list of culture codes, see the following Microsoft article: Table of Language Culture Names, Codes, and ISO Values Method​.

When this parameter is blank, the current language settings of the SharePoint site are used.

For details on using Insert Reference, please refer to Inserting reference fields.

1.18 Copy item

This workflow action copies an item from one list or library to another within the current site (not parent sites and not sub-sites). It only allows copying from the root level of a location (e.g; a folder within a document library is not valid) to the root level of another location in the same site. The content type of the source must match the content type of the destination - the workflow will error if the source and destination are incompatible. To copy the library item in the workflow to another location in SharePoint (including folders and sub-folders of the same site), please use the "Copy to SharePoint" action.

To use the workflow action:

  • Locate the action in Workflow Actions Toolbox (located on the left hand-side);
    • Click on the Category listings to reveal the actions; OR
    • Search for the action using a keyword.
  • Select the action, drag it onto the design canvas and drop it onto a design pearl.

Alternatively

  • Left-clicking the pearl, mouse-over Insert Action and then the Categories to reveal the actions, click the required action from the list.

To change the settings used by the action:

  • On the action’s title click the down arrow to activate a drop-down
  • Select Configure; OR
  • Double-click the action's icon.

For more information on the other options in the drop-down, please refer to the Getting started with the Nintex Workflow designer.

Options for this action

Copy from

This mandatory field is used to select the list or library where the item that is to be copied is located.

Where

This mandatory field is used to select the filter criteria to return one or more items to be copied (e.g; Created By, Title, Content Type etc.). The information types available in the drop-down are dependent on what is selected in Copy from.

For more details on using List lookups, please refer to the Using lookups.

For details on using Insert Reference, please refer to Inserting reference fields

Copy to

This mandatory field is used to select the destination in the current site for the item when it is copied. The destinations available in the drop-down are dependent on the content of the site. 

Only root level locations are valid (folders and sub-folders are not supported).

Overwrite an existing item

If the item to copy is a file in a library, and a file with the same name already exists in the target library, this option will determine if the file will be overwritten. If this option is not selected, a time stamp will be added to the end of the filename.

Overwriting a file does not increase its file version.

Troubleshooting

Action not executing

The work load for this action is added to a job queue. The workflow executes jobs in the queue as a batch when it reaches a "commit" point. For more information, see the Nintex article "Designing your Workflow - Commit Pending Changes Action NW2010 & NW2013." 

1.19 Copy to file share

This workflow action downloads a copy of the current item to a specified location. This action is only available when designing the workflow on a library.

To use the workflow action:

  • Locate the action in Workflow Actions Toolbox (located on the left hand-side);
    • Click on the Category listings to reveal the actions; OR
    • Search for the action using a keyword.
  • Select the action, drag it onto the design canvas and drop it onto a design pearl.

Alternatively

  • Left-clicking the pearl, mouse-over Insert Action and then the Categories to reveal the actions, click the required action from the list.

To change the settings used by the action:

  • On the action’s title click the down arrow to activate a drop-down
  • Select Configure; OR
  • Double-click the action's icon.

For more information on the other options in the drop-down, please refer to the Getting started with the Nintex Workflow designer.

Options for this action

Destination

This required field must be a valid UNC path accessible from the SharePoint server where Nintex Workflow is installed e.g. \\myfileserver\reports. If a file name is specified in the destination path, the file will be copied using this file name. 

For details on using Insert Reference, please refer to Inserting reference fields

Username

The user to authenticate against when the document is copied to the specified location.

Password

The password to authenticate with when the document is copied to the specified location.

1.20 Copy to SharePoint

This action allows the workflow to copy items from the current library to another library within SharePoint.

When the workflow is running on document libraries, the item that the workflow is running on will be copied. In a list, any attachments on the list item that the workflow is running on will be copied.

To use the workflow action:

  • Locate the action in Workflow Actions Toolbox (located on the left hand-side);
    • Click on the Category listings to reveal the actions; OR
    • Search for the action using a keyword.
  • Select the action, drag it onto the design canvas and drop it onto a design pearl.

Alternatively

  • Left-clicking the pearl, mouse-over Insert Action and then the Categories to reveal the actions, click the required action from the list.

To change the settings used by the action:

  • On the action’s title click the down arrow to activate a drop-down
  • Select Configure; OR
  • Double-click the action's icon.

For more information on the other options in the drop-down, please refer to the Getting started with the Nintex Workflow designer.

Options for this action

Destination

Select a location enables a site picker (Select a document library or folder) to navigate through the portal structure of the current SharePoint environment and select the library to which the document will be copied. Folders and sub-folders can be selected.

Enter a URL allows manual entry of the URL or selection using Insert Reference. To copy a file to a remote environment, Enter a URL must be used.

For more details on using Insert Reference, please refer to Inserting reference fields

Copy InfoPath form / Copy embedded attachments

This option is available when designing a workflow on a form library. It allows for InfoPath attachments embedded in the form to be extracted and copied. The XPath query is used to indicate where in the form XML structure the attachments exist. If the XPath query evaluates to more than one attachment node, each attachment will be copied. To copy the actual form item in the form library, choose the Copy InfoPath form option. 

Overwrite options

Use this setting to determine the behavior when a file with the same name already exists in the destination.

  • Remove existing item the file that already exists will be removed. If versioning is enabled in the destination the copy that is created will be an initial version
  • Rename new item the file that already exists will be not be modified. The copied item will have a time stamp appended to its name
  • Update existing item the file that already exists will be overwritten. If versioning is enabled in the destination, the version of the file will be incremented. 

Create folder structure

Check this box to replicate a folder structure in the target library if the item being copied is in a sub folder. This option is not applicable when the destination is a remote SharePoint environment.

Copy item meta data

Check this box to set the item properties on the target item to the same values as the source item. Only matching fields will have their values copied.

Store result in

Stores the new URLs of the copied files into a text or collection variable.

Override credentials

If the destination library is on a remote SharePoint environment, credentials with access to upload files are required. For copying files to a SharePoint site in the same environment as the workflow, the workflow automatically uses permissions with global SharePoint access if no other credentials are specified. To copy the item as a specific account in the local farm, enter the user credentials.

When a file is copied to the local farm with the global system account (i.e. no alternative credentials are specified), workflows in the destination location will not start automatically.

1.21 Create AD Group

* This topic applies to Nintex Workflow Enterprise Edition only

This workflow action will create an Active Directory group in the specified LDAP location.

To use the workflow action:

  • Locate the action in Workflow Actions Toolbox (located on the left hand-side);
    • Click on the Category listings to reveal the actions; OR
    • Search for the action using a keyword.
  • Select the action, drag it onto the design canvas and drop it onto a design pearl.

Alternatively

  • Left-clicking the pearl, mouse-over Insert Action and then the Categories to reveal the actions, click the required action from the list.

To change the settings used by the action:

  • On the action’s title click the down arrow to activate a drop-down
  • Select Configure; OR
  • Double-click the action's icon.

For more information on the other options in the drop-down, please refer to the Getting started with the Nintex Workflow designer.

Options within this action

Active Directory Details

LDAP Path

To configure the LDAP Path, refer to the LDAP Picker for more information.

Group Details

Group scope

Specify the scope for the group. Available options are: Domain local, Global or Universal.

Group type

Specify the type of group to be created. Available options are: Security or Distribution.

Group name

The name of the group to be created. E.g. Testers.

1.22 Create AD User

* This topic applies to Nintex Workflow Enterprise Edition only

This workflow action will create an Active Directory user account in the specified LDAP location.

To use the workflow action:

  • Locate the action in Workflow Actions Toolbox (located on the left hand-side);
    • Click on the Category listings to reveal the actions; OR
    • Search for the action using a keyword.
  • Select the action, drag it onto the design canvas and drop it onto a design pearl.

Alternatively

To change the settings used by the action:

For more information on the other options in the drop-down, please refer to the Getting started with the Nintex Workflow designer.

Options within this action

Where the account will be created

To configure the LDAP Path, refer to the LDAP Picker for more information.

New Account Details

sAMAccountName

A unique username to specify for the Active Directory entry. This must be a unique username not used within the Domain yet.

Common Name

The Active Directory Common Name value. This must be unique within the Container in which it will be created.

User Principal Name

The display name of the principal user. If this field is left blank, it will default to the value of sAMAAccountName@domain.com

Display Name

The display name of the new account. 

Given Name

The given name of the new account.

Last Name

The surname or last name of the new account.

Email

The email address of the new account.

Manager

The manager of the new account. The value entered must be the sAMAccountName of the manager in the Active Directory

New Account Password

The password of the new account. Use this drop down option to set password information correctly. The New Account Password option provides the following additional settings:

  • Generate password: If checked, a random password will be automatically generated by the action. If unchecked, specify the password for the account in the New password textbox.
  • Store generated password: The automatically generated password can be stored in a text type workflow variable. This can then be used in other actions.

Other Fields

Select other fields to set for the user. Select the field name, then click the Add button.

AD Fields to take note of:

Note: Leaving all 3 checkboxes unchecked will remove all options. The only valid multiple selection is User cannot change password AND Password never expires.


For details on using Insert Reference, please refer to Inserting reference fields.

1.23 Create appointment

* This topic applies to Nintex Workflow Enterprise Edition only.

This workflow action creates a calendar appointment or meeting request in Microsoft Exchange.

To use the workflow action:

  • Locate the action in Workflow Actions Toolbox (located on the left hand-side);
    • Click on the Category listings to reveal the actions; OR
    • Search for the action using a keyword.
  • Select the action, drag it onto the design canvas and drop it onto a design pearl.

Alternatively

  • Left-clicking the pearl, mouse-over Insert Action and then the Categories to reveal the actions, click the required action from the list.

To change the settings used by the action:

  • On the action’s title click the down arrow to activate a drop-down
  • Select Configure; OR
  • Double-click the action's icon.

For more information on the other options in the drop-down, please refer to the Getting started with the Nintex Workflow designer.

Options for this action

Ribbon Option: Action 

Microsoft Exchange connection details

This action connects to Microsoft Exchange Server using the Exchange web services.

  • Enter the URL to the Exchange web service.
  • Enter the username and password of an account that has rights to create appointments in the mailbox of the user specified in the For field.

Editor mode

  • Appointment: use the Nintex Workflow UI to build the appointment.
  • Advanced: edit the appointment XML manually. Use the Advanced mode to set appointment options not listed in the Appointment mode (UI). See the Microsoft Exchange Web Services SDK for more details.

Appointment details

This section defines the appointment to be created. When the action runs, the calendar appointment will be created in the calendar of the user specified in the For field.

No meeting request will be sent to this user. The account credentials specified above must have write access to this user's mailbox. 

For more details on using Insert Reference please refer to Inserting reference fields.  

Note: Dates specified in the Start Date and End Date fields will be treated as local time according to the time zone specified in the team site regional settings.

Ribbon Option: Attendees

This section allows the addition of additional meeting attendees. These users will receive meeting requests.

Ribbon Option: Recurrence

This section specifies the recurrence pattern (None, Daily, Weekly, Monthly or Yearly).
 

1.24 Create Audience

* This topic applies to Nintex Workflow Enterprise Edition only

* This action requires Microsoft Office SharePoint Server

This workflow action will create a new audience in the environment.

To use the workflow action:

  • Locate the action in Workflow Actions Toolbox (located on the left hand-side);
    • Click on the Category listings to reveal the actions; OR
    • Search for the action using a keyword.
  • Select the action, drag it onto the design canvas and drop it onto a design pearl.

Alternatively

  • Left-clicking the pearl, mouse-over Insert Action and then the Categories to reveal the actions, click the required action from the list.

To change the settings used by the action:

  • On the action’s title click the down arrow to activate a drop-down
  • Select Configure; OR
  • Double-click the action's icon.

For more information on the other options in the drop-down, please refer to the Getting started with the Nintex Workflow designer.


Options within this action

Audience name

The name of the new audience. The value can be added either manually or built up dynamically at run time using Insert Reference   

Credentials

An account with permissions to create an audience. The account must be an administrator of the User Profile Service with Manage Audiences permissions. See the Application Management page in Central Administration.​

Description

Additional information to describe the audience. The value can be added either manually or built up dynamically at run time using Insert Reference   

Owner

The user who will be listed as the owner of the audience.

To set the site owner, click on   to search for and/or add users to the Owner list by one or more of the following methods: 

  • Internal Search: Entering a partial display name, email or user account name and clicking on the magnifying glass will provide a list of matching users and groups from SharePoint as well as Active Directory.
  • External email address: Enter an external email address manually. Where possible, Nintex Workflow will resolve this to an actual user account.
  • Lookup: Provides the option of adding a dynamic reference as an approver. e.g. Workflow variable, list field.

 Click the title bar to expand or collapse each option. 

Include users who

Specify whether audience membership requires users to match any of the audience rules or all of the audience rules.

Audience Rules

Audience rules specify the requirements that a user must meet to be considered a member of this group. Multiple rules can be added by clicking the 'Add Rule' link.

1.25 Create CRM Record

* This topic applies to Nintex Workflow Enterprise Edition only

This workflow action will create a single record in Microsoft Dynamics CRM v4.0 and Microsoft Dynamics CRM 2011. A record can be created for any entity, including custom entities.
 

To use the workflow action:

  • Locate the action in Workflow Actions Toolbox (located on the left hand-side);
    • Click on the Category listings to reveal the actions; OR
    • Search for the action using a keyword.
  • Select the action, drag it onto the design canvas and drop it onto a design pearl.

Alternatively

  • Left-clicking the pearl, mouse-over Insert Action and then the Categories to reveal the actions, click the required action from the list.

To change the settings used by the action:

  • On the action’s title click the down arrow to activate a drop-down
  • Select Configure; OR
  • Double-click the action's icon.

For more information on the other options in the drop-down, please refer to the Getting started with the Nintex Workflow designer.

Options for this action

Dynamics CRM Version

The endpoint version of the Microsoft Dynamics CRM server to connect to.

Server URL

The URL of the CRM server to connect to.

Organization name

The Organization located within CRM. 

Credentials

The credentials used to connect to the CRM server and organization.

Entity

The type of CRM record to be created. 

Store record ID in

Specify a workflow variable in which to store the newly created CRM record ID. This could be used as a reference to the CRM record ID in other steps of the current workflow.

Attributes

Selecting an Entity will load any Required and Business Required attributes. This will then allow the entry of data for the attributes that relate to the entity selected.

1.26 Create item

This workflow action creates a new list item in a list within the current site.

To use the workflow action:

  • Locate the action in Workflow Actions Toolbox (located on the left hand-side);
    • Click on the Category listings to reveal the actions; OR
    • Search for the action using a keyword.
  • Select the action, drag it onto the design canvas and drop it onto a design pearl.

Alternatively

  • Left-clicking the pearl, mouse-over Insert Action and then the Categories to reveal the actions, click the required action from the list.

To change the settings used by the action:

  • On the action’s title click the down arrow to activate a drop-down
  • Select Configure; OR
  • Double-click the action's icon.

For more information on the other options in the drop-down, please refer to the Getting started with the Nintex Workflow designer.

Options for this action

Create item in

Used to select a list in which to create an item.

Content Type

Used when creating the item. If a folder content type is selected, a folder is created. Likewise, if a document content type is selected, the appropriate blank template will be used.

Overwrite an existing item

To overwrite an existing item in the destination library tick this check box. If this option is not selected, an identifier will be appended to the filename. This applies to libraries only.

Store new item ID in

The created item will be assigned an ID. This new item ID can be stored in a List Item ID Workflow Variable. For more on using variables, please refer to information on Workflow Variables, please refer to  Workflow variables.

Field

Available fields that can be added to the created item will be dependent on what fields have been created in the destination list. For each field in the drop down list, a value can be added either manually or based on a dynamic element provided by Insert Reference   .

Troubleshooting

Action not executing

The work load for this action is added to a job queue. The workflow executes jobs in the queue as a batch when it reaches a "commit" point. For more information, see the Nintex article "Designing your Workflow - Commit Pending Changes Action NW2010 & NW2013."  

1.27 Create item in another site

This workflow action creates a new item in a list within another site. 

To use the workflow action:

  • Locate the action in Workflow Actions Toolbox (located on the left hand-side);
    • Click on the Category listings to reveal the actions; OR
    • Search for the action using a keyword.
  • Select the action, drag it onto the design canvas and drop it onto a design pearl.

Alternatively

To change the settings used by the action:

For more information on the other options in the drop-down, please refer to the Getting started with the Nintex Workflow designer.


 Options for this action

 Item Location

Site

The target site for the new item.

  • Select site: Enables a site picker (Select a team site) to navigate through the portal structure and select the target location.
  • Enter a URL: Allows manual entry of the URL or selection using Inserting reference fields.  
    • Refresh Lists: Refreshes the drop-down list for List according to the entered URL. 
      Note: If the URL includes variables, then the Site URL dialog box prompts you to manually enter a URL for the refresh operation. The manually entered URL is not used during execution of the action. 

List

Drop down list containing available Lists at the target location. Additional Fields are displayed depending on the option List selected. 

Folder

Either specify a value or use the lookups feature to specify a new folder to create the item in. If no folder is specified, the item will be created at the root level of the library or list.   

Item Details

Content Type

Used when creating the item. If a folder content type is selected, a folder is created. Likewise, if a document content type is selected, the appropriate blank template will be used.

Field

Available fields that can be added to the created item will be dependent on what fields have been created in the destination list. More than one field can be selected. By default, the Name of the item must be specified. When a Field is selected, an input field is added to the dialog to allow a value to be specified. To remove a field click on .

Store new item ID in

The created item will be assigned an ID. This new item ID can be stored in a List Item ID Workflow Variable. For more information on using variables, please refer to Workflow variables.


1.28 Create list

This workflow action permits the creation of a new list anywhere in the web application.

To use the workflow action:

  • Locate the action in Workflow Actions Toolbox (located on the left hand-side);
    • Click on the Category listings to reveal the actions; OR
    • Search for the action using a keyword.
  • Select the action, drag it onto the design canvas and drop it onto a design pearl.

Alternatively

  • Left-clicking the pearl, mouse-over Insert Action and then the Categories to reveal the actions, click the required action from the list.

To change the settings used by the action:

  • On the action’s title click the down arrow to activate a drop-down
  • Select Configure; OR
  • Double-click the action's icon.

For more information on the other options in the drop-down, please refer to the Getting started with the Nintex Workflow designer.

Options for this action

Title

The Title is the name to be assigned to the new list. Added either manually or based on a dynamic element provided by Insert Reference  . For more details on using Insert Reference please refer to Inserting reference fields.  

Description 

The Description is a brief statement about the new list. Added either manually or based on a dynamic element provided by Insert Reference  . For more details on using Insert Reference please refer to Inserting reference fields.   

List template

The template is the SharePoint list template to be applied to the new list.

Click on the drop down box and select the desired template. For more information on SharePoint list templates, please refer to the SharePoint Help Files.

Team site

The Team site is the site or sub-site in which the new list will be created.

Select a parent site enables a site picker (Select a team site) to navigate through the portal structure and select the location to create the new list.
Enter a URL allows manual entry of the URL or selection using Insert Reference

Display on the Quick Launch of the parent site

This option displays a link to the created list on the left hand navigation (Quick Launch) of the parent site.

Override credentials

The list will be created using the current security context of the workflow by default. This can be the rights of the initiator or the rights of the workflow owner.  If an override username and password is provided, the workflow action will use the permissions of the provided account to create the list instead.

1.29 Create Site

This action allows the creation of a site anywhere within the SharePoint environment using the workflow.

To use the workflow action:

  • Locate the action in Workflow Actions Toolbox (located on the left hand-side);
    • Click on the Category listings to reveal the actions; OR
    • Search for the action using a keyword.
  • Select the action, drag it onto the design canvas and drop it onto a design pearl.

Alternatively

  • Left-clicking the pearl, mouse-over Insert Action and then the Categories to reveal the actions, click the required action from the list.

To change the settings used by the action:

  • On the action’s title click the down arrow to activate a drop-down
  • Select Configure; OR
  • Double-click the action's icon.

For more information on the other options in the drop-down, please refer to the Getting started with the Nintex Workflow designer.


Options for this action

Title

The Title is the name to be assigned to the site.  Added either manually or based on a dynamic element provided by Insert Reference  .  For more details please refer to Inserting reference fields.

Description

The Description is a brief statement about the site.  Added either manually or based on a dynamic element provided by Insert Reference  .  For more details please refer to Inserting reference fields

Inherit permissions / Site owner

Specifies whether or not to use the same permissions as the parent site.

If permissions are not inherited, a site owner must be specified.  The site owner is the person who will manage the site being created and will be given Administrator privileges for the created site.  For more information on privileges and permissions, please refer to the SharePoint Help Files.

To set the site owner, click on   to search for and/or add users to the Site owner list by one or more of the following methods: 

  • Internal Search: Entering a partial display name, email or user account name and clicking on the magnifying glass will provide a list of matching users and groups from SharePoint as well as Active Directory.
  • External email address: Enter an external email address manually.  Where possible Nintex Workflow will resolve this to an actual user account.
  • Lookup: Provides the option of adding a dynamic reference as an approver. e.g. Workflow variable, list field.
Click the title bar to expand or collapse each option.

Parent site

The Parent site is the site that will contain the created site.

  • Select a parent site enables a site picker (Select a team site) to navigate through the portal structure and select the location to create the new site.
  • Enter a URL allows manual entry of the URL or selection using Insert Reference

URL name

The URL name is the web address relative to the specified parent site (do not include the full site URL).  For example: http://myportal/sites/<URL name>

Template

The SharePoint site template to be applied to the site being created. If multiple languages are installed in the environment, an option to choose the language for the site is available.

Click on the drop down box and select the desired template.

For more information on SharePoint site templates, please refer to the SharePoint Help Files.

Display on the Quick Launch of the parent site

This option displays a link to the created site on the left hand navigation (Quick Launch) of the parent site.

Display on the top link bar of the parent site

This option displays a link to the created site on the top navigation of the parent site.

Use top link bar from the parent site

This option ensures that the created site uses the same top navigation as the parent site.

Store URL in

Stores the URL for the created site in a text workflow variable.

Override credentials

The site will be created using the current security context of the workflow by default.  This can be the rights of the initiator or the rights of the workflow owner.

If an override username and password is provided, the workflow action will use the permissions of the provided account to create the site instead.

1.30 Create Site Collection

This workflow action will provision a new site collection in the farm. All of the options available in the SharePoint Central Administration page 'Create site collection' are available.

For more information on any option, see the SharePoint documentation.

To use the workflow action:

  • Locate the action in Workflow Actions Toolbox (located on the left hand-side);
    • Click on the Category listings to reveal the actions; OR
    • Search for the action using a keyword.
  • Select the action, drag it onto the design canvas and drop it onto a design pearl.

Alternatively

  • Left-clicking the pearl, mouse-over Insert Action and then the Categories to reveal the actions, click the required action from the list.

To change the settings used by the action:

  • On the action’s title click the down arrow to activate a drop-down
  • Select Configure; OR
  • Double-click the action's icon.

For more information on the other options in the drop-down, please refer to the Getting started with the Nintex Workflow designer.

Options within the action

Credentials

The username and password to use when creating the site collection.

New Site Collection details

Title

The name of the new site collection.

Description

The description of the new site collection.

Primary administrator

The administrator of the new site collection.

Secondary administrator

The secondary administrator of the new site collection.

Web application

The SharePoint web application that will contain the new site collection.

URL name

The URL name for the new site collection. The managed path and top level site URL are specified.

Template

The site template to use to create the site collection.

Quota template

The quota template to limit the resources used by the new site collection.

Store URL in

The variable in which to store the complete URL of the new site collection.

1.31 Create task

* This topic applies to Nintex Workflow Enterprise Edition only

This workflow action creates a task in Microsoft Exchange.

To use the workflow action:

  • Locate the action in Workflow Actions Toolbox (located on the left hand-side);
    • Click on the Category listings to reveal the actions; OR
    • Search for the action using a keyword.
  • Select the action, drag it onto the design canvas and drop it onto a design pearl.

Alternatively

To change the settings used by the action:

For more information on the other options in the drop-down, please refer to the Getting started with the Nintex Workflow designer.

Options for this action

Microsoft Exchange connection details

This action connects to Microsoft Exchange Server using the Exchange web services.

  • Enter the URL to the Exchange web service.
  • Enter the username and password of an account that has rights to create tasks in the mailbox of the user specified in the Assign To field. 

Editor mode

  • Task use the Nintex Workflow UI to build the task.
  • Advanced edit the appointment XML manually. Use the Advanced mode to set task options not listed in the Task mode (UI). See the Microsoft Exchange Web Services SDK for more details.

Task Details

This section defines the task to be created. When the action runs, the task will be created in the Exchange task list of the user specified in the Assign To field.

The user will not receive any notification. The account credentials specified above must have write access to this user's mailbox. A task can only be assigned to a single user.

For more details on using Insert Reference please refer to Inserting reference fields

Note: Dates specified in the Start Date and Due Date fields will be treated as local time according to the time zone specified in the team site regional settings.

1.32 Declare as record

* This action requires Microsoft SharePoint Server

This workflow action can be used to declare the current item as a record.

The record restriction settings can be applied once the current item is declared as a record. Record restriction settings can be defined in the Record Declaration Settings page on your SharePoint site.


To use the workflow action:

  • Locate the action in Workflow Actions Toolbox (located on the left hand-side);
    • Click on the Category listings to reveal the actions; OR
    • Search for the action using a keyword.
  • Select the action, drag it onto the design canvas and drop it onto a design pearl.

Alternatively

  • Left-clicking the pearl, mouse-over Insert Action and then the Categories to reveal the actions, click the required action from the list.

To change the settings used by the action:

  • On the action’s title click the down arrow to activate a drop-down
  • Select Configure; OR
  • Double-click the action's icon.

For more information on the other options in the drop-down, please refer to the Getting started with the Nintex Workflow designer.

Note: There are no Options to configure within this workflow action.

1.33 Decommission AD User

* This topic applies to Nintex Workflow Enterprise Edition only

This workflow action will disable or remove a user from an Active Directory store.

To use the workflow action:

  • Locate the action in Workflow Actions Toolbox (located on the left hand-side);
    • Click on the Category listings to reveal the actions; OR
    • Search for the action using a keyword.
  • Select the action, drag it onto the design canvas and drop it onto a design pearl.

Alternatively

To change the settings used by the action:

For more information on the other options in the drop-down, please refer to the Getting started with the Nintex Workflow designer.

Options within this action

Active Directory details

LDAP Path

To configure the LDAP Path, refer to the LDAP Picker for more information.

Decommission user

User

The username (sAMAccountName) of the Active Directory entry.

Action

Whether to disable or delete a user.

  • Disable ticks the 'Disabled' option against the Active Directory user.
  • Delete will permanently remove the user from Active Directory.

1.34 Decommission Site Collection

This workflow action will delete or restrict access to an existing site collection.

To use the workflow action:

  • Locate the action in Workflow Actions Toolbox (located on the left hand-side);
    • Click on the Category listings to reveal the actions; OR
    • Search for the action using a keyword.
  • Select the action, drag it onto the design canvas and drop it onto a design pearl.

Alternatively

To change the settings used by the action:

For more information on the other options in the drop-down, please refer to the Getting started with the Nintex Workflow designer.


Options within the action

Credentials

The username and password to use when decommissioning the site collection.

URL

The URL to the site collection being decommissioned.

Action

The decommission action to apply.

  • Read only users can access the site but cannot make changes. This option provides an input to specify the reason this action was taken.
    Note: To apply this decommission action, SharePoint requires the workflow to run on the Central Administration site. 
  • No access users cannot access the site, the site collection is not deleted. This option provides an input to specify the reason this action was taken.
    Note: To apply this decommission action, SharePoint requires the workflow to run on the Central Administration site. 
  • Delete the site collection is removed.

1.35 Delegate Workflow Task

This action will delegate outstanding workflow tasks to a specific user.

This allows for escalation scenarios as seen below. In this example, an approval task is assigned to a user and after a specified delay, if the user has not responded, the task is delegated to another user.

To use the workflow action:

  • Locate the action in Workflow Actions Toolbox (located on the left hand-side);
    • Click on the Category listings to reveal the actions; OR
    • Search for the action using a keyword.
  • Select the action, drag it onto the design canvas and drop it onto a design pearl.

Alternatively

To change the settings used by the action:

For more information on the other options in the drop-down, please refer to the Getting started with the Nintex Workflow designer.


 Options within this action

Action ID

Select a workflow variable that contains the ID of the Request action that is to be delegated. Only variables of type "Action ID" are listed.

To store the Action ID in the variable, configure the Store action ID in field in one of the following actions:  

Delegate after 

Specifies how long to wait before the task is delegated.

If the task is completed in this period, the delegate action will not take effect.

The total time is calculated by summing all fields, regardless of the Time calculation option selected. For example, 4 days and 4 minutes will be calculated as 96 (24x4) hours and 4 minutes. 

Time calculation

Specifies whether or not hours outside the work week should be included when counting down the Delegate after value.  

During business days only 

The During business days only option will specify that weekends or holidays are not included in the count down, but after hours on a business day are. 
 
Example:
  • The delegate task action starts counting down Friday morning and is configured to wait 1 day. (the work week is defined as Monday to Friday)
  • The task will delegate on Monday morning, weekends are not included in the count down.  

During business hours only 

The During business hours only option specifies that only business hours are used in the count down.
 
Example:
  • The delegate task action starts counting down Wednesday at 4pm and is configured to wait 4 hours (the work day is defined as Monday to Friday, 8am to 5pm)
  • The task will delegate at 11am on Thursday, after business hours are not included in the count down.   

Neither option 

If neither option is selected, all hours will be included in the count down.
Examples:  
  • The delegate task action starts counting down Friday morning and is configured to wait 1 day.
    • A task delegation will be sent Saturday morning, weekends are included in the count down.
  • The delegate task action starts counting down Wednesday at 4pm and is configured to wait 4 hours.
    • A task delegation will be sent at 8pm on Wednesday, after business hours are included in the count down. 

Delegate to

The user or group to delegate to. Manually enter the user name, or use the people picker to search.

To search for users, click on the address book icon to the right of the input box. The Select People and Groups dialog will appear:
 
 
The dialog allows the workflow designer to search for and/or add users to the Delegate to list by one or more of the following methods:
Click the title bar to expand or collapse each option.  

Comments

Comments to be recorded when performing the delegation. These comments will appear on the workflow history page.

Enter the comments manually, or use Insert Reference to build the string dynamically at run time.

Apply to

  • All pending tasks: reassign all tasks that have not already been actioned to the delegate
  • First pending task: only reassign the first non-actioned task to the delegate, and all other pending tasks will be set to not required.

1.36 Delete / Disable CRM Record

* This topic applies to Nintex Workflow Enterprise Edition only

This workflow action will delete or disable a record of an entity in Microsoft Dynamics CRM v4.0 and Microsoft Dynamics CRM 2011. A record can be deleted or disabled for any entity, including custom entities.


To use the workflow action:

  • Locate the action in Workflow Actions Toolbox (located on the left hand-side);
    • Click on the Category listings to reveal the actions; OR
    • Search for the action using a keyword.
  • Select the action, drag it onto the design canvas and drop it onto a design pearl.

Alternatively

  • Left-clicking the pearl, mouse-over Insert Action and then the Categories to reveal the actions, click the required action from the list.

To change the settings used by the action:

  • On the action’s title click the down arrow to activate a drop-down
  • Select Configure; OR
  • Double-click the action's icon.

For more information on the other options in the drop-down, please refer to the Getting started with the Nintex Workflow designer.

Options for this action

Dynamics CRM Version

The endpoint version of the Microsoft Dynamics CRM server to connect to.

Server URL

The URL of the CRM server to connect to.

Organization name

The Organization located within CRM.

Credentials

The credentials used to connect to the CRM server and organization.

Action

Entity

The type of CRM record to be deleted/disabled.

Record to delete 

Specify the GUID of the CRM record to be deleted/disabled.
Note: It is recommended that the Query CRM action be used to obtain the GUID of the record and stored in a workflow variable which can then be specified in the Record to delete field

1.37 Delete AD Group

* This topic applies to Nintex Workflow Enterprise Edition only

This workflow action will delete an Active Directory security group.

To use the workflow action:

  • Locate the action in Workflow Actions Toolbox (located on the left hand-side);
    • Click on the Category listings to reveal the actions; OR
    • Search for the action using a keyword.
  • Select the action, drag it onto the design canvas and drop it onto a design pearl.

Alternatively

  • Left-clicking the pearl, mouse-over Insert Action and then the Categories to reveal the actions, click the required action from the list.

To change the settings used by the action:

  • On the action’s title click the down arrow to activate a drop-down
  • Select Configure; OR
  • Double-click the action's icon.

For more information on the other options in the drop-down, please refer to the Getting started with the Nintex Workflow designer.

Options within this action

Active Directory details

LDAP Path

To configure the LDAP Path, refer to the LDAP Picker for more information.

Group details

Group name

The name of the group to be deleted.

1.38 Delete Audience

* This topic applies to Nintex Workflow Enterprise Edition only.

* This action requires Microsoft SharePoint Server 2013.

This workflow action will delete an existing audience in the environment.

To use the workflow action:

  • Locate the action in Workflow Actions Toolbox (located on the left hand-side);
    • Click on the Category listings to reveal the actions; OR
    • Search for the action using a keyword.
  • Select the action, drag it onto the design canvas and drop it onto a design pearl.

Alternatively

  • Left-clicking the pearl, mouse-over Insert Action and then the Categories to reveal the actions, click the required action from the list.

To change the settings used by the action:

  • On the action’s title click the down arrow to activate a drop-down
  • Select Configure; OR
  • Double-click the action's icon.

For more information on the other options in the drop-down, please refer to the Getting started with the Nintex Workflow designer.

Options within this action

Audience name

The name of the audience to delete.

Added either manually or based on a dynamic element provided by Insert Reference  .

Credentials

An account with permissions to delete an audience. In Central Administration, this account will need to be explicitly added as the administrator of the User Profile Service with the permission to Manage Audiences.

1.39 Delete drafts

This workflow action can be used delete all drafts on the current item.

It deletes the draft or minor versions of the current item.

To use the workflow action:

  • Locate the action in Workflow Actions Toolbox (located on the left hand-side);
    • Click on the Category listings to reveal the actions; OR
    • Search for the action using a keyword.
  • Select the action, drag it onto the design canvas and drop it onto a design pearl.

Alternatively

  • Left-clicking the pearl, mouse-over Insert Action and then the Categories to reveal the actions, click the required action from the list.

To change the settings used by the action:

  • On the action’s title click the down arrow to activate a drop-down
  • Select Configure; OR
  • Double-click the action's icon.

For more information on the other options in the drop-down, please refer to the Getting started with the Nintex Workflow designer.

Note: There are no Options to configure within this workflow action.

1.40 Delete Item

This workflow action deletes a list item in a list within the current site.

To use the workflow action:

  • Locate the action in Workflow Actions Toolbox (located on the left hand-side);
    • Click on the Category listings to reveal the actions; OR
    • Search for the action using a keyword.
  • Select the action, drag it onto the design canvas and drop it onto a design pearl.

Alternatively

  • Left-clicking the pearl, mouse-over Insert Action and then the Categories to reveal the actions, click the required action from the list.

To change the settings used by the action:

  • On the action’s title click the down arrow to activate a drop-down
  • Select Configure; OR
  • Double-click the action's icon.

For more information on the other options in the drop-down, please refer to the Getting started with the Nintex Workflow designer.


Options for this action 

List and Library Workflows

Delete from

Select the list to delete an item from.

Where

Once the Delete from field is set, the Where field will appear.

Use the Where field to select which item to delete. The field choices will depend on what was selected in the Delete from drop-down.

Site Workflows

Delete From

Select the list to delete an item from.

Where

Use the Where field to select which item to delete. The field choices will depend on what was selected in the Delete From drop-down.

 
For more details on using Insert Reference please refer to Inserting reference fields
For more details on using List lookups, please refer to the Using lookups.

Troubleshooting

Action not executing

The work load for this action is added to a job queue. The workflow executes jobs in the queue as a batch when it reaches a "commit" point. For more information, see the Nintex article "Designing your Workflow - Commit Pending Changes Action NW2010 & NW2013."  

1.41 Delete multiple items

This workflow action can be used to delete multiple items within a library or list in a specified site.

To use the workflow action:

  • Locate the action in Workflow Actions Toolbox (located on the left hand-side);
    • Click on the Category listings to reveal the actions; OR
    • Search for the action using a keyword.
  • Select the action, drag it onto the design canvas and drop it onto a design pearl.

Alternatively

  • Left-clicking the pearl, mouse-over Insert Action and then the Categories to reveal the actions, click the required action from the list.

To change the settings used by the action:

  • On the action’s title click the down arrow to activate a drop-down
  • Select Configure; OR
  • Double-click the action's icon.

For more information on the other options in the drop-down, please refer to the Getting started with the Nintex Workflow designer.


Options within this action

Site

The target site where items are to be deleted.

  • Select site: Enables a site picker (Select a team site) to navigate through the portal structure and select the target location.
  • Enter a URL: Allows manual entry of the URL or selection using Inserting reference fields.  
    • Refresh Lists: Refreshes the drop-down list for List according to the entered URL. 
      Note: If the URL includes variables, then the Site URL dialog box prompts you to manually enter a URL for the refresh operation. The manually entered URL is not used during execution of the action. ​

Editor Mode

Choose whether to use the UI to build the query, or edit the CAML manually.

  • CAML editor: Use the CAML Editor mode to create more advanced cross list queries.  View the CAML at any time by switching to the CAML Editor mode.
  • Query builder: Build queries for a single list for the site specified.

The following elements will build the query:

List

Drop down list containing available Lists at the selected site.

Include subfolders

Specify whether to delete items within subfolders by checking this option.

Filter

The criteria that items in the list must match in order to be deleted. Use the Filter to specify the delete rules:

  • Select all list items: Deletes all items in the list.
  • Select items only when the following is true
    • Show the items when column: Selects an item based on the values set in the column. Either specify a value or use the lookups feature.
    • Add filter rule: Specify another rule. Use the And / Or options to specify if the item to be deleted needs to meet conditions of a single rule or all rules.

CAML Query

The CAML query editor appears when CAML Editor is selected in the Editor Mode. Displays the CAML query being constructed.

1.42 Delete previous versions

This workflow action can be used to delete all previous versions (major and minor) of the current item that the workflow is running on.

To use the workflow action:

  • Locate the action in Workflow Actions Toolbox (located on the left hand-side);
    • Click on the Category listings to reveal the actions; OR
    • Search for the action using a keyword.
  • Select the action, drag it onto the design canvas and drop it onto a design pearl.

Alternatively

  • Left-clicking the pearl, mouse-over Insert Action and then the Categories to reveal the actions, click the required action from the list.

To change the settings used by the action:

  • On the action’s title click the down arrow to activate a drop-down
  • Select Configure; OR
  • Double-click the action's icon.

For more information on the other options in the drop-down, please refer to the Getting started with the Nintex Workflow designer.

Note: There are no Options to configure within this workflow action.

1.43 Delete site

This workflow action allows the deletion of a site anywhere within the SharePoint environment.

To use the workflow action:

  • Locate the action in Workflow Actions Toolbox (located on the left hand-side);
    • Click on the Category listings to reveal the actions; OR
    • Search for the action using a keyword.
  • Select the action, drag it onto the design canvas and drop it onto a design pearl.

Alternatively

  • Left-clicking the pearl, mouse-over Insert Action and then the Categories to reveal the actions, click the required action from the list.

To change the settings used by the action:

  • On the action’s title click the down arrow to activate a drop-down
  • Select Configure; OR
  • Double-click the action's icon.

For more information on the other options in the drop-down, please refer to the Getting started with the Nintex Workflow designer.

Options for this action

Parent site

The Parent site is the site that will contain the site to be deleted.
  • Select a parent site enables a site picker (Select a team site) to navigate through the portal structure and select the location to be deleted.
  • Enter a URL manually or use Insert Reference to dynamically build the URL at run time.

URL name

The URL name is the web address relative to the specified parent site (do not include the full site URL).  For example: http://myportal/sites/<URL name>

Override credentials 

The site will be created using the current security context of the workflow by default. This can be the rights of the initiator or the rights of the workflow owner.  If an override username and password is provided, the workflow action will use the permissions of the provided account to delete the site instead.


1.44 Discard check out

This action discards the 'checked out' status of a previously checked out document within the current site.

To use the workflow action:

  • Locate the action in Workflow Actions Toolbox (located on the left hand-side);
    • Click on the Category listings to reveal the actions; OR
    • Search for the action using a keyword.
  • Select the action, drag it onto the design canvas and drop it onto a design pearl.

Alternatively

  • Left-clicking the pearl, mouse-over Insert Action and then the Categories to reveal the actions, click the required action from the list.

To change the settings used by the action:

  • On the action’s title click the down arrow to activate a drop-down
  • Select Configure; OR
  • Double-click the action's icon.

For more information on the other options in the drop-down, please refer to the Getting started with the Nintex Workflow designer.

Options within the action

Discard check out from

Select either the Current item that the workflow is running on, or one of the available libraries. 

If selecting a library location, the Where selector will appear.

Where

If not selecting the Current item, use this section to specify the filter criteria to identify which document should have a check out cancelled. Manually enter the value, or configure the criteria based on Inserting reference fields. For more information on lookups, see Using Lookups.

Note: if the filter criteria returns more than one document, only the first document in the collection will be applied.

Troubleshooting

Action not executing

The work load for this action is added to a job queue. The workflow executes jobs in the queue as a batch when it reaches a "commit" point. For more information, see the Nintex article "Designing your Workflow - Commit Pending Changes Action NW2010 & NW2013." 

1.45 Enable Lync / OCS

* This topic applies to Nintex Workflow Enterprise Edition only.

The Enable Lync/ OCS action will enable OCS/LCS or Lync 2010/2013 for an existing Active Directory user account.

To use the workflow action:

  • Locate the action in Workflow Actions Toolbox (located on the left hand-side);
    • Click on the Category listings to reveal the actions; OR
    • Search for the action using a keyword.
  • Select the action, drag it onto the design canvas and drop it onto a design pearl.

Alternatively

  • Left-clicking the pearl, mouse-over Insert Action and then the Categories to reveal the actions, click the required action from the list.

To change the settings used by the action:

  • On the action’s title click the down arrow to activate a drop-down
  • Select Configure; OR
  • Double-click the action's icon.

For more information on the other options in the drop-down, please refer to the Getting started with the Nintex Workflow designer.


Action Settings

Server version

Select from Lync 2010, OCS 2007 or LCS 2005.

Server Version: OCS 2007/ LCS 2005

Active Directory Details


LDAP Path

To configure the LDAP Path, refer to the LDAP Picker for more information.

  • Username: Enter a username with the required permissions to provision a user on OCS/ Lync and access the LDAP Path entered.
  • Password: Enter a password for the above username.
 
Primary home server
Primary home server for the organization. E.g. CN=LC Services,CN=Microsoft,CN=WS03R2EEEXCHLCS,CN=Pools,CN=RTC Service,CN=Microsoft,CN=System,DC=contoso,DC=com
Click on the LDAP Picker button to browse an LDAP Path. 
 
Account to enable

The username (sAMAccountName) of the Active Directory entry. 

SIP address

The SIP address for the Active Directory Account. E.g. sip:john.smith@mycompany.com

Enable user

Check to enable LCS/OCS for the nominated Active Directory account. If left un-checked, the other properties will still be set.

Server Version: Lync 2010 / 2013

Note: The Lync mode remotely invokes the PowerShell command 'Enable-CsUser'.

Lync server

The name of the Lync server.

  • Username: Enter a username with the required permissions to access the Lync server.
  • Password: Enter a password for the above username.

Registrar pool

The fully qualified domain name (FQDN) of the Registrar pool where the users' Lync Server account will be homed.

Account to enable

The username (sAMAccountName) of the Active Directory entry.

SIP address

The SIP address for the Active Directory Account. E.g. sip:john.smith@mycompany.com

Telephony

Select the desired communication type. Chose from Audio/video disabled, PC-to-PC only, enterprise voice, remote call control, remote call control only.

Policies

  • Conferencing policy: The conferencing policy specifies the conferencing experience for participants.
  • Client version policy: The client version policy checks the SIP User Agent header to determine the client version.
  • PIN policy: The PIN policy provides a personal identification number (PIN) authentication to users who are connecting to Microsoft Lync 2010/2013 with IP phones. 
  • External access policy: The external access policy determines whether or not your users can 1) communicate with users who have SIP accounts with a federated organization; 2) communicate with users who have SIP accounts with a public instant messaging and; 3) access Microsoft Lync Server 2010/2013 over the internet, without having to log on to your internal network.  
  • Archiving policy: The archiving policy controls whether archiving for specific users is enabled or disabled for internal and external communications.
  • Location policy: The location policy automatically locates clients within a network. The Lync Server uses a Location Policy to enable Lync 2010/2013 clients for E9-1-1 during client registration. A location Policy contains the settings that define how E9-1-1 will be implemented. You can edit the global location policy and create new tagged location policies. A client obtains a global policy when not locations within a subnet with an associated location policy or when the client has not been directly assigned a location policy.
  • Client policy: The client policy determines the features of Microsoft Lync 2010/2013 which are made available to users.

Advanced

Domain controller

Connect to the specified domain controller in order to enable a user account

SIP address type

Instructs Lync Server to auto-generate a SIP address for the new user.

SIP domain

The SIP domain for the user account being enabled.

Authentication mode

Select from with default, basic, digest or negotiate.

For more information on the above parameters refer to http://technet.microsoft.com/en-us/library/gg398711.aspx 


1.46 End workflow

This action will terminate the workflow and, if specified, will log a user defined message in the history list.

To use the workflow action:

  • Locate the action in Workflow Actions Toolbox (located on the left hand-side);
    • Click on the Category listings to reveal the actions; OR
    • Search for the action using a keyword.
  • Select the action, drag it onto the design canvas and drop it onto a design pearl.

Alternatively

  • Left-clicking the pearl, mouse-over Insert Action and then the Categories to reveal the actions, click the required action from the list.

To change the settings used by the action:

  • On the action’s title click the down arrow to activate a drop-down
  • Select Configure; OR
  • Double-click the action's icon.

For more information on the other options in the drop-down, please refer to the Getting started with the Nintex Workflow designer.


 Options within the action

There are no mandatory fields to complete in this workflow action.

A message can be added to be logged into the history list.

For details on the SharePoint History List, please refer to SharePoint Help Pages.

1.47 Execute SQL

This action is for advanced users and allows the workflow to run a SQL command.

To use the workflow action:

  • Locate the action in Workflow Actions Toolbox (located on the left hand-side);
    • Click on the Category listings to reveal the actions; OR
    • Search for the action using a keyword.
  • Select the action, drag it onto the design canvas and drop it onto a design pearl.

Alternatively

To change the settings used by the action:

For more information on the other options in the drop-down, please refer to the Getting started with the Nintex Workflow designer.


Options for this action

Connection String

A SQL connection string to use when connecting to the remote database.

Provider options are:

  • MS SQL
  • ODBC
  • OLEDB
  • Oracle

For example: Data Source=myServerAddress;Initial Catalog=myDataBase;Integrated Security=SSPI;.

Use windows authentication

Determines that the connection to the database will be made using integrated authentication (trusted connection). When using integrated authentication, username and password fields are presented to allow the credentials of an account with sufficient database access to be provided.

Query

Enter the SQL statement directly and/or use Insert reference fields to build the string dynamically at run time.

Escape reference values for use in strings

Use this option to ensure that any value chosen from the Insert Reference button is escaped for use in a SQL string. If the entire SQL statement is contained in a single variable, then this option must be unchecked. 

Store default result

Returns the result of a SQL 'select' query.

Store result in

This list contains all the workflow variables that can be used to store the result of a SQL ‘select’ query. A collection variable can be used to store multiple records. If a variable that is not a collection is selected, only the first record will be stored. If multiple columns are returned, only the value of the first column will be stored.

Specify column names

Use this option to store the result of specific column name that is returned from a SQL 'select' query.

To specify the column:

  1. In the Column to retrieve, enter the name of the column.
  2. Click the Add button and the property will appear below the Column to retrieve box.
  3. Specify a workflow variable to store the values of the column to be retrieved.


Note: If a variable that is not a collection is selected, only the first result will be stored.


1.48 Filter

This workflow action ends the workflow if a configured condition is not met.

Configuring this action is similar to the Set a condition action.

To use the workflow action:

  • Locate the action in Workflow Actions Toolbox (located on the left hand-side);
    • Click on the Category listings to reveal the actions; OR
    • Search for the action using a keyword.
  • Select the action, drag it onto the design canvas and drop it onto a design pearl.

Alternatively

  • Left-clicking the pearl, mouse-over Insert Action and then the Categories to reveal the actions, click the required action from the list.

To change the settings used by the action:

  • On the action’s title click the down arrow to activate a drop-down
  • Select Configure; OR
  • Double-click the action's icon.

For more information on the other options in the drop-down, please refer to the Getting started with the Nintex Workflow designer.

Options within this action

For more details on using this action, please refer to Set a condition

1.49 Find users by status

*This topic applies to Nintex Workflow Enterprise only.

This workflow action will find and return user(s) with a specified OCS/Lync presence status.

Note: Requires Office Communications Server 2007 or Lync Server 2010/2013 and the Instant messaging settings option in Global Settings must be set and configured.

To use the workflow action:

  • Locate the action in Workflow Actions Toolbox (located on the left hand-side);
    • Click on the Category listings to reveal the actions; OR
    • Search for the action using a keyword.
  • Select the action, drag it onto the design canvas and drop it onto a design pearl.

Alternatively

To change the settings used by the action:

For more information on the other options in the drop-down, please refer to the Getting started with the Nintex Workflow designer.

Options with this action 

Find users

The user, SharePoint or Active Directory group to search for users with the specified status from. Multiple users and groups can be separated with semi-colons (;).

To search for groups, click on the address book icon to the right of the input box. The Select People and Groups dialog will appear.


With status

The OCS/Lync presence status to retrieve users by. To specify a dynamic value using the insert reference function, select 'Other value...'.

Store users in

Select the workflow variable to store users from the group whom have the specified presence status.

The results can be stored in a text variable (only the first user of the total returned users will be stored) or a collection.


1.50 For Each

This workflow action is used to loop through each value in a collection variable.

Other actions can be dragged on to the designer as child actions of the For each action, and these actions will be executed for each value in the collection. The current value of the collection is accessible to each of the child actions via a workflow variable.

To use the workflow action:

  • Locate the action in Workflow Actions Toolbox (located on the left hand-side);
    • Click on the Category listings to reveal the actions; OR
    • Search for the action using a keyword.
  • Select the action, drag it onto the design canvas and drop it onto a design pearl.

Alternatively

  • Left-clicking the pearl, mouse-over Insert Action and then the Categories to reveal the actions, click the required action from the list.

To change the settings used by the action:

  • On the action’s title click the down arrow to activate a drop-down
  • Select Configure; OR
  • Double-click the action's icon.

For more information on the other options in the drop-down, please refer to the Getting started with the Nintex Workflow designer.

Options within the action

Target Collection

The collection variable to loop through.

Store result in

As the action loops through each value in the Target Collection, the value will be assigned to this variable. Actions that are children of the For Each action can use this variable to access the current value of the collection.

Any variable type can be selected, the workflow designer must ensure that it is compatible with the values stored in the collection.

Index

A number variable can be selected to store the position of each item in the collection as it is accessed. The first item will be at position 0.

Stop processing

A Yes/No variable type can be selected to break the loop. When the variable is true the loop will not process any more collection items and the workflow will continue to the next action after the For each loop.

1.51 Get meeting suggestions

* This topic applies to Nintex Workflow Enterprise Edition only
 
This workflow action will retrieve a series of meeting time suggestions based on a specified criteria.
 

To use the workflow action:

  • Locate the action in Workflow Actions Toolbox (located on the left hand-side);
    • Click on the Category listings to reveal the actions; OR
    • Search for the action using a keyword.
  • Select the action, drag it onto the design canvas and drop it onto a design pearl.

Alternatively

  • Left-clicking the pearl, mouse-over Insert Action and then the Categories to reveal the actions, click the required action from the list.

To change the settings used by the action:

  • On the action’s title click the down arrow to activate a drop-down
  • Select Configure; OR
  • Double-click the action's icon.

For more information on the other options in the drop-down, please refer to the Getting started with the Nintex Workflow designer.

 Options for this action 

Microsoft Exchange connection details

URL

This action connects to Microsoft Exchange using the Exchange web services.

Meeting Suggestion Properties

Attendees

The users that are to be invited to the proposed meeting.

Select People and Groups

To search for users, click on the address book icon on the right.


The configuration dialog allows the workflow designer to search for and/or add users to the Assignees list by one or more of the following methods:
  • Internal Search: Entering a partial display name, email address or user account name and clicking on the magnifying glass will provide a list of matching users and groups from SharePoint as well as Active Directory.
  • External email address: Enter an external email address manually. Where possible Nintex Workflow will resolve this to an actual user account.
  • Lookup: Provides the option of adding a dynamic reference as an approver. e.g. Workflow variable, list field.
  • Click the title bar to expand or collapse each option.

Start after

The beginning of the time span for the proposed meeting.

End by

The end of the time span for the meeting suggestion. 

Meeting duration (minutes)

The length of the meeting suggestion.

Store result in

The results of the meeting suggestions will be stored in the workflow variable specified.

Advanced

Maximum results per day

The maximum number of meeting suggestions that will be returned for any given day.

Maximum non-business-hours results

The maximum number of meeting suggestions that will be returned that occur outside of the business hours set on the Exchange server.

Define "Good" threshold for attendance

The Good threshold for attendance is the percentage of attendees that must be able to attend a meeting suggestion for the suggestion to be given a "Good quality" status.

Minimum suggestion quality

The minimum meeting suggestion quality that is required for a meeting suggestion to be returned.

Result format

The format that the results will be returned as.

1.52 Get user status

*This topic applies to Nintex Workflow Enterprise only.

This workflow action will retrieve the OCS/Lync presence status of a user.

Note: Requires Office Communications Server 2007 or Lync Server 2010/2013 and the Instant messaging settings option in Global Settings must be set and configured.

To use the workflow action:

  • Locate the action in Workflow Actions Toolbox (located on the left hand-side);
    • Click on the Category listings to reveal the actions; OR
    • Search for the action using a keyword.
  • Select the action, drag it onto the design canvas and drop it onto a design pearl.

Alternatively

To change the settings used by the action:

For more information on the other options in the drop-down, please refer to the Getting started with the Nintex Workflow designer.


Options with this action

User

The username of the user whose presence status is to be retrieved.

To search for users, click on the address book icon to the right of the input box. The Select People and Groups dialog will appear.


 Only a single user can be selected.

Store status in

The workflow variable to store the retrieved presence status of the user. 

1.53 Log in the History List

This workflow action will log a user-defined entry into the workflow history list.

To use the workflow action:

  • Locate the action in Workflow Actions Toolbox (located on the left hand-side);
    • Click on the Category listings to reveal the actions; OR
    • Search for the action using a keyword.
  • Select the action, drag it onto the design canvas and drop it onto a design pearl.

Alternatively

  • Left-clicking the pearl, mouse-over Insert Action and then the Categories to reveal the actions, click the required action from the list.

To change the settings used by the action:

  • On the action’s title click the down arrow to activate a drop-down
  • Select Configure; OR
  • Double-click the action's icon.

For more information on the other options in the drop-down, please refer to the Getting started with the Nintex Workflow designer.

Options for this action

Add the required message into the text box either manually or use Insert Reference to build the string dynamically at run time. 

There is a maximum length of 255 characters in the history list entry. Additional text will be trimmed.

For details on the SharePoint History List, please refer to the SharePoint Help Pages.

Troubleshooting

Action not executing

The work load for this action is added to a job queue. The workflow executes jobs in the queue as a batch when it reaches a "commit" point. For more information, see the Nintex article "Designing your Workflow - Commit Pending Changes Action NW2010 & NW2013."  

1.54 Loop

This workflow action runs a set of child actions while a condition evaluates to true.

Configuring this action is similar to the Set a condition action.

To use the workflow action:

  • Locate the action in Workflow Actions Toolbox (located on the left hand-side);
    • Click on the Category listings to reveal the actions; OR
    • Search for the action using a keyword.
  • Select the action, drag it onto the design canvas and drop it onto a design pearl.

Alternatively

  • Left-clicking the pearl, mouse-over Insert Action and then the Categories to reveal the actions, click the required action from the list.

To change the settings used by the action:

  • On the action’s title click the down arrow to activate a drop-down
  • Select Configure; OR
  • Double-click the action's icon.

For more information on the other options in the drop-down, please refer to the Getting started with the Nintex Workflow designer.

Options within this action

For more details on using this action, please refer to the Set a condition.

For information on safeguarding performance by preventing excessive looping iterations, see Preventing excessive looping iterations.

1.55 Math operation

This action allows the workflow to perform basic calculations at runtime for use within other actions in the workflow.

To use the workflow action:

  • Locate the action in Workflow Actions Toolbox (located on the left hand-side);
    • Click on the Category listings to reveal the actions; OR
    • Search for the action using a keyword.
  • Select the action, drag it onto the design canvas and drop it onto a design pearl.

Alternatively

  • Left-clicking the pearl, mouse-over Insert Action and then the Categories to reveal the actions, click the required action from the list.

To change the settings used by the action:

  • On the action’s title click the down arrow to activate a drop-down
  • Select Configure; OR
  • Double-click the action's icon.

For more information on the other options in the drop-down, please refer to the Getting started with the Nintex Workflow designer.

Options within this action

Calculation

To configure this action, two values need to be specified as well as the operation.

The mathematical operations available to be selected are:

  • Plus
  • Minus
  • Divided by
  • Multiplied by
  • Modulus

Enter the value manually or use Lookups to reference variables and reference fields.

Store result in

The result of the Calculation needs to be stored for future reference. The dropdown list will present the available workflow variables.

To create a variable, click the Variables button. For more information, see Workflow variables.

1.56 Pause for

This workflow action will pause the workflow at this step and delay it for a defined period of time.

Parameters are evaluated when the action is executed, with times calculated in UTC. If the resulting delay period is shorter than the frequency of the Workflow timer job, or if it is a negative value, then the action executes at the next iteration of the Workflow timer job. For more information about SharePoint timer jobs, see the Microsoft article Timer job reference (SharePoint 2013)​.

To use the workflow action:

  • Locate the action in Workflow Actions Toolbox (located on the left hand-side);
    • Click on the Category listings to reveal the actions; OR
    • Search for the action using a keyword.
  • Select the action, drag it onto the design canvas and drop it onto a design pearl.

Alternatively

  • Left-clicking the pearl, mouse-over Insert Action and then the Categories to reveal the actions, click the required action from the list.

To change the settings used by the action:

  • On the action’s title click the down arrow to activate a drop-down
  • Select Configure; OR
  • Double-click the action's icon.

For more information on the other options in the drop-down, please refer to the Getting started with the Nintex Workflow designer.


Options within this action 

By default, the delay period will be set to 5 minutes.

Set the delay period

  • Years
  • Months
  • Days
  • Hours
  • Minutes (defaulted to 5)

Manually enter values or use Insert reference for dynamic values.

Set the Business hours only option to ignore non-business hours when counting down.

1.57 Pause Until

This action will pause the workflow at this step and delay it until a set date and time defined.

Parameters are evaluated when the action is executed, with times calculated in UTC.​

To use the workflow action:

  • Locate the action in Workflow Actions Toolbox (located on the left hand-side);
    • Click on the Category listings to reveal the actions; OR
    • Search for the action using a keyword.
  • Select the action, drag it onto the design canvas and drop it onto a design pearl.

Alternatively

  • Left-clicking the pearl, mouse-over Insert Action and then the Categories to reveal the actions, click the required action from the list.

To change the settings used by the action:

  • On the action’s title click the down arrow to activate a drop-down
  • Select Configure; OR
  • Double-click the action's icon.

For more information on the other options in the drop-down, please refer to the Getting started with the Nintex Workflow designer.


 Options within the action

Set the date and time at which the workflow will recommence by:

  • Manually entering the date (in the regional date format e.g: mm/dd/yyyy), then selecting the hour and minutes.
  • Using Calendar Picker to select a date , then selecting the hour and minutes.
  • Setting the date value to a date workflow variable or a date field within the site in which the workflow is associated.

For more details on using List lookups, please refer to the Using lookups.

1.58 Provision User In Exchange

* This topic applies to Nintex Workflow Enterprise Edition only

The Provision User in Exchange workflow action will provision a mailbox for an Active Directory user account in the specified mailbox container or mailbox database location.

To use the workflow action:

  • Locate the action in Workflow Actions Toolbox (located on the left hand-side);
    • Click on the Category listings to reveal the actions; OR
    • Search for the action using a keyword.
  • Select the action, drag it onto the design canvas and drop it onto a design pearl.

Alternatively

  • Left-clicking the pearl, mouse-over Insert Action and then the Categories to reveal the actions, click the required action from the list.

To change the settings used by the action:

  • On the action’s title click the down arrow to activate a drop-down
  • Select Configure; OR
  • Double-click the action's icon.

For more information on the other options in the drop-down, please refer to the Getting started with the Nintex Workflow designer.

Action Settings

Exchange connector service

Web Service URL

The path to the Nintex Workflow Exchange Connector Service. E.g. http://www.mycompany.com/siteECS/EmailProvisioning.asmx

In this example, the mycompany website contains a virtual directory called siteECS, which must be created by the Nintex Workflow Exchange Connector Service installer. EmailProvisioning.asmx is the web service created by the installer.

Username

The IIS account created in the prerequisite section of the Nintex Workflow Exchange Connector Service installation manual.

Note: Click on the padlock icon to select from a list of Credential Workflow Constants, maintained in Site Settings by the system administrator.

Password

The password of the IIS account created in the prerequisite section of the Nintex Workflow Exchange Connector Service installation manual.

Provision details 

Version

Select the version of Microsoft Exchange Server. Supported versions are Microsoft Exchange Server 2003, 2007, 2010 & 2013.

Version: Exchange 2003

Mailbox Container

The LDAP path to the Mailbox container in which the mailbox will be located. E.g. LDAP://mycompany.com/CN=Mailbox Store (SERVERB),CN=First Storage Group,CN=InformationStore,CN=SERVERB,CN=Servers,CN=First Administrative Group,CN=Administrative Groups,CN=MLG,CN=Microsoft Exchange,CN=Services,CN=Configuration,DC=mycompany,DC=com

Click on the LDAP Picker button to browse for a Mailbox Container.

User

The sAMAccountName of the account to be created. E.g. jsmith

Version: Exchange 2007, 2010 & 2013 

Exchange Database

The Exchange Database in which the mailbox will be located. This can be provided in the following formats:

  • Database name
  • GUID of the database
  • Server name\database name
  • Server name\storage group\database name 

Note: It is recommended to use Workflow Constants to store information about the Exchange Server Database.

User

The identity of the account to be created. This can be provided in the following formats:

  • GUID
  • Distinguished name (DN)
  • Domain\Account
  • User principal name (UPN)

Alias

Enter the alias for the email address of the new exchange user. The alias is the first section of the email address. For Example: The alias of bob.jones@corporation.com would be bob.jones.
 
Note: If Alias is left blank, Exchange will automatically provide an alias.


1.59 Publish Workflow

This workflow action can be used to publish a workflow that is going through the workflow change approval process.

* This action is only available within the Workflow Change Approval process.

To use the workflow action:

  • Locate the action in Workflow Actions Toolbox (located on the left hand-side);
    • Click on the Category listings to reveal the actions; OR
    • Search for the action using a keyword.
  • Select the action, drag it onto the design canvas and drop it onto a design pearl.

Alternatively

  • Left-clicking the pearl, mouse-over Insert Action and then the Categories to reveal the actions, click the required action from the list.

To change the settings used by the action:

  • On the action’s title click the down arrow to activate a drop-down
  • Select Configure; OR
  • Double-click the action's icon.

For more information on the other options in the drop-down, please refer to the Getting started with the Nintex Workflow designer.

Note: There are no Options to configure within this workflow action.

1.60 Query BCS

* This topic applies to Nintex Workflow Enterprise Edition only

* This action requires Microsoft SharePoint Server

The Query BCS action will retrieve data from the Business Connectivity Service (BCS).

To use the workflow action:

  • Locate the action in Workflow Actions Toolbox (located on the left hand-side);
    • Click on the Category listings to reveal the actions; OR
    • Search for the action using a keyword.
  • Select the action, drag it onto the design canvas and drop it onto a design pearl.

Alternatively

  • Left-clicking the pearl, mouse-over Insert Action and then the Categories to reveal the actions, click the required action from the list.

To change the settings used by the action:

  • On the action’s title click the down arrow to activate a drop-down
  • Select Configure; OR
  • Double-click the action's icon.

For more information on the other options in the drop-down, please refer to the Getting started with the Nintex Workflow designer.

 Action Settings

Credentials

A valid username and password are required to access the BCS. This identity must have access to the external content type. If the external content type is configured to pass through credentials, the identity must also have access to the underlying data source.

Application name

The BCS application to query.

Instance name

The instance of the application to query.

Entity name

The name of the external content type to query.

Filters

the filter used to determine which instances of the selected entity to retrieve data from. Multiple filters can be added by clicking the Add filter link. Only entities matching all of the filters will be retrieved.

  • Filter name: The property of the entity to filter on.
  • Filter value: The value that the filter property must match for the entity to be retrieved.

Entity property to retrieve

The property of the entity to query. More than one entity property may be retrieved.

To specify entity property:

  1. Enter desired property in the Entity property to retrieve box.
  2. Click the Add button and the entity property will appear below the Entity property to retrieve box.
  3. Specify a workflow variable to store the values of the entity property to be retrieved.

Note: If a variable that is not a collection is selected, only the first result will be stored.

1.61 Query CRM

* This topic applies to Nintex Workflow Enterprise Edition only

This workflow action will retrieve data from Microsoft Dynamics CRM v4.0 and Microsoft Dynamics CRM 2011. The action mimics the Advanced Find functionality available in CRM.


To use the workflow action:

  • Locate the action in Workflow Actions Toolbox (located on the left hand-side);
    • Click on the Category listings to reveal the actions; OR
    • Search for the action using a keyword.
  • Select the action, drag it onto the design canvas and drop it onto a design pearl.

Alternatively

  • Left-clicking the pearl, mouse-over Insert Action and then the Categories to reveal the actions, click the required action from the list.

To change the settings used by the action:

  • On the action’s title click the down arrow to activate a drop-down
  • Select Configure; OR
  • Double-click the action's icon.

For more information on the other options in the drop-down, please refer to the Getting started with the Nintex Workflow designer.

Options for this action

Dynamics CRM Version

The endpoint version of the Microsoft Dynamics CRM server to connect to.

Server URL

The URL of the CRM server to connect to.

Organization name

The Organisation located within CRM.

Credentials

The credentials used to connect to the CRM server and organization.

Attributes To Return

The results returned can either be in XML or individual attributes can be specified and stored in a workflow variable.

Entity

The type of entity to be queried.

Return as

Filters

Where there is

Used to specify/narrow down the records returned for the Primary entity selected.

1.62 Query Excel Services

* This topic applies to Nintex Workflow Enterprise Edition only

* This action requires Microsoft SharePoint Server

This workflow action will retrieve data from a Microsoft Excel workbook via Excel Services.

To use the workflow action:

  • Locate the action in Workflow Actions Toolbox (located on the left hand-side);
    • Click on the Category listings to reveal the actions; OR
    • Search for the action using a keyword.
  • Select the action, drag it onto the design canvas and drop it onto a design pearl.

Alternatively

  • Left-clicking the pearl, mouse-over Insert Action and then the Categories to reveal the actions, click the required action from the list.

To change the settings used by the action:

  • On the action’s title click the down arrow to activate a drop-down
  • Select Configure; OR
  • Double-click the action's icon.

For more information on the other options in the drop-down, please refer to the Getting started with the Nintex Workflow designer.

 Options within this action

URL

URL to the excel services web service.
Providing this URL is optional. If the URL is left blank, this action will use the default excel services URL based on the URL of the site workflow is running on.  

Credentials

Username and password

Valid credentials to access the Excel Services web service. The credentials must have access to the workbook.

Workbook path

The location of the Excel workbook to query. The workbook must be in a configured Excel Service trusted location.

Sheet name

The name of the Excel sheet in the workbook that will be queried.

Update cell values

Specifies cells that should be set in the workbook before data is retrieved. Changes to these cell values are not committed to the workbook, they are only used to determine the values of the cells to retrieve information.

For example, if the cell to retrieve is the sum of E2 and E4, E2 and E4 can be set in this section and the result will be reflected in the cell to retrieve that data. Multiple cells can be updated by clicking the Add cell to update link.

  • Cell position the location of the cell to update. The cell location must be specified in the 'A1' format or be the defined name of a cell. Note that only single cells can be updated, you cannot specify a range with multiple cells.
  • Cell value the value to update the cell with.

Cells to retrieve

The range of cells to retrieve values from. A single cell must be specified in the 'A1' format. Cell ranges must be specified in the 'A1:B2' format. If a cell or cell range is named, the defined name can also be specified.

Store result in

The workflow variable to store the resulting value in.

If the selected variable can only contain a single value and a range is returned, only the first cell in the range will be used.

In a collection, values are stored left to right, top to bottom. For example, if the range to return is A1:B3, the values will be stored in this order: A1, A2, A3, B1, B2, B3.

Retrieve as formatted text

Specifies whether or not to keep the cell formatting, or only return the plain value. For example, if a cell is formatted to display numbers as currency, selecting this option will return a string with the currency symbol matching the display in Excel. If this option is not selected, only the numeric value of the cell is stored.

  • date values when an unformatted date value is stored into a collection, it will be stored as a numeric representation of the date (this is how Excel Services provides the data). The action cannot determine the difference between a number and a date represented as a number, so the value will be treated as a number when added to the collection. When returning a date result into a Date Time variable, the action will assume the value being retrieved is a date and store it as such.

1.63 Query LDAP

The Query LDAP action allows the workflow to query a LDAP compliant data source such as Microsoft Active Directory. This action is for advanced users.

To use the workflow action:

  • Locate the action in Workflow Actions Toolbox (located on the left hand-side);
    • Click on the Category listings to reveal the actions; OR
    • Search for the action using a keyword.
  • Select the action, drag it onto the design canvas and drop it onto a design pearl.

Alternatively

  • Left-clicking the pearl, mouse-over Insert Action and then the Categories to reveal the actions, click the required action from the list.

To change the settings used by the action:

  • On the action’s title click the down arrow to activate a drop-down
  • Select Configure; OR
  • Double-click the action's icon.

For more information on the other options in the drop-down, please refer to the Getting started with the Nintex Workflow designer.


Action Settings

LDAP Path

To configure the LDAP Path, refer to the LDAP Picker for more information.

Query

Select the LDAP query to run. The query can be added manually or use the Inserting reference fields to include runtime values in the query.

Property to retrieve

The property to retrieve for the item found. More than one property may be retrieved. To specify the property to retrieve:

  1. Enter the desired property in the Property to retrieve box.
  2. Click the Add button and the property will appear below the Property to retrieve.
  3.  Specify a workflow variable to store the value of the property to be retrieved.

Advanced Options 

Authentication type

Specify the method used to authenticate to the LDAP server.

Search scope

Determines how the query should behave. The default search scope is 'Sub tree'. Details of each scope are as follows:

  • Base: Limits the search to the base object, the result contains the maximum of one object.
  • One level: Searches the immediate child objects of the base object, excluding the base object.
  • Sub tree: Searches the whole sub tree, including the base object and all its child objects.

Perform paged query

Check to specify that paging should be enabled on the result set. Enabling this option may help if the query result set does not contain all expected results. Note: This option is not supported in all environments.

1.64 Query List

​The Query List action allows for list item data queries and stores the results in a workflow variable. The action performs a CAML site data query.

To use the workflow action:

  • Locate the action in Workflow Actions Toolbox (located on the left hand-side);
    • Click on the Category listings to reveal the actions; OR
    • Search for the action using a keyword.
  • Select the action, drag it onto the design canvas and drop it onto a design pearl.

Alternatively

To change the settings used by the action:

For more information on the other options in the drop-down, please refer to the Getting started with the Nintex Workflow designer.


Action Settings

Editor Mode

Choose whether to use the UI to build the query, or edit the CAML manually.

  • CAML editor use the CAML Editor mode to create more advanced cross list queries.  View the CAML at any time by switching to the CAML Editor mode.
  • Query builder can build queries for a single list in the same team site as the workflow.

Editor Mode: Query Builder

In Query builder mode, the following elements will build the query:

List

Select the list to query data from. Lists in the current team site are displayed.

Recursive

Check this option to query for items within folders and subfolders.

Filter

The criteria that nominated list items must match in order to be selected.

Sort

The order in which selected values should be returned. 

XML encode inserted tokens

This option ensures that the inserted tokens will be encoded and is able to support special characters. 

Output options

Include HTML formatting in rich text columns: This option determines how a value queried from a rich text field is returned. When this option is selected, the HTML mark-up from the field will be preserved. When this option is not selected, HTML mark-up is removed, leaving only the text.

Specify item limit: Specify the maximum number of items to be returned from the query.

Field

The field to retrieve the data from. More than one field can be selected.

  1. Select the required field to retrieve the data from and click Add.
  2. Specify a workflow variable to store the values from the field to be retrieved.

Note: If a variable that is not a collection is selected, only the first result will be stored.

Editor Mode: CAML Editor

When CAML editor is selected, the query can be run on either the current site or an alternate site to the one the workflow is running in.

To query an alternative site, select the Alternative site option and enter the Site URL to a SharePoint site. The site must exist in the same farm as the workflow, but can be in a different site collection or web application.

When the Alternative site is selected, the Query builder mode is disabled.


XML encode inserted tokens

This option ensures that the inserted tokens will be encoded and is able to support special characters.  

Output options

Include HTML formatting in rich text columns: This option determines how a value queried from a rich text field is returned. When this option is selected, the HTML mark-up from the field will be preserved. When this option is not selected, HTML mark-up is removed, leaving only the text. For more information about CAML queries and Site Data queries, see the SharePoint SDK.

Specify item limit: Specify a number of items to be returned from the query.

Field: The field to retrieve the data from. More than one field can be selected.

1. Select the required field to retrieve the data from and click Add.

2. Specify a workflow variable to store the values selected from the field query.

Note: If a variable that is not a collection is selected, only the first result will be stored.

1.65 Query User Profile

* This topic applies to Nintex Workflow Enterprise Edition only

* This action requires Microsoft SharePoint Server

The Query User Profile action will retrieve information about a user from their SharePoint user profile.

To use the workflow action:

  • Locate the action in Workflow Actions Toolbox (located on the left hand-side);
    • Click on the Category listings to reveal the actions; OR
    • Search for the action using a keyword.
  • Select the action, drag it onto the design canvas and drop it onto a design pearl.

Alternatively

  • Left-clicking the pearl, mouse-over Insert Action and then the Categories to reveal the actions, click the required action from the list.

To change the settings used by the action:

  • On the action’s title click the down arrow to activate a drop-down
  • Select Configure; OR
  • Double-click the action's icon.

For more information on the other options in the drop-down, please refer to the Getting started with the Nintex Workflow designer.

Action Settings

User

The login name of the user whose profile should be queried. Multiple users can be specified.

Properties to retrieve

A list of available profile properties that the action can read. More than one property may be retrieved.

To specify the property to retrieve:

  1. Select the desired property in the drop-down menu.
  2. Click the Add button and the property will appear below the Properties to retrieve box.
  3. Specify a workflow variable to store the value of the property to be retrieved.

Note: If a variable that is not a collection is selected, only the first result will be stored.  

Advanced

Credentials

An account with permissions to query the user profiles.

1.66 Query XML

The Query XML action allows the reading, transforming or querying of XML Data.

To use the workflow action:

  • Locate the action in Workflow Actions Toolbox (located on the left hand-side);
    • Click on the Category listings to reveal the actions; OR
    • Search for the action using a keyword.
  • Select the action, drag it onto the design canvas and drop it onto a design pearl.

Alternatively

To change the settings used by the action:

For more information on the other options in the drop-down, please refer to the Getting started with the Nintex Workflow designer.

Action Settings

XML Source

The XML source can be selected from these three options:

  • Current item: The item in the list or library to which this workflow is associated. This option is only available if this action is being applied to a library.
  • URL: A URL to the XML source to be processed. A username and password can be specified when accessing the URL. If no credentials are specified, the request will be made anonymously.
  • XML: Direct XML entered in the configuration dialog.

Process using

  • None: The resulting XML will not be processed. This allows the reading of the XML file or source without processing.
  • XPath: Allows querying of XML to retrieve data from a node or node set. Click on the XPath Builder button to use the XML browser to navigate the XML structure and select an element from the XML data. Note: If the XML source specified for the action is available and all tokens and references are replaced with actual run time values, then the XPath Builder will use the XML source to display the XML structure within the XML browser. Otherwise, sample XML data will need to be provided in order to select the node using the XML browser. Note: The expression must return a node set. If the XML includes an explicit default namespace, then 'defaultNS' must be used as the prefix when selecting nodes in that namespace.  
  • XSLT: Allows the transformation of XML.

Return results as

Return query results as text, inner XML or outer XML.

Store result in

Use the drop-down to specify where the resulting text should be stored. More than one output value may be entered. To specify additional output select Add output and fill in the required information.

1.67 Read Document

* This topic applies to Nintex Workflow Enterprise Edition only


* This action requires Microsoft SharePoint Server


This workflow action can be used to retrieve a value from a 'content control' within a Word document and store the value in a workflow variable.

PLEASE NOTE: The Word document must be in the docx format (either Word 2007, Word 2010 or Word 2013).  Files in the format ".doc" cannot save content controls - it converts them to static content.

To use the workflow action:

  • Locate the action in Workflow Actions Toolbox (located on the left hand-side);
    • Click on the Category listings to reveal the actions; OR
    • Search for the action using a keyword.
  • Select the action, drag it onto the design canvas and drop it onto a design pearl.

Alternatively

  • Left-clicking the pearl, mouse-over Insert Action and then the Categories to reveal the actions, click the required action from the list.

To change the settings used by the action:

  • On the action’s title click the down arrow to activate a drop-down
  • Select Configure; OR
  • Double-click the action's icon.

For more information on the other options in the drop-down, please refer to the Getting started with the Nintex Workflow designer.

Options within this action

Source

The document where the 'content control' is to be read from. Select either:

  • The Current item; OR
  • Source URL. In the Source URL field, the full URL including the filename and type will need to be provided. E.g. 'http://mycompany.com/sales/Shared%20Documents/WordDocument.docx'

Content control title

The title of the 'content control' within the document.
 
Note: Be aware of the following when specifying a content control title:
  • If there are 'content controls' with the same title within the document, the first content control title that matches the one specified will be used.

However if the selected workflow variable to store the content control values is type of Collection, all the values returned from all the content controls with the specified title will be saved.

  • If a 'content control' specified is of rich text type, it will not include formatting or pictures that are within the 'content control'.

Store in

Select the Workflow variable to store the value retrieved from the 'content control' within the document. Collection type workflow variables can be used to save multiple content control values of the same title.

1.68 Regular Expression

This workflow action allows a regular expression to be performed on a block of text. A regular expression is a pattern that can match various text strings. It can be used to either check if the text matches a regular expression pattern or replace parts of the text that match a regular expression with different text.

To use the workflow action:

  • Locate the action in Workflow Actions Toolbox (located on the left hand-side);
    • Click on the Category listings to reveal the actions; OR
    • Search for the action using a keyword.
  • Select the action, drag it onto the design canvas and drop it onto a design pearl.

Alternatively

  • Left-clicking the pearl, mouse-over Insert Action and then the Categories to reveal the actions, click the required action from the list.

To change the settings used by the action:

  • On the action’s title click the down arrow to activate a drop-down
  • Select Configure; OR
  • Double-click the action's icon.

For more information on the other options in the drop-down, please refer to the Getting started with the Nintex Workflow designer.

Options within the action

Pattern

The regular expression pattern to apply to the text. This action uses the Microsoft .NET regular expression syntax.

Ignore case

Use this option to specify that the pattern should be treated as case insensitive. When this option is selected, a pattern that matches 'T' will also match 't'.

Operation

  • Replace text replaces the text matching the pattern with the replacement text.
  • Check match outputs a yes/no value to indicate if the input text matches the pattern.
  • Split divides the input text into sections using the pattern as a delimiter. The output value is a collection containing each portion of the split text.
  • Extract searches the input text for sub strings that match the pattern. Each matching substring is stored in the collection output value.

Input text

The input text to which the regular expression will be applied.

Store result in

The workflow variable in which to store the output from the operation. The drop-down will list:

  • Yes/No variables in Check match mode.
  • Text variables in Replace text mode.
  • Collection variables in the Split and Extract modes.

1.69 Remove User From AD Group

* This topic applies to Nintex Workflow Enterprise Edition only

This workflow action will remove a User from an Active Directory security group.

To use the workflow action:

  • Locate the action in Workflow Actions Toolbox (located on the left hand-side);
    • Click on the Category listings to reveal the actions; OR
    • Search for the action using a keyword.
  • Select the action, drag it onto the design canvas and drop it onto a design pearl.

Alternatively

  • Left-clicking the pearl, mouse-over Insert Action and then the Categories to reveal the actions, click the required action from the list.

To change the settings used by the action:

  • On the action’s title click the down arrow to activate a drop-down
  • Select Configure; OR
  • Double-click the action's icon.

For more information on the other options in the drop-down, please refer to the Getting started with the Nintex Workflow designer.

Options within this action

Active Directory Details

LDAP Path

To configure the LDAP Path, refer to the LDAP Picker for more information.

Remove User from AD Group

User

The Active Directory username (sAMAccountName) of the user. E.g. jsmith.

Group

The name of an existing Group from which the user will be removed. E.g. Finance.

1.70 Request Approval

This action allows the request of one or more users to process an approval as part of the workflow.

For more details on the actual process please refer to Approving, Rejecting and Reviewing Items.

To use the workflow action:

  • Locate the action in Workflow Actions Toolbox (located on the left hand-side);
    • Click on the Category listings to reveal the actions; OR
    • Search for the action using a keyword.
  • Select the action, drag it onto the design canvas and drop it onto a design pearl.

Alternatively

To change the settings used by the action:

For more information on the other options in the drop-down, please refer to the Getting started with the Nintex Workflow designer.

Visible on the design canvas will be two branches that dictate the path followed by the workflow depending on the response from the task approvers, to the right is the approval branch and the left the rejected branch.


Options for this action

Ribbon Option: Action

Approvers

The Approvers list contains all users or groups that will be assigned the approval task during the running of the published workflow. 

Users can be: 
  • Entered directly using their username, email address or full name and will be resolved where possible against the SharePoint user list or Active Directory.
  • Search for users, click on the address book icon on the right.  
 
Please note that users not part of the Active Directory can be added as Approvers by specifying their email address.  However, the only way that they can respond to the Task is through LazyApproval as they will have no access to the SharePoint site.   
 

Select People and Groups  

To search for users, click on the address book icon on the right.

The configuration dialog allows the workflow designer to search for and/or add users to the Approvers list by one or more of the following methods:
  • Internal Search: Entering a partial display name, email or user account name and clicking on the magnifying glass will provide a list of matching users and groups from SharePoint as well as Active Directory
  • External email address: Enter an external email address manually. Where possible Nintex Workflow will resolve this to an actual user account.
  • Lookup: Provides the option of adding a dynamic reference as an approver. e.g. Workflow variable, list field.
Click the title bar to expand or collapse each option.


Create individual tasks for all group members  

In the case that a group is assigned the approval task and Create individual tasks for all group members checkbox is:

  • not selected, all users in that group will receive the task notification. The first respondent will represent the entire group.
  • selected, an individual task will be assigned to every group member.


Users can be entered directly by their username, email address or full name and will be resolved where possible against the SharePoint user list. Users and groups that do not resolve automatically with the system users will require LazyApproval to complete their assigned task.

Allow delegation

When this option is selected the assigned approver at runtime can delegate the task to another user. For more information, please refer to the Delegating Approval Tasks.

Allow Lazy Approval

If LazyApproval has been enabled on the server, the workflow can permit the approvers to use LazyApproval. Lazy Approval means that an approval or rejection can be registered when the approver replies to a notification email or an automated OCS / Lync conversation with an approved word or phrase. A system administrator can edit or add to the list of acceptable terms. For more information, please refer to the Managing LazyApproval settings.

Task description

Allows entry of dynamic text that will display on the task response form. This can be used to communicate additional information about the task to the responding user. Insert Reference see Inserting reference fields.   

Approval options

There are four options that will determine which approvals are required at runtime in case of multiple assigned users.

  • All must approve: Each user in the Approvers list must approve the item for it to qualify as approved. If one of the users denies or rejects the item, the item will be considered denied or rejected.
  • First response applies: The first response received will be used for the overall outcome. All other pending tasks will be set to 'not required'.
  • Only one approval is required: The task will be deemed as approved as soon as one approval response is accepted. All other approval requests will subsequently no longer be required.
  • Vote: The number of approvals from users required for the document to be considered approved can be set using the "Vote" option. A text field will appear and a whole number equal to or less than the total number of approvers set in the Approvers section can be entered. 

Task name

Allows the title of the task to be defined. This is the title that appears in a SharePoint task list. If left blank, the action title will be used by default.  

Task content type 

Allows a task content type other than the default to be used. This option will only display if an alternative content type is available on the site. Alternative content types are primarily used to enable custom task response forms.  

Priority 

Specifies the value that should be assigned to the priority flag for the task. 

Due Date

Set a date for the task to be completed by. Note: When tasks appear in Nintex Mobile Apps, the tasks list will be sorted by this due date.

Form type 

Choose which form type is presented to Approvers.

Store action ID in

Allows a unique identifier for the action to be stored in an Action ID workflow variable. This identifier can be used to link the action to Delegate Task and Task reminder actions. Please note that the Action ID does not correspond to the ID of the SharePoint task item that is created.

Store task IDs in

When the workflow runs, the ID given to each task that is created will be stored into an Integer, List Item ID or Collection workflow variable.

Item Permissions

Set user permissions to: Sets the user permission on the item.

When task is complete, set user permissions to: Sets the user permission on the item after the task has been completed.

Note: Setting the item permissions could be useful when the task is delegated, this will give the delegated user the necessary permissions to view the item.  

Advanced Options: Complete tasks for all assignees when an outcome has been achieved​

When an outcome is achieved, sets the % Complete value for "Not Required" tasks to 100%. ​

Ribbon Option: Task Notification

Sent when the task is assigned to a user, also used when the task is delegated by one user to another.
 

Edit settings for

Changing this setting from the default All Approvers allows the setting of separate notification options for each Approver in the list. In such a case please check the settings for each user.

Changes to All Approvers will not affect users who are given custom settings.


Allow delegation

When this option is selected the assigned approver at runtime can delegate the task to another user. For more information, please refer to the Delegating Approval Tasks.

Allow LazyApproval

If LazyApproval has been enabled on the server, the workflow can permit the approvers to use About LazyApproval. Lazy Approval means that an approval or rejection can be registered when the approver replies to a notification email or an automated OCS or Lync conversation with an approved word or phrase. A system administrator can edit or add to the list of acceptable terms. For more information, please refer to the Managing LazyApproval settings.

Delivery type

Delivery type is the method of delivering the notification to the recipients.

Available delivery options; None, Email, User preference or Instant Message (if enabled on the server). For information on User preference, please refer to the Configuring user preferences.

Please note: Nintex does not provide support for troubleshooting email, SMS / OCS systems.

If Allow LazyApproval is checked and Delivery type selected is IM. The option Send a conversation request to confirm if the user is available to respond will be available. Checking this option will ask the assignee if they are available to respond, if the assignee responds with "No", the Delivery type will be switched to Email and the assignee will receive a notification email instead.

If at anytime the assignee does not respond within 5 minutes to the automated OCS / Lync conversation, the conversation will end and a notification email to complete the tasks will be sent instead.

CC

The CC field sets read only users who will receive the notification.  CC recipients are not able to respond to the tasks.

To set the CC field click on to open the Select People and Groups configuration dialog. 
 

BCC

The BCC field sets read only users who will receive the email. BCC recipitants are not able to respond to the tasks. Other users addressed in the email via the To, CC and BCC fields will not be able to see any addresses in the BCC field. To set the BCC field, enter the account name, or alternatively, select the address book icon for additional options.

From

The From field sets the user or domain group that will appear as the sender of the message. This setting applies to emails only. If no From user or domain group is specified, the From address configured in Global Settings will be used.

Importance

The priority of the notification. This is only applicable when using email notifications.

Subject

The Subject is the title of the notification being sent. If an Instant Message is being sent it will be pre-pended to the body of the notification.

Added manually or by clicking on , to use Insert reference fields from within the runtime instance of the workflow. 

Attachments

Allows file attachments to be added to the notification. You can specify multiple URLs by separating each URL with a semicolon. You can also specify multiple URLs by referencing a collection variable.

Files will not be received by a user when SMS or IM is selected as the delivery method.  For information on User preference, please refer to the Configuring user preferences

Format 

This sets the format of the email.
Selecting:
  • Rich Text enables italicize, bold, underline and indent information within the email using simple HTML styles provided by the SharePoint rich text tool bar.
  • Plain Text is simply the text without any stylized formatting.

Notification body 

The body of the notification will adapt depending on whether the Rich Text or Plain Text format is selected. Within the space provided enter the content for the notification as straight text, also available are Insert reference fields from within the workflow. 

Ribbon Option: Not Required Notification

Sent when the user no longer needs to respond to the task. This can occur when:
  • A task is assigned to multiple users but only one is required to respond.
  • The workflow is terminated prior to the task being processed.
  • An error occurs in the workflow at runtime.

 The notifications inherit default messages which can be edited by an Administrator. For more information, please refer to the Defining message templates.


 See above Ribbon Option: Task Notification above for field descriptions.

Custom approval forms

A custom task form can be used to respond to an approval task. Please download the Nintex Workflow SDK from http://www.nintex.com for more information.


1.71 Request Data

This workflow action assigns a task to a specified user. To complete the task, the user must provide a value for each data item specified in the action configuration. The workflow will wait for the task to be completed before continuing the execution. Once the task is completed, the data that the user entered is available within the workflow.

To use the workflow action:

  • Locate the action in Workflow Actions Toolbox (located on the left hand-side);
    • Click on the Category listings to reveal the actions; OR
    • Search for the action using a keyword.
  • Select the action, drag it onto the design canvas and drop it onto a design pearl.

Alternatively

To change the settings used by the action:

For more information on the other options in the drop-down, please refer to the Getting started with the Nintex Workflow designer.


Options within the action

Ribbon Option: Action

Collect data from

The user or group to retrieve data from. This task can only be assigned to a single user or group. If it is assigned to a group, the first group member to respond will act on behalf of the entire group.  

Note: Although the People Picker field will allow multiple users to be added, the first person added will be the only person notified and the only person who can approve the task. If a group is added, all will receive the notification, but only one person will be able to respond. This is because the workflow action will only create a single task, and only one user will be able to respond to the task. Also, once one person responds to the task, the task will be completed and the other user will not be able to provide input.

Select People and Groups

To search for users, click on the address book icon on the right.
 

The configuration dialog allows the workflow designer to search for and/or add users to the Assignees list by one or more of the following methods:

  • Internal Search: Entering a partial display name, email or user account name and clicking on the magnifying glass will provide a list of matching users and groups from SharePoint as well as Active Directory.
  • External email address: Enter an external email address manually. Where possible Nintex Workflow will resolve this to an actual user account.
  • Lookup: Provides the option of adding a dynamic reference as an approver. e.g. Workflow variable, list field.

Click the title bar to expand or collapse each option. 

Content type

When the action runs, it creates a task for the user to complete. Each data item is created as a field in a task content type, and this content type is used when creating a task.

An existing content type can be used, or a new content type constructed. The list of existing content types will show all content types that inherit from the 'Workflow Task' content type. The new content type will also inherit from this parent. See the SharePoint documentation for more information on content types.

If an existing content type is chosen, the option will appear to make changes to the content type. This can include removing, adding or modifying existing fields. This option should be used with caution, as changes may affect other workflows or applications that use the content type.

A content type is only created or modified when the workflow is published, not when it is saved. If you define a new content type, then save the workflow, your changes will be lost when you next edit the workflow.

Field list

In this panel the data items to request from the user are defined. Each represents a field in the selected Content Type.

Each field has the option to store the value in a workflow variable. This will enable the value to be used directly in the workflow without it having to be looked up manually with a Set Variable action.

Further options for each field can be set from the SharePoint Content Type settings page.

The content type is only updated when the workflow is published.

Publish task edit form

When the workflow is published, it will generate a form for the task. This form is associated with the task content type and will overwrite an existing form if it exists. This option allows the designer to specify whether to publish the form or not when the content type already exists. If other applications use the form, or the form has been customised, the designer may not want to republish it so the changes are not lost.

Only show fields with variables assigned

When this option is selected, only data fields that have a variable selected for 'Store Result In' will have a visible input field on the published form. If this option is not selected, all the data items displayed in the field list will have input fields on the form.

The generated form is a standard list item edit page and can be customized in SharePoint Designer. The form is stored in the Workflows/NintexWorkflows/workflowname folder and will be named the same as the content type.

Note that the form is only published when the workflow is published.

Display link to workflow item on the task form

When this option is selected, the published task form will have a field called 'Link' containing a hyperlink back to the item that the workflow is running on. This is used to provide context about the workflow item for the user responding to the task.

Display the item properties panel on the task form

When this option is selected, the default SharePoint task form will display a panel with the field names and values of the item that the workflow is running on. This option does not affect the task form published by Nintex.

Allow attachments

When this option is selected, the published task form will display a link to add attachments to the task item. The task respondent will then have the opportunity to optionally attach one or more files to the form.

Store attachment URLs in

This option allows the selection of a collection workflow variable in which to store the URL of each attachment that the task respondent added to the task. This option is only available if Allow attachments is enabled, or if Publish task form is disabled.

Task description

On the default task edit page, this text will appear at the top of the page before the input controls. It is stored in the task's description field.

Allow delegation

When this option is selected, the user whom the task was assigned to will have the option to reassign it to another user.

Enable responses by email using LazyApproval

When this option is selected, the user can complete the task by replying to the notification email. The email will contain a basic form, providing a location for the user to enter each requested value. By default, the form is appended to the message body. To control the location of the form, use the following token in the Input Required message:

{LAZY_APPROVAL_DATA_FORM}

Note: the email form only shows fields that have variables assigned.

For more information see the About LazyApproval help topic.

Task name

The title that will be assigned to the task.

Priority 

Specifies the value that should be assigned to the priority flag for the task. 

Due Date

Set a date for the task to be completed by. Note: When tasks appear in Nintex Mobile Apps, the tasks list will be sorted by this due date.

Store action ID in

Action IDs are used to link a task action to other actions in the workflow that are task related, such as the Task Reminder. Select an Action ID workflow variable to link this task to another action.

Store task ID in

This will store the SharePoint list item ID of the created task into an integer workflow variable. This value can then be used to reference the task list item directly in workflow lookups.

Item Permissions

Set user permissions to: Sets the user permission on the item.

When task is complete, set user permissions to: Sets the user permission on the item after the task has been completed.

Note: Setting the item permissions could be useful when the task is delegated, this will give the delegated user the necessary permissions to view the item.

Form type

Select the Default form or an InfoPath form.

Ribbon Option: Task Notification

Sent when the task is assigned to a user, also used when the task is delegated by one user to another.
 

Delivery type

Delivery type is the method of delivering the notification to the recipients.

Available delivery options; None, Email, User preference or Instant Message (if enabled on the server). For information on User preference, please refer to the Configuring user preferences.

CC

The CC field sets read only users who will receive the notification.  CC recipients are not able to respond to the tasks.

To set the CC field click on to open the Select People and Groups configuration dialog.

BCC


The BCC field sets read only users who will receive the email. BCC recipitants are not able to respond to the tasks. Other users addressed in the email via the To, CC and BCC fields will not be able to see any addresses in the BCC field. To set the BCC field, enter the account name, or alternatively, select the address book icon for additional options.


From

The From field sets the user or domain group that will appear as the sender of the message. This setting applies to emails only. If no From user or domain group is specified, the From address configured in Global Settings will be used. 

Importance

The priority of the notification. This is only applicable when using email notifications.

Subject

The Subject is the title of the notification being sent. Manually enter the text or click the button to use Insert reference fields to build the string dynamically at run time.

Attachments

Allows file attachments to be added to the notification. You can specify multiple URLs by separating each URL with a semicolon. You can also specify multiple URLs by referencing a collection variable.

Files will not be received by a user when SMS or IM is selected as the delivery method.  For information on User preference, please refer to the Configuring user preferences.

Format

This sets the format of the email.

Selecting:

  • Rich Text enables italicize, bold, underline and indent information within the email using simple HTML styles provided by the SharePoint rich text tool bar.
  • Plain Text is simply the text without any stylized formatting.

Notification body

The body of the notification will adapt depending on whether the Rich Text or Plain Text format is selected. Within the space provided enter the content for the notification as straight text and Inserting reference fields from with the workflow.

Ribbon Option: Not Required Notification

Sent when the user no longer needs to respond to the task. This can occur when:

  • A task is assigned to multiple users but only one is required to respond.
  • The workflow is terminated prior to the task being processed.
  • An error occurs in the workflow at runtime.


See Ribbon Option: Task Notification above for field descriptions.

Ribbon Option: Reminders

Optional notification Reminders can be configured to be sent to each assignee who has not yet completed the task.


Number of reminders

The number of reminders to be sent.

Time between reminders

The delay before sending each reminder in days, hours and minutes.

The total time is calculated by summing all fields, regardless of the Time calculation option selected. For example, 4 days and 4 minutes will be calculated as 96 (24x4) hours and 4 minutes.

Time calculation

Specifies whether or not hours outside the work week should be included when counting down to send a reminder.  

During business days only 

The During business days only option will specify that weekends or holidays are not included in the countdown, but after hours on a business day are. 
 
Example:
    • The task is assigned Friday morning and is configured to wait 1 day before sending a reminder (the work week is defined as Monday to Friday).
    • A reminder will be sent Monday morning: weekends are not included in the countdown.


During business hours only

The During business hours only option specifies that only business hours are used in the count down.
 
Example:
  • The task is assigned Wednesday at 4pm and is configured to wait 4 hours before sending a reminder (the work day is defined as Monday to Friday, 8am to 5pm).
  • A reminder will be sent at 11am on Thursday: after-business hours are not included in the countdown.  

Neither option

If neither option is selected, all hours will be included in the count down.  
Examples:  
  • The task is assigned Friday morning and is configured to wait 1 day before sending a reminder.
  • A reminder will be sent Saturday morning: weekends are included in the countdown.
  • The task is assigned Wednesday at 4pm and is configured to wait 4 hours before sending a reminder.
  • A reminder will be sent at 8pm on Wednesday: after-business hours are included in the countdown.
 
Public holidays and any other special occasions are set using the "Site Settings > Nintex Workflow > Manage Holidays" page.
  
See Ribbon Option: Task Notification above for additional field descriptions.  

Ribbon Option: Escalation

Escalation is optional, there are two possible escalation paths:
  • Delegate task will re-assign all pending tasks to the nominated user after the specified time.
  • Complete task will automatically complete the task.

Escalation occurs after all reminders have been sent and the specified "Time to escalation" has elapsed. 


 See Ribbon Option: Reminders above for additional field descriptions. 

1.72 Request Review

​This action is used to assign a task and send a notification to one or more users to review an item as part of the workflow. For more details on the review process please refer to Approving, Rejecting and Reviewing Items.  

To use the workflow action:

  • Locate the action in Workflow Actions Toolbox (located on the left hand-side);
    • Click on the Category listings to reveal the actions; OR
    • Search for the action using a keyword.
  • Select the action, drag it onto the design canvas and drop it onto a design pearl.

Alternatively

To change the settings used by the action:

For more information on the other options in the drop-down, please refer to the Getting started with the Nintex Workflow designer.


Options for this action


Ribbon Option: Action

Reviewers

The Reviewers list contains all users or groups that will be assigned the review task during the running of the published workflow.

Users can be entered directly by their username, email address or full name, and will be resolved where possible against the SharePoint user list.

In the case that a group is assigned the review task and Expand Groups is not selected, all users in that group will receive the task but the first response will represent the whole group. If Expand Groups is selected, an individual task will be assigned to every group member. Note that groups will only be expanded at one level. Groups within groups will not be expanded.

In order to search for the reviewers click on the address book icon to the right of the reviewers input box. The Select People and Groups dialog will appear.

Select People and Groups


The Select People and Groups dialog allows the workflow designer to search for and/or add users to the Reviewers list by one or more of the following methods: 

  • Internal Search: Entering a partial display name, email or user account name and clicking on the magnifying glass will provide a list of matching users and groups from SharePoint as well as Active Directory.
  • External email address: Enter an external email address manually. Where possible Nintex Workflow will resolve this to an actual user account.
  • Lookup: Select a property reference to add to the list. These are broken up into common types such as the initiator of the workflow and their manager, as well as properties from the current SharePoint list. The item properties that are included are any column that is of a "Person or Group" type or contains the word "Email" in the name. 


Create individual tasks for all group members

In the case when a group is assigned the task and Create individual tasks for all group members checkbox is: 

  • not selected, all users in that group will receive the task notification. The first respondent will represent the entire group.
  • selected, an individual task will be assigned to every member of the group.  


Groups will only be expanded to one level. Groups within groups will not be expanded.

 Users can be entered directly using their username, email address or full name and will be resolved where possible against the SharePoint user list or Active Directory. 

Allow delegation 

When this option is selected the assignee at runtime can delegate the task to another user. For more information, please refer to the Delegating Approval Tasks

Allow LazyApproval

If LazyApproval has been enabled, the workflow can permit the assignees to use LazyApproval. Lazy Approval means that a task response can be registered when the assignee replies to a notification email or an automated OCS / Lync conversation. In a Request Review action, the users response will be used for the task comments.  Changing the allow LazyApproval option on the 'Action' ribbon option is the same as changing the 'Allow LazyApproval' option for all assignees on the 'Task Notification' ribbon option. See the 'Task Notification' ribbon option section below for more information.

Task description 

Allows entry of dynamic text that will display on the task response form. This can be used to communicate additional information about the task to the responding user. The description can be built up dynamically be using the Insert Reference function. For more information see Inserting reference fields.  

Review options

There are two options that will determine which reviewers are required at runtime in case of multiple assigned users.

  • All must review: Each user in the Reviewers list must review the item. The workflow will not proceed until a response has been received from each reviewer or reviewer's delegate.
  • First response applies: The first response is registered and enables the workflow to continue. All other review requests will subsequently no longer be required and a no longer required notification will be sent to remaining reviewers if configured. 

Task name 

Allows the title of the task to be defined. This is the title that appears in a SharePoint task list. If left blank, the action title will be used by default.

Task content type

Allows a task content type other than the default to be used. This option will only display if an alternative content type is available on the site. Alternative content types are primarily used to enable custom task response forms.

Priority

Specifies the value that should be assigned to the priority flag for the task.

Due Date

Set a date for the task to be completed by. Note: When tasks appear in Nintex Mobile Apps, the tasks list will be sorted by this due date.

Form type

Choose which form type is presented to Reviewers. Choices are Default, InfoPath, or Custom. 

Store Action ID in

Allows a unique identifier for the action to be stored in an Action ID workflow variable. This identifier can be used to link the action to Delegate Task and Task reminder actions. Please note that the Action ID does not correspond to the ID of the SharePoint task item that is created. 

Store task IDs in

When the workflow runs, the ID given to each task that is created will be stored into an Integer, List Item ID or Collection workflow variable.

Item Permissions

Set user permissions to: Sets the user permission on the item.

When task is complete, set user permissions to: Sets the user permission on the item after the task has been completed.

Note: Setting the item permissions could be useful when the task is delegated, this will give the delegated user the necessary permissions to view the item.

Advanced Options: Complete tasks for all assignees when an outcome has been achieved

When an outcome is achieved, sets the % Complete value for "Not Required" tasks to 100%. ​

Ribbon Option: Task Notification

Use the Task Notification area to configure the notification that is sent when the task is assigned to a user. The notification is also used when the task is delegated by one user to another.
 

Edit settings for 

Changing this setting from the default All Reviewers, allows the configuration of unique notification options for each Reviewer in the list.

Unless specifically configured, assignees will use the All Assignees settings. To override settings for a specific Reviewer, select their name from the drop down list.

Changes to All Reviewer will not affect users who are given custom settings.


Allow delegation

When this option is selected the assignee at runtime can delegate the task to another user. For more information, please refer to the Delegating Approval Tasks.

Allow Lazy Approval

If LazyApproval has been enabled, the workflow can permit the assignees to use LazyApproval. Lazy Approval means that a task response can be registered when the assignee replies to a notification email or an automated OCS / Lync conversation. In a Request Review action, the users response will be used for the task comments.

Delivery type

Delivery type is the method of delivering the notification to the recipients.

 Available delivery options; None, Email, User preference or Instant Message (if enabled on the server). For information on User preference, please refer to Configuring user preferences.

If Allow LazyApproval is checked and Delivery type selected is IM. The option Send a conversation request to confirm if the user is available to respond will be available. Checking this option will ask the assignee if they are available to respond, if the assignee responds with "No", the Delivery type will be switched to Email and the assignee will receive a notification email instead.

If at anytime the assignee does not respond within 5 minutes to the automated OCS or Lync conversation, the conversation will end and a notification email to complete the tasks will be sent instead.

CC

The CC field sets read only users who will receive the notification.  CC recipients are not able to respond to the tasks.

To set the CC field click on to open the Select People and Groups configuration dialog


BCC

The BCC field sets read only users who will receive the email. BCC recipitants are not able to respond to the tasks. Other users addressed in the email via the To, CC and BCC fields will not be able to see any addresses in the BCC field. To set the BCC field, enter the account name, or alternatively, select the address book icon for additional options.


From

The From field sets the user or domain group that will appear as the sender of the message. This setting applies to emails only. If no From user or domain group is specified, the From address configured in Global Settings will be used. 

Importance

The priority of the notification. This is only applicable when using email notifications.

Subject

The Subject is the title of the notification being sent. If an Instant Message is being sent it will be pre-pended to the body of the notification.

The Subject line can be typed manually or built up dynamically at runtime using the Insert reference fields button .

Attachments

Allows file attachments to be added to the notification. You can specify multiple URLs by separating each URL with a semicolon. You can also specify multiple URLs by referencing a collection variable.

Files will not be received by a user when SMS or IM is selected as the delivery method.  For information on User preference, please refer to Configuring user preferences.

Format

This sets the format of the email.

Selecting: 

  • Rich Text enables italics, bold, underline and indenting within the email using simple HTML styles provided by the SharePoint rich text tool bar.
  • Plain Text is simply the text without any stylized formatting.

Notification body

The body of the notification will adapt depending on whether the Rich Text or Plain Text format is selected. Within the space provided enter the content for the notification as straight text, also available are Insert reference fields from within the workflow. 

Ribbon Option: Not Required Notification

Use the Not Required Notification area to configure the notification that is sent when the user no longer needs to respond to the task. This can occur when:

  • A task is assigned to multiple users but only one is required to respond.
  • The workflow is terminated prior to the task being processed.
  • An error occurs in the workflow at runtime.
 
See above Ribbon Option: Task Notification above for field descriptions.
 

Custom review forms

A custom task form can be used to respond to an approval task. Please download the Nintex Workflow SDK from http://www.nintex.com for more information.


1.73 Retrieve data

This workflow action can be used to retrieve data which has been stored using the Store data workflow action. Using both the Store data and Retrieve data workflow actions, it is possible to pass data between workflow instances.

To use the workflow action:

  • Locate the action in Workflow Actions Toolbox (located on the left hand-side);
    • Click on the Category listings to reveal the actions; OR
    • Search for the action using a keyword.
  • Select the action, drag it onto the design canvas and drop it onto a design pearl.

Alternatively

  • Left-clicking the pearl, mouse-over Insert Action and then the Categories to reveal the actions, click the required action from the list.

To change the settings used by the action:

  • On the action’s title click the down arrow to activate a drop-down
  • Select Configure; OR
  • Double-click the action's icon.

For more information on the other options in the drop-down, please refer to the Getting started with the Nintex Workflow designer.

Options within this action

Workflow instance to retrieve from

The instance ID of the workflow to retrieve data from. Select either:

  • Current Workflow: This will retrieve the information from the current workflow.
  • A workflow variable: Use this to specify a specific workflow instance ID that is set in a workflow variable.

Note: Using the Start Workflow workflow action within the current workflow, a new workflow can be started. The instance ID of the new workflow can then be stored in a workflow variable which then can be selected. This can be used by a parent workflow to start a child workflow and return a value to the parent workflow.

Item to retrieve

The same value that was specified in the 'Store as' field in the Store data workflow action of the workflow instance to retrieve from.

E.g. If the 'Store as' value specified in the Store data workflow action is 'KeyValue', the Item to retrieve value must be 'KeyValue'.

Retrieve to

Select the workflow variable that the data will be stored in.

1.74 Run If

This workflow action sets a condition to dictate the logic that is processed at runtime. E.g. the workflow actions contained within the Run If action will only execute if the condition evaluates to true.

Note: Any actions within the Run if action will run in the same context that the Run if action is configured to.  


This action is similar to the Set a condition action.

To use the workflow action:

  • Locate the action in Workflow Actions Toolbox (located on the left hand-side);
    • Click on the Category listings to reveal the actions; OR
    • Search for the action using a keyword.
  • Select the action, drag it onto the design canvas and drop it onto a design pearl.

Alternatively

To change the settings used by the action:

For more information on the other options in the drop-down, please refer to the Getting started with the Nintex Workflow designer.


Action Settings 

Condition


There are twelve types of conditions that can be used here. These are:


  • If current item field equals value

This condition type evaluates if an individual field of the current item matches or compares to a certain value/column.

This condition allows the use of two fields, two workflow variables or two lookups to compare at runtime.

This condition allows a comparison to be performed that determines if the item's title contains certain specific words.

This condition evaluates to true if the current item is modified between two specified dates.

This condition evaluates to true if the item has been modified by a specific person. The username is case sensitive.

Once the name has been entered click Check name button to validate user.

This condition checks if the specified user is a member of the SharePoint site.

This condition checks if the item was created between the specified dates.

If manually entering information, ensure that the date format matches that used in the SharePoint environment.

This condition checks if an item was created by a specific user.

Once the name has been entered click the Check name button to validate user.

This condition checks if the file type extension of the current item is of the specified type.

This condition checks if the file size of a document is between the specified sizes, in kilobytes.

 
The following two conditions are available when running the workflow action as the workflow owner (impersonation): 

This condition checks if the permissions of a specified user matches or is higher than the specified permission level provided for an item in a list. It does not check that the users have specific permission levels. A user can be a single user, multiple users or a group. For the condition to evaluate as true, the user/s must have at least the permissions that the permission levels provide.

This condition checks if permission levels of a specified user matches or is higher than the permission levels for an item within this list. A user can be a single user or multiple users but cannot be a group for this condition.  For the condition to evaluate as true, the users must have the permission levels specified in the condition.

There are many operators that can be used within this condition, e.g. equals, not equals to, greater than, less than, is empty, contains etc. Enter data manually into the text box or use lookups to dynamically build the values at run time.  

Add Conditions

Multiple conditions can be constructed by using the Add condition option.

Specify And or Or between the condition statements.

Conditions are evaluated in order, from first to last condition (top to bottom). For example, the first two conditions are evaluated, and then that result is evaluated against the next condition. This pattern continues until a final result is reached. ​

Related Topics


1.75 Run parallel actions

This workflow action runs at least two workflow actions simultaneously.


To use the workflow action:

  • Locate the action in Workflow Actions Toolbox (located on the left hand-side);
    • Click on the Category listings to reveal the actions; OR
    • Search for the action using a keyword.
  • Select the action, drag it onto the design canvas and drop it onto a design pearl.

Alternatively

  • Left-clicking the pearl, mouse-over Insert Action and then the Categories to reveal the actions, click the required action from the list.

To change the settings used by the action:

  • On the action’s title click the down arrow to activate a drop-down
  • Select Configure; OR
  • Double-click the action's icon.

For more information on the other options in the drop-down, please refer to the Getting started with the Nintex Workflow designer.


There is no configuration required for this workflow action. However, it is important to note that the workflow will not continue until all workflow paths have been completed. To run more than two actions at a time, left-click on the action title and select 'Add Branch'. If a branch is left empty the workflow will continue to run.

1.76 Search Query

* This topic applies to Nintex Workflow Enterprise Edition only

* This action requires Microsoft SharePoint Server

This workflow action will retrieve property values by performing a SharePoint search query.

To use the workflow action:

  • Locate the action in Workflow Actions Toolbox (located on the left hand-side);
    • Click on the Category listings to reveal the actions; OR
    • Search for the action using a keyword.
  • Select the action, drag it onto the design canvas and drop it onto a design pearl.

Alternatively

  • Left-clicking the pearl, mouse-over Insert Action and then the Categories to reveal the actions, click the required action from the list.

To change the settings used by the action:

  • On the action’s title click the down arrow to activate a drop-down
  • Select Configure; OR
  • Double-click the action's icon.

For more information on the other options in the drop-down, please refer to the Getting started with the Nintex Workflow designer.


Options within this action

Search scope

The search scope to use for the query.

Search for

Searches for SharePoint content that has properties matching the criteria. Individual words should be separated by a space character.

Result type

Specify a file type filter for the search. A pre-defined file type can be selected, or a custom filter entered into the text input box. To retrieve all file types, select 'all results' or clear the text input box.

Property restrictions

Allows further narrowing of the search results by only returning items where the property restriction rules are true.

Properties to return

Determines which property data will be retrieved from the search result. Multiple properties can be selected.

Results as XML

This option specifies whether to return the result set in an XML string. Returning the results as XML allows further processing and styling to be applied with the Query XML workflow action. A text workflow variable must be chosen to store the result if Return as XML is selected.

Store result in

Specifies the workflow variable to store the search results in. If the workflow variable can only hold a single value, only the first property of the first search result will be returned. If a collection variable is selected, each property of each search result is stored.

1.77 Send / Receive Biztalk

* This topic applies to Nintex Workflow Enterprise Edition only.

This workflow action is used to enable interaction with BizTalk Server 2006. The action can send messages into a BizTalk orchestration and/or wait for a message from BizTalk. The action allows a workflow to interact with any external system with which BizTalk interoperates.

For more information on setting up Nintex Workflow to interoperate with a BizTalk orchestration, please download the Nintex Workflow SDK from http://www.nintex.com.

To use the workflow action:

  • Locate the action in Workflow Actions Toolbox (located on the left hand-side);
    • Click on the Category listings to reveal the actions; OR
    • Search for the action using a keyword.
  • Select the action, drag it onto the design canvas and drop it onto a design pearl.

Alternatively

To change the settings used by the action:

For more information on the other options in the drop-down, please refer to the Getting started with the Nintex Workflow designer.

Options within the action

Action

Specifies whether the workflow is only sending a message to BizTalk, waiting for a message to arrive from BizTalk or both.

Message ID

A unique identifier that is used by Nintex Workflow when the BizTalk message handler receives a message. Nintex Workflow uses this value to determine for which workflow a message is intended.

The following settings define the web service location where the BizTalk orchestration is published. These items are only required when the action is sending a message into BizTalk. These details are defined when running the BizTalk Web Services Publishing Wizard tool.

URL

The URL of the published BizTalk web service.

Method

The web method of the web service to invoke.

Namespace

The namespace of the web service.

Credentials

Username and password, if required, to access the web service.

The following settings define the data that is sent to BizTalk, and the data that is expected in messages from BizTalk.

XML Namespace

The XML Namespace for the messages that are generated. This will be reflected in the schema.

Send Workflow file (Document and Form Libraries only)

This option allows the current workflow item to be sent to BizTalk, instead of defining individual data from the workflow. If this option is used, the schema must be provided by the user.

Data to send

Allows selection of the data that must make up the message to send to BizTalk. Each data item will be presented as an element in the resulting message.

Data to receive

Allows selection of the data that is expected in a message from BizTalk. Only workflow variables can be selected. After the message has been received, the workflow variables will hold the values that they were mapped to in BizTalk.

Export to XSD

Nintex Workflow generates the schema file for both the 'data to send' and 'data to receive' messages. These schema files can be imported into BizTalk to define messages. Each definition contains a header section containing information used by Nintex Workflow for routing the message and a content section containing the data items specified.

1.78 Send document set to repository

* This action requires Microsoft SharePoint Server

This workflow action can be used to specify by what method and to which repository or records center a document set is sent.

To be able to define rules and send documents, the Content Organizer site feature has to be enabled in the SharePoint site.

To use the workflow action:

  • Locate the action in Workflow Actions Toolbox (located on the left hand-side);
    • Click on the Category listings to reveal the actions; OR
    • Search for the action using a keyword.
  • Select the action, drag it onto the design canvas and drop it onto a design pearl.

Alternatively

To change the settings used by the action:

For more information on the other options in the drop-down, please refer to the Getting started with the Nintex Workflow designer.


 Options in this action


Action

Select how the document set will be sent. Select one of the following values:

  • Copy: Select this option to create a copy of the document set and send the copy to the destination repository.
  • Move: Select this option to copy the document set to the destination repository then delete the document set from its original location.  Users will no longer be able to access the document set from its original location.
  • Move and Leave a Link: Select this option to copy the document set to the destination repository, delete the document set from its original location and leave a link at the current location, indicating that the document set was moved. When a user clicks this link, a page will appear that displays the URL of the document set and the document set’s metadata.

Destination Router

Enter the URL to the Content Organizer for the destination site.  The URL can be found in the Submission Points section of the 'Content Organizer: Settings' page of the destination repository, for example: 'http://mycompany.com/_vti_bin/OfficialFile.asmx'.

Comments

The information to be added to the audit log when the document set is sent to the repository.

Store submit results in

This refers to the 'submit result' provided by SharePoint on the status of the submission, for example: 'Success'. Select a workflow variable in which to store the results.


1.79 Send document to repository

This workflow action can be used to specify by what method and to which repository or records center a document is sent.

To be able to set rules and send documents, the 'Content Organizer' SharePoint site feature has to be enabled in the SharePoint site.

To use the workflow action:

  • Locate the action in Workflow Actions Toolbox (located on the left hand-side);
    • Click on the Category listings to reveal the actions; OR
    • Search for the action using a keyword.
  • Select the action, drag it onto the design canvas and drop it onto a design pearl.

Alternatively

To change the settings used by the action:

For more information on the other options in the drop-down, please refer to the Getting started with the Nintex Workflow designer.

Options in this action

Action

Select how the document will be sent. Select one of the following values:

  • Copy: Select this option to create a copy of the document and send the copy to the destination repository.
  • Move: Select this option to copy the document to the destination repository and delete the document from its original location. Users will no longer be able to access the document from its original location.
  • Move and Leave a Link: Select this option to copy the document to the destination repository, delete the document from its original location but leave a link at the original location, indicating that the document was moved. When a user clicks this link, a page will appear that displays the URL of the document and the document’s metadata.

Destination Router

Enter the URL to the Content Organizer for the destination site. The URL can be found in the Submission Points section of the 'Content Organizer: Settings' page of the destination repository. For example: 'http://mycompany.com/_vti_bin/OfficialFile.asmx'.

Comments

The information to be added to the audit log when the document is sent to the repository.

Store submit result in

This refers to the 'submit result' provided by SharePoint on the status of the submission, for example 'Success'. Select a workflow variable in which to store the 'submit result'.

1.80 Send notification

This workflow action will send customizable workflow notifications to users via Email, SMS or Instant Message via Microsoft Office Communication Server or Live Communications Server.

For more information on Office Communication Server, please refer to the Microsoft Office Communication Server website.

To use the workflow action:

  • Locate the action in Workflow Actions Toolbox (located on the left hand-side);
    • Click on the Category listings to reveal the actions; OR
    • Search for the action using a keyword.
  • Select the action, drag it onto the design canvas and drop it onto a design pearl.

Alternatively

  • Left-clicking the pearl, mouse-over Insert Action and then the Categories to reveal the actions, click the required action from the list.

To change the settings used by the action:

  • On the action’s title click the down arrow to activate a drop-down
  • Select Configure; OR
  • Double-click the action's icon.

For more information on the other options in the drop-down, please refer to the Getting started with the Nintex Workflow designer.

Options for this action

To

Sets the primary users who will receive the customized notification.

To set the primary users click on  to open the Select People and Groups configuration dialog.

Send individual notifications

  • When selected, each specified user will receive a separate notification that is only addressed to them in the To field.
  • When it is not selected, only one notification will be sent, with all users in the To field. This option only applies to email notifications.

CC

The CC field sets read only users who will receive the notification.  CC recipients are not able to respond to the tasks.
To set the CC field click on to open the Select People and Groups configuration dialog.
 

BCC

The BCC field sets read only users who will receive the email. BCC recipients are not able to respond to the tasks. Other users addressed in the email via the To, CC and BCC fields will not be able to see any addresses in the BCC field. To set the BCC field, enter the account name, or alternatively, select the address book icon for additional options.

From

The From field sets the user or domain group that will appear as the sender of the message. This setting applies to emails only. If no From user or domain group is specified, the From address configured in Global Settings will be used. To set the from user click on to open the Select People and Groups configuration dialog.

Importance

The priority of the notification. This is only applicable when using email notifications.

Subject

The Subject is the title of the notification being sent. Added manually or by clicking on , to use Insert reference fields from within the runtime instance of the workflow. The Subject field can be set within the list or library where the workflow is being used

If an email is sent it will appear as the header or title of the email.

If an Instant Message is being sent it will be pre-appended to the body of the notification.

Attachments

Allows file attachments to be added to the notification. You can specify multiple URLs by separating each URL with a semicolon. You can also specify multiple URLs by referencing a collection variable.

Please note: Files will not be received by a user when SMS or IM is selected as the delivery method.

Format 

This sets the format of the email.

Selecting:

  • Rich Text enables italicize, bold, underline and indent information within the email using simple HTML styles provided by the SharePoint rich text tool bar.

  • Plain Text is simply the text without any stylized formatting.

Notification body

The body of the notification will adapt depending on whether the Rich Text or Plain Text format is selected. Within the space provided enter the content for the notification as straight text, also available are Insert reference fields from within the workflow. 

Include message header and footer

Specifies whether or not the configured message header and footer template should be used in this email notification. This option is only available when enabled by an administrator.

Delivery type

Delivery type is the method of delivering the notification to the selected users. Available delivery options; Email, User preference or Instant Message (if enable on the server). For information on User preference, please refer to the Configuring user preferences.


1.81 Set a condition

This workflow action processes logic within the workflow that will run when a certain condition evaluates to true or false.

To use the workflow action:

  • Locate the action in Workflow Actions Toolbox (located on the left hand-side);
    • Click on the Category listings to reveal the actions; OR
    • Search for the action using a keyword.
  • Select the action, drag it onto the design canvas and drop it onto a design pearl.

Alternatively

  • Left-clicking the pearl, mouse-over Insert Action and then the Categories to reveal the actions, click the required action from the list.

To change the settings used by the action:

  • On the action’s title click the down arrow to activate a drop-down
  • Select Configure; OR
  • Double-click the action's icon.

For more information on the other options in the drop-down, please refer to the Getting started with the Nintex Workflow designer.

When the action is added to the design canvas there are 2 branches. To the right is the Yes branch which is the path followed if the condition evaluates to true, to the left is the No branch followed if the condition is false.


 Action Settings


Condition

There are twelve types of conditions that can be used here. These are:

  • If current item field equals value

This condition type evaluates if an individual field of the current item matches or compares to a certain value/column.

Please note: When configuring the workflow action, the Where section is case sensitive.  

  • If any value equals value

This condition allows the use of two fields, two workflow variables or two lookups to compare at runtime.

Please note: When configuring the workflow action, the Where section is case sensitive.

  • Title field contains keywords

This condition allows a comparison to be performed that determines if the item's title contains certain specific words.

  • Modified in a specific date span 

This condition evaluates to true if the current item is modified between two specified dates.

  • Modified by a specific person

This condition evaluates to true if the item has been modified by a specific person. The username is case sensitive.

Once the name has been entered click Check name button to validate user.

  • Person is a valid SharePoint user

This condition checks if the specified user is a member of the SharePoint site.  

  • Created in a specific date span

This condition checks if the item was created between the specified dates.

If manually entering information, ensure that the date format matches that used in the SharePoint environment.

  • Created by a specific person

This condition checks if an item was created by a specific user.

Once the name has been entered click the Check name button to validate user.

  • The file type is a specific type

This condition checks if the file type extension of the current item is of the specified type.

  • The file size is in a specific range kilobytes

This condition checks if the file size of a document is between the specified sizes, in kilobytes.


The following two conditions are available when running the workflow action as the workflow owner (impersonation):

  • Check list item permissions

This condition checks if the permissions of a specified user matches or is higher than the specified permission level provided for an item in a list. It does not check that the users have specific permission levels. A user can be a single user, multiple users or a group. For the condition to evaluate as true, the user/s must have at least the permissions that the permission levels provide.
  • Check list item permission levels

This condition checks if permission levels of a specified user matches or is higher than the permission levels for an item within this list. A user can be a single user or multiple users but cannot be a group for this condition.  For the condition to evaluate as true, the users must have the permission levels specified in the condition.

There are many operators that can be used within this condition, e.g. equals, not equals to, greater than, less than, is empty, contains etc.

Enter data manually into the text box or use lookups to dynamically build the values at run time.  

Add Condition

Multiple conditions can be constructed by using the Add condition option.

Specify And or Or between the condition statements.

Conditions are evaluated in order, from first to last condition (top to bottom). For example, the first two conditions are evaluated, and then that result is evaluated against the next condition. This pattern continues until a final result is reached. 

Related Topics

Run If

1.82 Set a variable

This workflow action will set the value of a Workflow variable and works in conjunction with Using lookups.

Note: at least one workflow variable needs to be created for this action to be relevant.

To use the workflow action:

  • Locate the action in Workflow Actions Toolbox (located on the left hand-side);
    • Click on the Category listings to reveal the actions; OR
    • Search for the action using a keyword.
  • Select the action, drag it onto the design canvas and drop it onto a design pearl.

Alternatively

  • Left-clicking the pearl, mouse-over Insert Action and then the Categories to reveal the actions, click the required action from the list.

To change the settings used by the action:

  • On the action’s title click the down arrow to activate a drop-down
  • Select Configure; OR
  • Double-click the action's icon.

For more information on the other options in the drop-down, please refer to the Getting started with the Nintex Workflow designer.

Options for this action  

Set

Select the workflow variable to set from the drop-down menu. Either specify a value or use the lookups feature to set the value of the field selected.
 
Note: Depending on the type (text, integer, number, date, etc.) of the workflow variable selected the options available that can be set on the workflow variable will change to suite the type.


1.83 Set approval status

This workflow action is used by the workflow to update the built-in SharePoint approval status of the current item.

To use the workflow action:

  • Locate the action in Workflow Actions Toolbox (located on the left hand-side);
    • Click on the Category listings to reveal the actions; OR
    • Search for the action using a keyword.
  • Select the action, drag it onto the design canvas and drop it onto a design pearl.

Alternatively

  • Left-clicking the pearl, mouse-over Insert Action and then the Categories to reveal the actions, click the required action from the list.

To change the settings used by the action:

  • On the action’s title click the down arrow to activate a drop-down
  • Select Configure; OR
  • Double-click the action's icon.

For more information on the other options in the drop-down, please refer to the Getting started with the Nintex Workflow designer.


Options in this action

Set the status to

This mandatory field determines the status attributed to the item. Select a value from the drop-down menu.

Comments

The comments entered here will be associated with the update to the status of the item. Enter comments manually, or build up the string dynamically at run time using the Insert Reference.

List Settings

In order for this workflow action to work properly, the library or list to which the workflow is associated to must have Content Approval activated. To activate Content Approval:

  • In the library or list, select 'Library Settings' (or 'List Settings').
  • In the 'General Settings' section, click on the 'Versioning settings'.
  • In the Content Approval section, select Yes.
  • When all settings have been configured, click the OK button.

Troubleshooting

Action not executing

The work load for this action is added to a job queue. The workflow executes jobs in the queue as a batch when it reaches a "commit" point. For more information, see the Nintex article "Designing your Workflow - Commit Pending Changes Action NW2010 & NW2013."  

1.84 Set document set approval status

* This action requires Microsoft SharePoint Server

This workflow action is used by the workflow to update the built-in SharePoint approval status of the document set.

To use the workflow action:

  • Locate the action in Workflow Actions Toolbox (located on the left hand-side);
    • Click on the Category listings to reveal the actions; OR
    • Search for the action using a keyword.
  • Select the action, drag it onto the design canvas and drop it onto a design pearl.

Alternatively

  • Left-clicking the pearl, mouse-over Insert Action and then the Categories to reveal the actions, click the required action from the list.

To change the settings used by the action:

  • On the action’s title click the down arrow to activate a drop-down
  • Select Configure; OR
  • Double-click the action's icon.

For more information on the other options in the drop-down, please refer to the Getting started with the Nintex Workflow designer.


Options in this action

Approval status

This mandatory field determines the status attributed to the document set. Select a value from the drop-down menu.

Comments

The comments entered here will be associated with the update to the status of the document set. To insert values to be evaluated at runtime, use the lookups feature.

List Settings

In order for this workflow action to work properly, the library or list to which the workflow is associated must have Content Approval activated. To activate Content Approval:

  • In the library, select 'Library Settings'.
  • In the 'General Settings' section, click on the 'Versioning settings'.
  • In the 'Content Approval' section, select Yes.
  • When all settings have been configured, click the OK button.


1.85 Set field value

This workflow action updates one of the fields of the current item within the workflow.

To use the workflow action:

  • Locate the action in Workflow Actions Toolbox (located on the left hand-side);
    • Click on the Category listings to reveal the actions; OR
    • Search for the action using a keyword.
  • Select the action, drag it onto the design canvas and drop it onto a design pearl.

Alternatively

  • Left-clicking the pearl, mouse-over Insert Action and then the Categories to reveal the actions, click the required action from the list.

To change the settings used by the action:

  • On the action’s title click the down arrow to activate a drop-down
  • Select Configure; OR
  • Double-click the action's icon.

For more information on the other options in the drop-down, please refer to the Getting started with the Nintex Workflow designer.

Options for this action

Set

Select the field that the workflow action will set from the drop-down menu. Either specify a value or use the lookups feature to set the value of the field selected.

Troubleshooting

Action not executing

The work load for this action is added to a job queue. The workflow executes jobs in the queue as a batch when it reaches a "commit" point. For more information, see the Nintex article "Designing your Workflow - Commit Pending Changes Action NW2010 & NW2013."  

1.86 Set item permissions

This workflow action allows the permissions to be changed for an item on which the workflow is running.

To use the workflow action:

  • Locate the action in Workflow Actions Toolbox (located on the left hand-side);
    • Click on the Category listings to reveal the actions; OR
    • Search for the action using a keyword.
  • Select the action, drag it onto the design canvas and drop it onto a design pearl.

Alternatively

  • Left-clicking the pearl, mouse-over Insert Action and then the Categories to reveal the actions, click the required action from the list.

To change the settings used by the action:

  • On the action’s title click the down arrow to activate a drop-down
  • Select Configure; OR
  • Double-click the action's icon.

For more information on the other options in the drop-down, please refer to the Getting started with the Nintex Workflow designer.


Options within the action

Set permission on

Select either the Current item that the workflow is running on, or one of the available lists or libraries.

If selecting a library list or library location, the Where selector will appear.

Inherit permissions from parent

This drop-down is used to break the link to the parent permission set (the permissions used in the library or list that contains the item in workflow). Once the option No is selected, specific permissions for specific users can be set.

Remove Existing Permissions

When this option is selected, removes existing permissions before adding new permissions that are defined in the action. Existing permissions are those defined for the item before the action is run. 

Let’s say that the current permissions inherit from the parent, which is set to Design for all users in the Members group. You configure the action to add Contribute to all users in the Owners group. 

  • If you select Remove Existing Permissions, then the inherited permission is removed before adding the configured permissions. After the action is run, the item is accessible only by users in the Owners group, with the permission level of Contribute. (Users in the Members group no longer have any permission level for the item.)
  • If you clear (do not select) Remove Existing Permissions, then the inherited permission is retained and the configured permissions are added. After the action is run, the item is accessible by both Members and Owners: users in the Members group have the permission level of Design while users in the Owners group have the permission level of Contribute.

User(s)

Select a user or group to assign access permissions for the item.

Permission

The level of permission that can be assigned to a user or group for the item. Unless Remove existing permissions is selected, the permission will be added to the user's existing rights. Choose the Remove option in the drop down list to remove all permissions from a user or group. Permissions are processed in the order that they are configured, therefore permissions can be cleared from a user in the first panel, then a new permission level can be set for the same user in the second panel.

Add user permission 

Click this link to add more users or groups to apply permissions to.

Note: if the Initiating user of the workflow does not have read permissions, the workflow may error. This is because the workflow is running as the user and requires the ability to read the list item.

Troubleshooting

Action not executing

The work load for this action is added to a job queue. The workflow executes jobs in the queue as a batch when it reaches a "commit" point. For more information, see the Nintex article "Designing your Workflow - Commit Pending Changes Action NW2010 & NW2013."  
​​

1.87 Set workflow status

This workflow action updates the status of the workflow instance as shown on the Workflows page. For list workflows, status is also shown in the workflow status column within the list. 

You can use this action to track workflow status during the progress of the workflow instance, assigning either standard or custom workflow status values. Standard workflow status values include "In Progress," "Canceled," "Completed," and "Errored."​

To use the workflow action:

  • Locate the action in Workflow Actions Toolbox (located on the left hand-side);
    • Click on the Category listings to reveal the actions; OR
    • Search for the action using a keyword.
  • Select the action, drag it onto the design canvas and drop it onto a design pearl.

Alternatively

  • Left-clicking the pearl, mouse-over Insert Action and then the Categories to reveal the actions, click the required action from the list.

To change the settings used by the action:

  • On the action’s title click the down arrow to activate a drop-down
  • Select Configure; OR
  • Double-click the action's icon.

For more information on the other options in the drop-down, please refer to the Getting started with the Nintex Workflow designer.


Options in this action

Status text

Either enter a new status value (Add new status) or select a status value previously used in the current workflow. The specified status value is applied to the workflow instance when the action executes. 

​You can specify a custom value, such as "Workflow Started," or a standard workflow status value from SharePoint, such as "In Progress," "Canceled," "Completed," or "Errored." For example, you might add two instances of this action to a workflow: one at the beginning, with the status value "Workflow Started," and another at the end, with the status value "Completed."

1.88 Start workflow

This workflow action will initiate a site workflow or a different workflow in the current list or library.  When designing a site workflow, you can only nominate another site workflow in the same site to use.

To use the workflow action:

  • Locate the action in Workflow Actions Toolbox (located on the left hand-side);
    • Click on the Category listings to reveal the actions; OR
    • Search for the action using a keyword.
  • Select the action, drag it onto the design canvas and drop it onto a design pearl.

Alternatively

  • Left-clicking the pearl, mouse-over Insert Action and then the Categories to reveal the actions, click the required action from the list.

To change the settings used by the action:

  • On the action’s title click the down arrow to activate a drop-down
  • Select Configure; OR
  • Double-click the action's icon.

For more information on the other options in the drop-down, please refer to the Getting started with the Nintex Workflow designer.

Options within the action

Workflow to Start

From the drop-down that is presented, choose the title of a workflow to start. In lists or libraries, only published site workflows in the same site or published workflows in the list or library in which the current workflow is operating will be available.  When designing a site workflow, only other published site workflows will be available.

If the workflow was created with Nintex Workflow and has start data specified, a form will be displayed to provide values. For a workflow that is provided out of the box, or installed as a Feature, a panel will be provided to edit the association xml.

Set the Start mode with one of the following:

  • Start immediately: Specifies that the target workflow will start when this executes.
    • Wait for the workflow to complete before continuing: When this option is checked, the current workflow will only run when the specified workflow has completed.
    • Do not start this workflow if it is already running: When this option is checked, the current workflow will not run the specified workflow if it is in progress.
    • Store Instance ID in: Select a workflow variable in which to store the workflow instance ID. The value in the workflow variable can then be used elsewhere in the workflow.
  • Schedule: Creates a new workflow schedule for the target workflow. The target workflow will then execute based on the schedule. For more information on workflow schedules see the Scheduling a workflow help page.

Schedule Editor mode

When using the Schedule start mode, select one of the following schedule editor modes:

  • Schedule Builder: Set the schedule settings for the workflow.
  • Schedule XML: This is the format in which the schedule is stored and can be edited directly.

Note: When a date is typed in, it must be in the ISO8601 format.

Sharing data between workflows

The Store data and Retrieve data workflow actions can be used to transfer values between workflow instances. A workflow that is started by the Start workflow action can store a value with the Store data action, and the parent workflow can later retrieve that value with the Retrieve data action and the value stored from the Store Instance ID in option.

Troubleshooting

Action not executing

The work load for this action is added to a job queue. The workflow executes jobs in the queue as a batch when it reaches a "commit" point. For more information, see the Nintex article "Designing your Workflow - Commit Pending Changes Action NW2010 & NW2013." 

1.89 State Machine

This workflow action provides a construct to define a number of states that the workflow can be in. Each state contains actions that will execute when the workflow is in that state. The workflow moves between states until it is instructed to end the state machine.

To use the workflow action:

  • Locate the action in Workflow Actions Toolbox (located on the left hand-side);
    • Click on the Category listings to reveal the actions; OR
    • Search for the action using a keyword.
  • Select the action, drag it onto the design canvas and drop it onto a design pearl.

Alternatively

  • Left-clicking the pearl, mouse-over Insert Action and then the Categories to reveal the actions, click the required action from the list.

To change the settings used by the action:

  • On the action’s title click the down arrow to activate a drop-down
  • Select Configure; OR
  • Double-click the action's icon.

For more information on the other options in the drop-down, please refer to the Getting started with the Nintex Workflow designer.

Note: The State machine workflow action cannot be copied.


Action Settings

Select a state from the drop-down to determine which will be used first when the workflow is run.

States

The State Machine supports the configuration of a number of states. States can be added, deleted and renamed. Deleting a state will delete all actions currently added to it.

The state machine construct uses Change State actions to set which state to run next. The actions in a state are repeated until a Change State action is encountered and all actions in the state have completed executing. Workflow execution does not move to the next state instantly when the Change State action is run. The workflow moves to the next state once all actions in the current state have completed executing.

The states can be made to run in any order and conditions in one state can cause another state to be re-run. The workflow continues executing actions in the state machine until it encounters a Change State action set to "End State Machine." The workflow then exits the state machine and continues with any actions defined below the state machine.

Note: To end a state machine, use the Change State action set to "End State Machine." Errors result from attempting to end state machines using End Workflow or other actions. ​

The following example image shows a state machine containing three states for each group's approval during an advertisement review cycle: Graphics Team for artwork review, Marketing Department for both content and artwork review, and CEO Approval for review of the entire advertisement. The workflow uses the Change State action to determine the next state. If the Marketing department rejects the artwork, the artwork returns to the Graphics department. If the CEO rejects the advertisement then it returns to the Marketing department.


Nintex Workflow state machine construct is very different from a Visual Studio created State Machine. Nintex workflows' are Windows Workflow Foundation sequential workflows. Nintex made the ‘state machine’ by wrapping up loops, parallel branches, if statements and variables to control it. It’s not a real state machine, but rather a construct to provide the ability to jump around between steps and mimic some of the scenarios that a state machine might be used for.

.NET 3.0 workflows come in 2 varieties.  Sequential (like a flow chart) and state machines.  With SharePoint declarative workflows (like the ones Nintex Workflow designs), these can only be sequential.  To achieve the effect of a state machine in a sequential workflow, under the covers there is some clever logic made up of a while loop, parallel actions and various conditions. 

With each iteration of the loop, a common workflow variable, used to store the current state, is evaluated to see if it should exit.  Otherwise, it begins down each branch of the parallel action.  At the top of each branch (state) is a condition to determine if the workflow should process actions in this branch. (if state = current state)  The change state action sets the value of the current state workflow variable.  Upon the next iteration of the loop, this determines which branch (state) to execute.

Each 'state' may have complex logic within it to determine the next.  Using the 'wait for item update' action, or 'request approval', will ensure the state machine wait on user input before deciding which state to process next.

For 'states' that transitioned based on mutually exclusive inputs, it may be better off having several workflows that run when the item is modified.  At the start of each workflow, use the filter action to check if the input conditions are met.  If it is not, the workflow will end.  In this scenario, each workflow essentially becomes a state.

For information on safeguarding performance by preventing excessive looping iterations, see Preventing excessive looping iterations.

1.90 Store data

This workflow action can be used to store data which can then be retrieved using the Retrieve data workflow action. Using both the Store data and Retrieve data workflow actions, it provides the ability to pass workflow variables (values) between workflow instances (running workflows).

To use the workflow action:

  • Locate the action in Workflow Actions Toolbox (located on the left hand-side);
    • Click on the Category listings to reveal the actions; OR
    • Search for the action using a keyword.
  • Select the action, drag it onto the design canvas and drop it onto a design pearl.

Alternatively

  • Left-clicking the pearl, mouse-over Insert Action and then the Categories to reveal the actions, click the required action from the list.

To change the settings used by the action:

  • On the action’s title click the down arrow to activate a drop-down
  • Select Configure; OR
  • Double-click the action's icon.

For more information on the other options in the drop-down, please refer to the Getting started with the Nintex Workflow designer.

Options within this action

Workflow instance to store to

The instance ID of the workflow to store data to. Select either:

  • Current Workflow: This will store the information to the current workflow.
  • A workflow variable: Use this to specify a specific workflow instance ID that is set in a workflow variable.

Note: By selecting a workflow instance ID, the Store data workflow action can store data to the workflow instance. Using the Retrieve data workflow action, the 'Workflow instance to retrieve from' can be set to 'Current workflow' and the 'Item to retrieve value' written to a workflow variable. 

Store as

This is the user defined value that the data will be stored as.

E.g. If the 'Store as' value specified is 'KeyValue', the Item to retrieve value in the Retrieve data workflow action must be 'KeyValue'.

Variable to store

Select the workflow variable containing the data to be stored.

1.91 Submit Record

* This topic applies to Nintex Workflow Enterprise Edition only

* This workflow action applies to Microsoft SharePoint Server only

This workflow action will submit the item that the workflow is running on to the SharePoint Records Center that has been configured in the environment.

Note: This action is only available in workflows being created on document libraries.

To use the workflow action:

  • Locate the action in Workflow Actions Toolbox (located on the left hand-side);
    • Click on the Category listings to reveal the actions; OR
    • Search for the action using a keyword.
  • Select the action, drag it onto the design canvas and drop it onto a design pearl.

Alternatively

  • Left-clicking the pearl, mouse-over Insert Action and then the Categories to reveal the actions, click the required action from the list.

To change the settings used by the action:

  • On the action’s title click the down arrow to activate a drop-down
  • Select Configure; OR
  • Double-click the action's icon.

For more information on the other options in the drop-down, please refer to the Getting started with the Nintex Workflow designer.

Options within this action

Record series

The 'Record series' can be used to overwrite the default Record Center behaviour by specifying which routing record this item should follow. If Record series is left empty, the default routing record for the item content type will be used.

Record status

When a record is submitted, a status message is returned to describe the result of the submission process. The Record status can be used to select a workflow variable to store the outcome status message.

1.92 Switch

This workflow action directs the flow of actions based on the value of a single variable. A branch for each possible defined value is used to determine which branch of workflow actions will run.

To use the workflow action:

  • Locate the action in Workflow Actions Toolbox (located on the left hand-side);
    • Click on the Category listings to reveal the actions; OR
    • Search for the action using a keyword.
  • Select the action, drag it onto the design canvas and drop it onto a design pearl.

Alternatively

  • Left-clicking the pearl, mouse-over Insert Action and then the Categories to reveal the actions, click the required action from the list.

To change the settings used by the action:

  • On the action’s title click the down arrow to activate a drop-down
  • Select Configure; OR
  • Double-click the action's icon.

For more information on the other options in the drop-down, please refer to the Getting started with the Nintex Workflow designer.

Each time this action runs, either a single child branch or no child branch will execute - the workflow will continue to follow the main path of the workflow if none of the variables return matching values, bypassing the Switch construct completely.

Options within the action

Select the value to evaluate

This is the value that the action will evaluate to determine which child branch to run. Either an item property or a workflow variable that is a number or text value can be chosen.

Enter the possible values

This section lists the allowed values for the variable. A child branch will be rendered in the workflow designer for each specified value. Each specified value must be compatible with the data type of the selected variable. Only one value is allowed for any single branch.

Click Add switch value to add a new value. Click the button to remove a value. Removing a value will remove any workflow actions configured to run when the variable is equal to the value specified.

Include an "other" value branch

Choose this option to add an additional child branch that will run if the variable value does not match any of the listed possible values. Using this option provides an alternative set of actions to the main workflow instead of the Switch construct simply being bypassed.

1.93 Task reminder

This workflow action will send notifications to the approvers or reviewers of an outstanding task. This allows for reminder scenarios as seen below.

In this example, an approval task is assigned to a set of users and after a configured delay, if any approvers are still required to respond, they will receive a notification. The approval task will repeat waiting and sending messages 3 times. If the original approval task allows LazyApproval, the reminder notification will include the LazyApproval token in the subject to allow the workflow replies send to it.

To use the workflow action:

  • Locate the action in Workflow Actions Toolbox (located on the left hand-side);
    • Click on the Category listings to reveal the actions; OR
    • Search for the action using a keyword.
  • Select the action, drag it onto the design canvas and drop it onto a design pearl.

Alternatively

  • Left-clicking the pearl, mouse-over Insert Action and then the Categories to reveal the actions, click the required action from the list.

To change the settings used by the action:

  • On the action’s title click the down arrow to activate a drop-down
  • Select Configure; OR
  • Double-click the action's icon.

For more information on the other options in the drop-down, please refer to the Getting started with the Nintex Workflow designer.


Options within the action

Action ID

Specify this workflow variable to nominate which request approval/review/data action to send reminders regarding.

When configuring a Request Approval, Request Review or Request Data action, nominate a workflow variable of type Action ID to store the assigned workflow action ID. 

Number of reminders

The action will repeat the delay and notifications this number of times.

Time to reminder

The delay the action will wait inbetween sending each reminder.

 
The action will start with a delay, so no external delay action is required. The total time is calculated by summing all fields, regardless of the Time Calculation option selected. For example, 4 days and 4 minutes will be calculated as 96 (24x4) hours and 4 minutes.

Time calculation

Specifies whether or not hours outside the work week should be included when counting down to send a reminder. 

During business days only

The During business days only option will specify that weekends or holidays are not included in the count down, but after hours on a business day are. 
 
Example:
  • A reminder starts counting down Friday morning and is configured to wait 1 day (the work week is defined as Monday to Friday).
  • A reminder will be sent Monday morning, weekends are not included in the count down. 

During business hours only

The During business hours only option specifies that only business hours are used in the count down.
 
Example:
  • A reminder starts counting down Wednesday at 4pm and is configured to wait 4 hours (the work day is defined as Monday to Friday, 8am to 5pm).
  • A reminder will be sent at 11am on Thursday, after business hours are not included in the count down.  

Neither option

If neither option is selected, all hours will be included in the count down.  
Examples:  
  • A reminder starts counting down Friday morning and is configured to wait 1 day.
    • A reminder will be sent Saturday morning, weekends are included in the count down.
  • A reminder starts counting down Wednesday at 4pm and is configured to wait 4 hours.
    • A reminder will be sent at 8pm on Wednesday, after business hours are included in the count down. 
Public holidays and any other special occasions are set using the "Site Settings > Nintex Workflow > Manage Holidays" page.

CC

The CC field sets read only users who will receive the notification.  CC recipients are not able to respond to the tasks.

To set the CC field click on to open the Select People and Groups configuration dialog. 

BCC

The BCC field sets read only users who will receive the email. BCC recipients are not able to respond to the tasks. Other users addressed in the email via the To, CC and BCC fields will not be able to see any addresses in the BCC field. To set the BCC field, enter the account name, or alternatively, select the address book icon for additional options.

From

The From field sets the user or domain group that will appear as the sender of the message.

This setting applies to emails only. If no From user or domain group is specified, the From address configured in Global Settings will be used.

Subject

The subject field of the notification.

Attach file

Allows file attachments to be added to the notification. 

Files will not be received by a user when SMS or IM is selected as the delivery method.    

Format

This sets the format of the email.

Selecting:

  • Rich Text enables italicize, bold, underline and indent information within the email using simple HTML styles provided by the SharePoint rich text tool bar.
  • Plain Text is simply the text without any stylized formatting.

Notification body

The body of the notification will adapt depending on whether the Rich Text or Plain Text format is selected. Within the space provided enter the content for the notification as straight text and Inserting reference fields from with the workflow. 

Delivery type

Delivery type is the method of delivering the notification to the recipients.

Available delivery options; Email, User preference or Instant Message (if enable on the server). For information on User preference, please refer to the Configuring user preferences.

Please note: Nintex does not provide support for troubleshooting email, SMS or LCS systems.

1.94 Terminate workflow

This workflow action can be used to terminate any running or errored workflow on the current item.

To use the workflow action:

  • Locate the action in Workflow Actions Toolbox (located on the left hand-side);
    • Click on the Category listings to reveal the actions; OR
    • Search for the action using a keyword.
  • Select the action, drag it onto the design canvas and drop it onto a design pearl.

Alternatively

  • Left-clicking the pearl, mouse-over Insert Action and then the Categories to reveal the actions, click the required action from the list.

To change the settings used by the action:

  • On the action’s title click the down arrow to activate a drop-down
  • Select Configure; OR
  • Double-click the action's icon.

For more information on the other options in the drop-down, please refer to the Getting started with the Nintex Workflow designer.

Options within this action

Stop workflow

Select a workflow from the drop-down box. Either select a specific workflow that has been associated with the parent list or All except current workflow which will terminate all other workflows except the current.

Note: Only workflow instances on the current item will be terminated.

Troubleshooting

Action not executing

The work load for this action is added to a job queue. The workflow executes jobs in the queue as a batch when it reaches a "commit" point. For more information, see the Nintex article "Designing your Workflow - Commit Pending Changes Action NW2010 & NW2013." 

1.95 Undeclare as record

* This action requires Microsoft SharePoint Server

This workflow action can be used to undeclare the current item as a record within the workflow.

To use the workflow action:

  • Locate the action in Workflow Actions Toolbox (located on the left hand-side);
    • Click on the Category listings to reveal the actions; OR
    • Search for the action using a keyword.
  • Select the action, drag it onto the design canvas and drop it onto a design pearl.

Alternatively

  • Left-clicking the pearl, mouse-over Insert Action and then the Categories to reveal the actions, click the required action from the list.

To change the settings used by the action:

  • On the action’s title click the down arrow to activate a drop-down
  • Select Configure; OR
  • Double-click the action's icon.

For more information on the other options in the drop-down, please refer to the Getting started with the Nintex Workflow designer.

Note: There are no Options to configure within this workflow action.

1.96 Update AD User

* This topic applies to Nintex Workflow Enterprise Edition only

This workflow action will update the properties of an Active Directory user account.

To use the workflow action:

  • Locate the action in Workflow Actions Toolbox (located on the left hand-side);
    • Click on the Category listings to reveal the actions; OR
    • Search for the action using a keyword.
  • Select the action, drag it onto the design canvas and drop it onto a design pearl.

Alternatively

To change the settings used by the action:

For more information on the other options in the drop-down, please refer to the Getting started with the Nintex Workflow designer.

Options within this action

Where the account is located

LDAP Path

To configure the LDAP Path, refer to the LDAP Picker for more information.

Account to update

sAMAccountName

The username (sAMAccountName) of the Active Directory entry.

AD Fields to update

Fields

Select fields from the drop down list. At least 1 field must be updated.

If a field to update is not available, select Other, and type the field name, then click the Add button.

Note: The Add button will appear when Other is selected.

The property name entered must be a valid Active Directory schema property. Some properties cannot be set within this workflow action. E.g. 'memberOf' must be updated via the 'Add User to AD Group' and 'Remove User from AD Group' workflow actions.

AD Fields to take note of:

  • Country: If selected, this option correctly sets the 3 Active Directory properties; c, co and countryCode.
  • Password: If selected, this option allows the resetting of a password. Use this drop down option to set password information correctly. The Password option provides the following additional settings:
    • Generate password: If checked, a random password will be automatically generated by the action. If unchecked, specify the password for the account in the New password textbox.
    • Store generated password: The automatically generated password can be stored in a text type workflow variable. This can then be used in other actions.
  • Manager: If selected, this value must be the sAMAccountName of an existing Active Directory account.
  • Directory Location: Use this property to move the AD object from one location to another. Use the LDAP Picker to select a valid location, or enter an LDAP path, in the format LDAP://OU=someOU,DC=company,DC=country. E.g. LDAP://OU=archived users,DC=nintex,DC=com

Note: The credentials entered in the Username and Password fields at the top of the page will be used to connect to the new AD location.

  • Rename: Use this property to rename an AD object. Use the format CN=[new name] or [new name]. E.g. CN=John Smith, or John Smith.

Note: Setting this property will only affect the cn, canonicalName, distinguishedName and name properties in AD. Setting the Display Name, Given Name and Last Name properties to complete a rename operation may also be required.

OCS properties such as SIP Address and email will need to be set separately. The 'Rename' field is available from the 'Other fields' drop down menu.

Note: An account can't be locked out. By unchecking Enable, the account is disabled. Leaving it checked ensures it will be left in, or change to an enabled state. Checking Unlock will unlock the account.

Note: Leaving all 3 checkboxes unchecked will remove all options. The only valid multiple selection is User cannot change password AND Password never expires.

1.97 Update CRM record

* This topic applies to Nintex Workflow Enterprise Edition only

This workflow action will update a record in Microsoft Dynamics CRM v4.0 and Microsoft Dynamics CRM 2011. A record can be updated for any entity, including custom entities.


To use the workflow action:

  • Locate the action in Workflow Actions Toolbox (located on the left hand-side);
    • Click on the Category listings to reveal the actions; OR
    • Search for the action using a keyword.
  • Select the action, drag it onto the design canvas and drop it onto a design pearl.

Alternatively

  • Left-clicking the pearl, mouse-over Insert Action and then the Categories to reveal the actions, click the required action from the list.

To change the settings used by the action:

  • On the action’s title click the down arrow to activate a drop-down
  • Select Configure; OR
  • Double-click the action's icon.

For more information on the other options in the drop-down, please refer to the Getting started with the Nintex Workflow designer.

Options for this action

Dynamics CRM Version

The endpoint version of the Microsoft Dynamics CRM server to connect to.

Server URL

The URL of the CRM server to connect to.  

Organization name

The Organization located within CRM. 

Credentials

The credentials used to connect to the CRM server and organization. 

Entity

The type of CRM record to be updated. 

Record to update

Specify the GUID of the CRM record to be updated.
Note: It is recommended that the Query CRM action be used to obtain the GUID of the record and stored in a workflow variable which can then be specified in the Record to update field.

Attributes

Selecting an Entity will load any Required and Business Required attributes. Select the attributes of the record to be updated and specify the updated value in the fields provided.
 

1.98 Update document

* This topic applies to Nintex Workflow Enterprise Edition only

* This action requires Microsoft SharePoint Server
 
This workflow action can be used to update values in multiple 'content controls' within a Word document. 

PLEASE NOTE: The Word document must be in the docx format (either Word 2007, Word 2010 or Word 2013).  Files in the format ".doc" cannot save content controls - it converts them to static content.

To use the workflow action:

  • Locate the action in Workflow Actions Toolbox (located on the left hand-side);
    • Click on the Category listings to reveal the actions; OR
    • Search for the action using a keyword.
  • Select the action, drag it onto the design canvas and drop it onto a design pearl.

Alternatively

To change the settings used by the action:

For more information on the other options in the drop-down, please refer to the Getting started with the Nintex Workflow designer.

Options within this action

Source

The document to be updated. Select either:

  • The Current item; OR
  • Source URL. In the Source URL field, the full URL including the filename and type will need to be provided. E.g. 'http://mycompany.com/sales/Shared%20Documents/WordDocument.docx'

Add content control values

The 'content controls' to update within the document. Expand the section and select Add content control value to specify a 'content control'.
 
Note: Be aware of the following when specifying a content control title to update:
  • If there are 'content controls' with the same title within the document, it will update all the 'content controls' with the same title with the value specified.
  • To update a specific 'content control' that has the same title as other 'content controls' within the document, specify the sequence of the 'content control' using an array.
    • E.g. If there are multiple content controls called 'TextControl' within the document and the 2nd 'TextControl' needs to be updated, set the Content Control Title field to 'TextControl[1]'. Arrays always start from 0.

Output

The destination where the document with its updated 'content controls' is to be placed. Select either:
  • The Current item; OR
  • Output URL.
    • In the Output URL field, the full URL including the filename and type will need to be provided. E.g. 'http://mycompany.com/sales/Shared%20Documents/WordDocument.docx'.
    • In the Overwrite existing item checkbox, select to overwrite if a file already exists in the specified Output URL field.


1.99 Update item

This workflow action allows multiple fields in an item to be changed.

To use the workflow action:

  • Locate the action in Workflow Actions Toolbox (located on the left hand-side);
    • Click on the Category listings to reveal the actions; OR
    • Search for the action using a keyword.
  • Select the action, drag it onto the design canvas and drop it onto a design pearl.

Alternatively

  • Left-clicking the pearl, mouse-over Insert Action and then the Categories to reveal the actions, click the required action from the list.

To change the settings used by the action:

  • On the action’s title click the down arrow to activate a drop-down
  • Select Configure; OR
  • Double-click the action's icon.

For more information on the other options in the drop-down, please refer to the Getting started with the Nintex Workflow designer.

Options within the action

Update


Select either the Current item that the workflow is running on, or one of the available libraries. 

 
If selecting a library location, the Where selector will appear.

Where


If not selecting the Current item, use this section to specify the filter criteria to identify which document should have a check out cancelled. Manually enter the value, or select a workflow variable to evaluate at run time. For more information on lookups, see Using Lookups.
 

Note: if the filter criteria returns more than one item, only the first item in the collection will be applied.

Field

Select the fields that the action will update. More than one field can be selected. When a field is selected, an input field is added to the dialog to allow a value to be specified. To remove a field click on .

Troubleshooting

Action not executing

The work load for this action is added to a job queue. The workflow executes jobs in the queue as a batch when it reaches a "commit" point. For more information, see the Nintex article "Designing your Workflow - Commit Pending Changes Action NW2010 & NW2013."  

1.100 Update multiple items

This workflow action can be used to update the fields of multiple items within a library or list in a specified site.

To use the workflow action:

  • Locate the action in Workflow Actions Toolbox (located on the left hand-side);
    • Click on the Category listings to reveal the actions; OR
    • Search for the action using a keyword.
  • Select the action, drag it onto the design canvas and drop it onto a design pearl.

Alternatively

  • Left-clicking the pearl, mouse-over Insert Action and then the Categories to reveal the actions, click the required action from the list.

To change the settings used by the action:

  • On the action’s title click the down arrow to activate a drop-down
  • Select Configure; OR
  • Double-click the action's icon.

For more information on the other options in the drop-down, please refer to the Getting started with the Nintex Workflow designer.


Options within this action

Site

The target site where items that are to be updated reside.

  • Select site: Enables a site picker (Select a team site) to navigate through the portal structure and select the target location.
  • Enter a URL: Allows manual entry of the URL or selection using inserting reference fields.  ​
    • Refresh Lists: Refreshes the drop-down list for List according to the entered URL. 
      Note: If the URL includes variables, then the Site URL dialog box prompts you to manually enter a URL for the refresh operation. The manually entered URL is not used during execution of the action. ​

List

Drop down list containing available Lists at the selected site.

Include subfolders

Specify whether to update items within subfolders by checking this option.

Filter

The criteria that items in the list must match in order to be updated. Use the Filter to specify the update rules:

  • Select all list items: Updates all items in the list.
  • Select items only when the following is true:
  • Show the items when column: Selects an item based on the values set in the column. Either specify a value or use the lookups feature.
  • Add filter rule: Specify another rule. Use the And / Or options to specify if the item to be updated needs to meet conditions of a single rule or all rules.

Fields to Update

Select the fields that the action will update. More than one field can be selected. When a field is selected, an input field is added to the dialog to allow a value to be specified. To remove a field click on

1.101 Update User Profile

* This topic applies to Nintex Workflow Enterprise Edition only

* This action requires Microsoft SharePoint Server

This workflow action will update the SharePoint user profile information of a user.

To use the workflow action:

  • Locate the action in Workflow Actions Toolbox (located on the left hand-side);
    • Click on the Category listings to reveal the actions; OR
    • Search for the action using a keyword.
  • Select the action, drag it onto the design canvas and drop it onto a design pearl.

Alternatively

  • Left-clicking the pearl, mouse-over Insert Action and then the Categories to reveal the actions, click the required action from the list.

To change the settings used by the action:

  • On the action’s title click the down arrow to activate a drop-down
  • Select Configure; OR
  • Double-click the action's icon.

For more information on the other options in the drop-down, please refer to the Getting started with the Nintex Workflow designer.


Options within this action

User

The login name of the user whose profile should be updated. Multiple users can be specified.

To search for users, click on the address book icon to the right of the input box. The Select People and Groups dialog will appear: 


The dialog allows the workflow designer to search for and/or add users to the User list by one or more of the following methods: 
  • Internal Search: Entering a partial display name, email or user account name and clicking on the magnifying glass will provide a list of matching users and groups from SharePoint as well as Active Directory.
  • External email address: Enter an external email address manually. Where possible Nintex Workflow will resolve this to an actual user account.
  • Lookup: Provides the option of adding a dynamic reference as an approver. e.g. Workflow variable, list field.
Click the title bar to expand or collapse each option.  

Credentials

An account with permissions to modify user profiles. Click on the padlock icon to get a list of predefined workflow constants which are of credential type.

Profile properties

Select the profile properties that the action will update. More than one property can be selected. When a property is selected, an input field is added to the dialog to allow a value to be specified. To remove a field click on .

1.102 Update XML

The Update XML action is used to alter XML data. It can be used to alter an XML file that the workflow is running on, including InfoPath forms.

To use the workflow action:

  • Locate the action in Workflow Actions Toolbox (located on the left hand-side);
    • Click on the Category listings to reveal the actions; OR
    • Search for the action using a keyword.
  • Select the action, drag it onto the design canvas and drop it onto a design pearl.

Alternatively

To change the settings used by the action:

For more information on the other options in the drop-down, please refer to the Getting started with the Nintex Workflow designer.


Action Settings

XML source

Specify the location of the XML to alter. A copy of this XML data is processed by the workflow action. Select one of the following options:

  • Current item: The item that the workflow is running on will be used as the source. This option is available for workflows designed on libraries only.
  • URL: Data located at a nominated URL will be used as the source. A username and password can be provided for the request. If no username or password is provided, the request will be anonymous.
  • XML: Specify text or inserted references as the XML source.

Updates

A number of update operations can be performed by a single Update XML action.

XPath query

The XPath query to the XML nodes that will be altered. The XPath query can resolve to a single node, or a node list. If the result is a node list, the selected change will be applied to each node. Click on the XPath Builder button to use the XML browser to navigate the XML structure and select an element from the XML data.

Note: If the XML source specified for the action is available and all tokens and references are replaced with actual run time values, then the XPath Builder will use the XML source to display the XML structure within the XML browser. Otherwise, sample XML data will need to be provided in order to select the node using the XML browser.  

Selected node(s) action

The operation to perform on the selected node. Select one of the following options:

  • Replace node contents: Replace all content within the XML node with the supplied value. 
  • Add child node: Adds a new node from the supplied XML fragment.
  • Set node text: Sets the value of the XML node to the supplied text.


Add XML update: Select to define another update operation.

Store result in

Specifies where the resulting XML should be stored. Select Workflow variables type or choose from the following options:

Troubleshooting

Action not executing

The work load for this action is added to a job queue. The workflow executes jobs in the queue as a batch when it reaches a "commit" point. For more information, see the Nintex article "Designing your Workflow - Commit Pending Changes Action NW2010 & NW2013."  

1.103 Wait for an item update

This workflow action delays the workflow until a property (list or library column) of the current item meets a specified condition.

To use the workflow action:

  • Locate the action in Workflow Actions Toolbox (located on the left hand-side);
    • Click on the Category listings to reveal the actions; OR
    • Search for the action using a keyword.
  • Select the action, drag it onto the design canvas and drop it onto a design pearl.

Alternatively

  • Left-clicking the pearl, mouse-over Insert Action and then the Categories to reveal the actions, click the required action from the list.

To change the settings used by the action:

  • On the action’s title click the down arrow to activate a drop-down
  • Select Configure; OR
  • Double-click the action's icon.

For more information on the other options in the drop-down, please refer to the Getting started with the Nintex Workflow designer.

Options for this action

Wait for

The "Wait for" field allows a column in the list or library where the current item is located to be selected. This column's value will be the one that the following condition needs to evaluate as true against to proceed in the workflow.

Condition

The condition contains the comparison that must be true for the workflow to move past this action. A comparison operator and a value must be specified. Refer to Using lookups for more information.

Troubleshooting

Action not executing

The work load for this action is added to a job queue. The workflow executes jobs in the queue as a batch when it reaches a "commit" point. For more information, see the Nintex article "Designing your Workflow - Commit Pending Changes Action NW2010 & NW2013."  

1.104 Wait for check out status change

This workflow action can be used to pause the current workflow on a document and wait for the check out status to change before proceeding.

To use the workflow action:

  • Locate the action in Workflow Actions Toolbox (located on the left hand-side);
    • Click on the Category listings to reveal the actions; OR
    • Search for the action using a keyword.
  • Select the action, drag it onto the design canvas and drop it onto a design pearl.

Alternatively

To change the settings used by the action:

For more information on the other options in the drop-down, please refer to the Getting started with the Nintex Workflow designer.


Options in this action

Wait for document to be

Select the 'Check out' state that should be monitored for change:

  • Checked out: When the document is checked out.
  • Checked in: When the document is checked in.
  • Unlocked by document editor: When the document is no longer being edited in an editor.
  • Discarded: When the document's checked out status is discarded.

1.105 Web Request

This workflow action performs an HTTP request to a URL. It can be used to perform a variety of HTTP operations.

To use the workflow action:

  • Locate the action in Workflow Actions Toolbox (located on the left hand-side);
    • Click on the Category listings to reveal the actions; OR
    • Search for the action using a keyword.
  • Select the action, drag it onto the design canvas and drop it onto a design pearl.

Alternatively

  • Left-clicking the pearl, mouse-over Insert Action and then the Categories to reveal the actions, click the required action from the list.

To change the settings used by the action:

  • On the action’s title click the down arrow to activate a drop-down
  • Select Configure; OR
  • Double-click the action's icon.

For more information on the other options in the drop-down, please refer to the Getting started with the Nintex Workflow designer.

For more information about web requests, please refer to this MSDN reference.

Options within the action

Url

The URL to which the HTTP request will be made.

Credentials

The credentials that will be used for authentication to the URL. If no credentials are provided, the request will be made anonymously.

Operation

The Web Request action is capable of making many common HTTP calls. GET, POST, SOAP 1.1 and SOAP 1.2 are predefined and Other can be selected to specify another operation. Input fields for headers will be displayed if they are required for the operation.

Add headers

Specify the headers to be sent with the web request. Multiple headers can be selected by choosing the Add header option.

Text

Specifies the textual data that is sent as the body of the web request. This option is available for all operations except GET. To include a base64 encoded copy of the file that the workflow is running on in the request text, type in [FileData] and it will be replaced at run time (libraries only).

Send workflow file

Specifies that the bytes of the file on which the workflow is running should be sent as the web request body. This option is only available for workflows that are created on a document library.

Keep alive

Allows for the Keep alive option to be specified for the request.

Allow auto redirect

Allows for the Auto redirect option to be specified for the request.

Store result in

The workflow variable of text type in which to store the contents of the response.

Store http status in

The workflow variable text or number type in which to store the numeric http response code.

Store response headers in

The workflow variable of collection type in which to store each response header. Each header will be represented by a single item in the collection, and will be formatted as header name=header value.

Store response cookies in

The workflow variable of collection type in which to store each response cookie. Each cookie will be represented by a single item in the collection, and will be formatted as cookie name=cookie value.

2 Using Nintex Live Connector for Nintex Workflow 2013

2.1 Access Management

The Access management page is used to allow and disallow access to the services available in Nintex Live. These settings apply to all the SharePoint farms of the organization using Nintex Live.

Private services are specific services that are provided from a specific service provider to a company. Public services are services that are available to all companies.

The Always make new services from this service provider available checkbox will automatically select any new private services added by the service provider and make them available in the Catalog.

New public services are automatically selected by default when they're made available by a service provider.

When a service is allowed:

When a service is disallowed:

Note: Disallowing a service will only disable the service from making requests to Nintex Live. To remove the service (workflow action) from the workflow action toolbox, navigate to the Manage allowed actions settings page and uncheck the particular service.

2.2 Adding and removing services

In the Nintex Live Catalog, the administrator / workflow designer can select the services to be made available as workflow actions in the workflow toolbox.

To add a service into the workflow action toolbox:

  1. In the workflow designer, click on the Catalog button in the Ribbon.
  2. In the Catalog, select the service to add to the toolbox by clicking the Add button. You can select and deselect services before clicking OK
  3. Click OK to add the selected pending service(s) to the toolbox.

The service will now be available in the workflow toolbox.


To remove a service from the workflow action toolbox:

  1. In the workflow designer, click on the Catalog button in the Ribbon.
  2. In the Catalog, select the service to remove from the toolbox by clicking the Remove button. You can select and deselect services before clicking OK
  3. Click OK to remove the selected service(s) from the toolbox.

The service will no longer be available in the workflow toolbox.

Note: Removing the service does not delete the service from the list of available workflow actions that are displayed in the Manage allowed action settings page.


If Nintex Live is unavailable and there is a service action on the design canvas, a warning will be displayed below the Ribbon.


When a service is used in a workflow a warning will be displayed on the action when a more recent version of the service is available. To update, open and save the action configuration.


2.3 Catalog Settings

The Catalog Settings page is used to manage the options for the Nintex Live Catalog.

Allow Catalog browsing in the workflow designer

This option determines if workflow designers can browse the Nintex Live Catalog.

When this option is set to Yes, workflow designers can browse the Catalog and add services into the workflow toolbox.

When this option is set to No, this will disable the Catalog button in the workflow designer. The Catalog will only be accessible from the Nintex Workflow Manage allowed actions page.

Note: The Nintex Workflow - Nintex Live Catalog site collection feature must be activated on the site collection(s) for this setting to be effective. If the site collection feature is not activated, the Catalog button will not be displayed at all.

Allow comments and ratings to be viewed

This option determines the type of ratings and comments for services that can be viewed by users in the organization within the Catalog.

Allow comments and ratings to be posted

This option determines if ratings and comments for services can be added by users in the organization.

Note: The option selections are enabled and disabled based on the Allow comments and ratings to be viewed selection.


2.4 Nintex Live Workflow Settings

Use the Nintex Live Workflow Settings page to enable or disable Nintex Live and External Start. 

Enabling Nintex Live​

Note: Ensure that the Nintex Live Framework and the certificates required to enable connectivity to Nintex Live have been installed.
 
If the “Install Nintex Live” option was not selected during Nintex Workflow 2013 installation, manually install and deploy the “nintexlivecore.wsp”.
 
To enable Nintex Live Workflow settings:
  1. In Central Administration, click on Nintex Workflow Management.
  2. Click on Live Settings.
  3. In the Enable Nintex Live for Nintex Workflow section, click on Enable.

Note: When Nintex Live Workflow is disabled, the workflows already published to Nintex Live will remain active.  

Use the following as required:

Update Services
Forces an update of all service definitions.

Update request tracking
Updates Live request tracking if a pending service request has become orphaned after a database migration.

Field descriptions

The Nintex Live Workflow Settings page has fields in the form of the following section labels.

Selection Description
Enable Nintex Live for Nintex Workflow 
Allows workflow designers to add web services from the Nintex Live Catalog to the Nintex Workflow actions toolbox, which can then be used in workflows. ​
Enable External Start Allows workflow designers to create endpoint URLs for use in initiating workflows from external services. 
Note: Requires Enterprise Edition. For more information, see Managing External Start settings.
Update services ​Forces an update of all service definitions.
Update request tracking ​Updates Live request tracking if a pending service request has become orphaned after a database migration.

2.5 Using the Nintex Live Catalog

The Nintex Live Catalog displays the list of available services that can be added to the workflow toolbox.

The list of services include a mix of free and paid for services. For example, StrikeIron are a subscription based provider. Most StrikeIron services offer a free trial of a limited number of calls per service. Any further usage will require paid subscriptions to be arranged directly with StrikeIron.

The Service Information (located at the right of the Catalog) will state if the service is free or paid and if registration is required to use the service.

Browsing the Catalog

When browsing the Catalog, a number of options are available to help narrow down the services that you may be interested in.

Tabs

Tabs that are located on the top right of the Catalog provide a quick way to change the focus of the Catalog:

Sorting

The services can be sorted in ascending or descending order by the following:

Filtering

The filter option narrows down the list of services that are displayed in the Catalog.

Searching

To search for services, use the search box located on the top right of the Catalog or use the Search tab which provides advanced options to narrow down the search scope. The search query only searches against the service title and description. Searches do not include the comments made for the services.

Rating and Commenting

In the Catalog, ratings and comments of services made by users (within the organization or from outside the organization) may be displayed. The displaying of the rating and comments is set at an administration level. Users browsing the Catalog would be able to:


To view the rating and comments of a service:

Click on the Show most recent ratings and comments link for the service. This will display the three most recent rating and comments that have been made for the service. The View all ratings and comments displays all the ratings and comments of the service, including any ratings and comments made about the previous version(s) of the service.


When posting a rating and comment, the user's domain username will be displayed with the rating and comments made when it is viewed by users within the organization. The option to put an Alias will be available if ratings and comments have been set to all Nintex Live users (includes users outside the organization).

To post a rating and comment for a service:

Click on the Rate and comment link for the service.

A user can only make a rating and comment once. By rating and commenting on the service again, the previous rating and comments that was made will be displayed and the user will be able to modify them.

Adding and removing services

For help on adding and removing services, please refer to Adding and removing services topic.

3 Workflow Interaction with SharePoint

3.1 About LazyApproval

The LazyApproval feature of Nintex Workflow enables approvals or rejections of an item to be registered when the approver replies to the notification email or respond to the automated OCS or Lync conversation with a permitted word or phrase. That word or phrase is recognized and interpreted by the system and applied to the item in the workflow.

LazyApproval is not automatically enabled at the time of installation, it has to be manually enabled. For more information, please refer to the Managing LazyApproval settings.

The LazyApproval feature is only available with the Request Approval, Request Data, Request Review and Assign Flexi Task workflow actions.

There are two LazyApproval methods that can be enabled for Nintex Workflow:

  • LazyApproval via email: Workflow tasks actions can be configured to accept responses from users via an email reply.
  • LazyApproval via OCS / Lync:Workflow task actions can be configured to accept responses via an automated OCS or Lync conversation.

Not all workflow actions support both methods. LazyApproval via email is supported by the workflow actions that have been mentioned above. LazyApproval via OCS / Lync is only supported by the Request Approval, Request Review and Assign Flexi Task workflow actions.

 At the time of configuring the workflow action, the designer needs to check the box "Allow LazyApproval".


When LazyApproval via email is used, an addition to the standard email template footer is added that explains how to use LazyApproval. When the system receives the return email it will scan the first 20 lines of the reply for a recognized LazyApproval term. It scans from the top of an email downwards and uses the first recognized term it finds that is an exact match for a permitted whole word or whole phrase on a line by itself. Recognized words or phrases that appear with unrecognized words or phrases on the same line will be ignored and skipped.

You can customize the footer text from the Managing LazyApproval settings in Central Administration.

If a term is not found, a return email will be sent to the user informing him/her that their response was not able to be interpreted. The user can then reply to that email with a recognized term for the 'approve' or 'deny' to take effect.

IMPORTANT NOTE: When LazyApproval emails are sent, a specific piece of identification code is appended to the email subject. Do not edit or remove the identification code as any change to it will mean that the LazyApproval thread cannot be traced and approval by email will not be possible for the user involved. That user will have to approve the item by navigating through the SharePoint library or list where the item and workflow are being used. For more information, please refer to the Approving, Rejecting and Reviewing Items.

A system administrator can edit or add to the list of acceptable and recognized terms. For more information, please refer to the Managing LazyApproval settings. LazyApproval terms are not case sensitive. The default set of terms is: "approve", "approved", "decline", "declined", "no", "ok", "reject", "rejected" and "yes" as seen below:


3.2 Approving, Rejecting and Reviewing Items

During runtime, when a user interaction task is created as part of a workflow, tasks will be assigned and the notification message(s) sent. The task(s) assigned to a user can be seen at any time via the My Workflow Tasks web part or the Nintex workflow task list setup within the site.


To process an assigned task, click the item's hyperlink (if configured and allowed) within the notification email or on the hyperlink within the Item column of the My Workflow Tasks web part web part. This will open the 'Approve Reject' page ready for the user's response.


The 'Approve Reject' page

Status

When a task is generated by the 'Request approval' action, the user can choose to approve or reject the item in the workflow. The selection made will determine the path followed by the workflow.

When a task is generated by the 'Request review' action, there is no response to process as the item is deemed satisfactory when the user is finished with it.

Depending on the configured workflow action, the user may be given the option of Delegating Approval Tasks the task to another user.

Comment

Use this field to enter any comments about why the item was approved or rejected.

Item Properties

Listed in the Item Properties section is the meta data related to the item in the workflow. To view the full details of the item click the hyperlink next to the Item property heading. Similarly, to view the status of the workflow graphically, click on the View link provided.

The Item Properties panel also displays the field values of the item the workflow is running on (not shown in this screenshot). You can determine which fields are displayed by creating a view called 'Workflow Task View'. The name of the view to use is configurable in the Global settings in SharePoint Central Administration.

3.3 Configuring the Chart Viewer Webpart

* This topic applies to Nintex Workflow Enterprise Edition only

Use the Nintex Chart Viewer web part to display a Nintex Workflow report in graph/chart view on a page within a site.

To use the Workflow Chart Viewer web part:

  • Navigate to the page of the site to which you want to add the web part.
  • Click on the Settings Icon , in the top right-hand corner, and click Edit Page.

  • Click within the Rich Content area, where the web part is to be inserted.
  • In the Ribbon, click on the Insert tab, then click on Web Part.

Web Part Settings: Chart Settings

Chart to display

Note: This list is configurable by the Administrator in SharePoint Central Administration.

Chart display settings

Note: If Enable Silverlight is checked, ensure that users have Microsoft Silverlight installed in order to view the Workflow Charts.

Columns used in the chart display


Note: The first column displayed in the list becomes the x-axis value. The remaining columns become the y-axis. For example: To chart the number of tasks for each approver, add the "Approver" column as the first column and place the numerical value columns below the "Approver" column.

Filters

Note: Not all reports accept filter values.


3.4 Configuring the Report Viewer Webpart

* This topic applies to Nintex Workflow Enterprise Edition only.

Use the Nintex Report Viewer web part to display a Nintex Workflow report in tabular view on a page within a site.

To use the Workflow Report Viewer web part:

  • Click within the Rich Content area, where the web part is to be inserted.
  • In the Ribbon, click on the Insert tab, then click on Web Part.

  • Edit the settings for the web part, click the  to activate the web part menu, then click on Edit Web Part.

Web Part Settings: Report Settings

Report to display

Note: This list is configurable by the Administrator in SharePoint Central Administration.

Filter

Note: Not all reports accept filter values.


Records displayed per page


3.5 Delegating Approval Tasks

Delegation is processed from the Approving, Rejecting and Reviewing Items task pages when the user interaction task is configured to allow delegation.

To delegate a task:

  • In the 'Approve Reject' page, in the Status section, click on delegate.


  • In the Delegate page:
    • The Delegate field is used to specify the user to assign the selected task to. To select a user, click on the address book icon on the right to select a user from the Select People or Group dialog box.
    • The Comments field is used to provide instructions or additional information to the user the task is being delegated to. This text is appended to the 'Approval Required' notification that is sent to the delegated user.
    • When all settings are configured, click the OK button.
  • The task is now reassigned to the selected user.

Setting personal delegation preferences

A user can delegate their tasks to another user for specified duration, or may delegate their tasks due to absence within the organisation.

To set your personal preferences:

Note: Task delegations done through Task Delegation feature are only used when a task is initially assigned to a user. If a task is reassigned via the 'Delegate workflow task' action, or by another user manually, the task will be assigned to the specified user, even if they have long term delegations defined.

3.6 InfoPath Forms

The Nintex Workflow InfoPath Forms feature allows workflow designers to edit start and task forms using Microsoft InfoPath 2013.

InfoPath forms can be defined for the following:

Server requirements

Assigning Form type

Nintex Workflow supports the use of either the Default form (which is an .aspx form provided out of the box and is not editable by end users), an InfoPath form (which is editable in Microsoft InfoPath 2013) and Custom (pre-developed .aspx) forms.

To assign the form type:


 Edit a Microsoft InfoPath 2013 form


Shared forms

When a workflow action using InfoPath is copied and pasted, the form will be shared by both actions by default.


Important note

Nintex Workflow will automatically attempt to update fields in the InfoPath form when the action configuration changes. However, if the Cancel button within the form is modified, the form fields will no longer update automatically but can still be added manually in InfoPath. 

Data context (Advanced)

The InfoPath forms contain a data source called NWContext which provides additional information relevant to the current item, list and user permissions. A developer or designer can use this information to extend the functionality of the form.

To access the data source:


These fields can be used to extend the functionality of the form. Some examples are:


3.7 Managing Workflow Change Approval

When the Workflow Change Approval is enabled on a site, all workflows will need to be approved before the workflow can be used.

The workflow status page displays the workflows that are currently awaiting approval, have been approved, cancelled and errored.


When new and existing workflows are published, the workflow must be approved by the assigned 'Approvers group' before it can be used on items.

If the workflow is started on an item before the latest version is approved, the current live version (most recently approved) of the workflow will still be used.

To view the changes made to the workflow:

To approve or reject the changes to the workflow:


In the Workflow details section:


3.8 Managing workflow history lists

The Manage workflow history lists provides the ability to create new SharePoint workflow history lists and enable existing SharePoint workflow history lists for use with Nintex Workflow within a team site.

A SharePoint workflow history list stores messages generated by a workflow.  Everything from approval activity (approve/reject), updates to a workflow, comments, cancellations and even workflow errors.

By default Nintex Workflow creates a SharePoint workflow history list that is enabled for Nintex Workflow. The enablement deploys event receivers into the list for workflow reporting. The standard SharePoint workflow history list cannot be used with workflows in Nintex. To use a standard SharePoint workflow history list it must first be enabled for Nintex Workflow.

To manage the history lists for use with Nintex Workflow:


To create a new history list for use with Nintex Workflow:

Note: To edit the Title and Description of the history list, navigate to the Lists Settings and under the General Settings, click on the Title, description and navigation link and make the required changes. To delete the list, navigate to the Lists Settings and under the Permissions and Management, click on the Delete this list link.

To enable an existing history list to be used with Nintex workflows:

Note: All history lists that are enabled for Nintex Workflow can be selected in the Workflow Settings  when designing a workflow within the site.

Purge items from the workflow history lists 

The Manage workflow history lists also provides the option to delete workflow history messages from the workflow history list on a site. This option is also available as an NWAdmin operation. This option can be used for maintenance on the history list to prevent the number of history items exceeding 2000 which can have performance implications. Deleting history messages does not affect the operation of a running workflow.

To remove/purge items from a history lists:


3.9 My Workflow Tasks web part

The My Workflow Tasks web part is used to display a list of workflow related tasks that have been assigned to the user currently logged on. The web part is used on a page within a site.

Note: Tasks that are no longer valid due to missing information will display a link to remove the entry from the web part.

To use the My Workflow Tasks web part:

  • Navigate to the page of the site to which you want to add the web part.
  • Click on the Settings Icon , in the top right-hand corner. Click on Edit Page

  • Click within the Rich Content area, where the web part is to be inserted.
  • In the Ribbon, click on the Insert tab, then click on Web Part.

Web Part Settings: My Workflow Tasks

3.10 NintexWorkflows library

The NintexWorkflows library for a given site is at the following URL. 

http://[mysitename]/NintexWorkflows/Forms/AllItems.aspx 

where [mysitename] is the URL for your site. 

Check this library if you receive an unexpected error for the name of a new or imported workflow. If that workflow name is not listed on the Workflow Gallery page, then an orphaned workflow is likely. A workflow is orphaned when its associated list or library is deleted. Orphaned workflows remain in the NintexWorkflows library, along with any active workflows. 

To remove orphaned workflows from the site and make their names available for reuse, delete them from the NintexWorkflows library. 

3.11 Reusable Workflows

A resusable workflow template allows the workflow to be used on a content type, list, or library through the default SharePoint Workflow settings option.

Reusable workflow templates can be created for use within a single site or an entire site collection.

Site Reusable Workflow Templates

To create a reusable workflow template:

To manage reusable workflow templates:

Site Collection Reusable Workflow Templates

To create a site collection reusable workflow template:

To manage site collection reusable workflow templates:

Workflow Settings

To use a reusable workflow template for a content type:

To use a reusable workflow template for a list or library:


3.12 Scheduling a workflow

Workflows can be configured automatically to run at a certain time.


A library or list item can be regularly subjected to a workflow. This might be useful for running recurring checks on items.

To schedule a workflow for an item:

  • Navigate to the item's location.
  • Click on the context menu , and then the dots again to activate the menu. Click Schedule Workflows.
  • If no schedule have been defined before, none will be shown. To create a new Scheduled Workflow, click the Add Schedule button.


Note: Workdays are set by the Administrator via the 'Site Settings > Site Administration > Regional settings' section. Public holidays and any other special occasions are set using the 'Site Settings > Nintex Workflow > Manage Holidays' page.

To configure an existing schedule, click the hyperlink of the schedule in the list and edit the settings in the same manner as above.

Note: If you make a change to a schedule it will take effect immediately. If the item is currently in the workflow, changing the schedule will not disrupt it, the schedule will be updated once the workflow has been completed.

Site Workflows can also be set up to run according to a schedule.

 To schedule a site workflow:


3.13 Set Title and Description for Reusable Workflow Template

When creating a reusable workflow template, the reusable workflow template can be associated to a specific content type.

To associate a reusable workflow template:

3.14 Site Workflows

​A site workflow is attached to the site rather than a list or library.

The creation and management of site workflows is the same as for workflows that are attached to a list or library. 

Note: Actions specific to lists and libraries are not availalbe for site workflows in the Nintex Workflow Designer.


To create a site workflow:

To manage site workflows:

To view the site workflow history:

To schedule site workflows:

3.15 Starting a workflow

There are three options to start a workflow. How the workflow starts is dependent on how the workflow is configured.

Following are the various ways to start a workflow:

  • Start manually: When this setting is checked for a workflow, the user has the option to start the workflow manually. This help page will explain how to start a workflow manually.
  • Start when items are created: When a library or list item is created or uploaded, all workflows in the library or list with this option enabled will start.
  • Start when items are modified: When a library or list item is modified, all workflows in the library or list with this option enabled will start. Conditions can be set to start the workflow when a specific column is modified. Refer to Workflow Settings.

Note: For list and library workflows, folders and sub-folders are subject to the same workflows as the parent library. Therefore, if you set a workflow to start when items are created or modified, any item, regardless of how many folders or sub-folders the item is stored within, it will trigger all the workflows that are set to start automatically. That behavior is governed by SharePoint.

Starting a workflow manually

To start a workflow manually:

      For List/Library Workflows

       
  • Navigate to the list or library that contains the item that the workflow is to be started on.
  • Click on the item context menu ,  and the dots again to activate the menu. Then click Workflows.


      For Site Workflows


3.16 Updating User Defined Action in Published Workflows

Published workflows that use a User Defined Action must be republished whenever a change is made to the instance of the UDA. Until the published workflow is republished, it will continue to reflect the last published version of the UDA when it was used and published in the workflow.

When republishing a UDA, an option is available to analyze the UDA (Analyze UDA function) to show all instances of the UDA in published workflows and republish the workflows.

To update all instances of the UDA in published workflows through the workflow designer:


Note: This is the same function as clicking on the Analyze UDA through the Manage User Defined Actions function.


If the current published workflow has a minor version, the workflow will not be republished. In the Republish results of the Analyze UDA, the Republish Status will be Not republished - Minor version exists.

If required, manually republish the workflow to ensure that the workflow has no minor version. Click on the Workflow name and republish. The current opened Analyze UDA dialog will need to be closed and reopened to reflect the latest changes.


3.17 User Defined Action Parameters

User Defined Action Parameters can be defined to obtain and supply information when using the User Defined Action within a workflow. 


Managing User Defined Parameters

To manage a workflow parameter:

  • In the Nintex Workflow Designer Ribbon, click on UDA Settings.
  • In the User Defined Action settings dialog, within the Ribbon, click on Parameters.

Alternatively:


To create a new workflow parameter:


To modify an existing workflow parameter:

 
To delete an existing workflow parameter:

  • In the User Defined Action Parameters dialog, select the workflow parameter in the list.
  • In the Ribbon, click on Delete.

:

3.18 User Defined Action Settings

Use the User Defined Action Settings dialog to set the User Defined Action (UDA) title and description, workflow variables, parameters and options. 


User Defined Action options: 


Ribbon menu buttons: 


3.19 User Defined Actions

User Defined Actions (UDA) provides the ability to string together a predefined set of multiple workflow actions for workflow designers to use when creating a workflow. The UDA feature is similar to using workflow snippets, however a UDA will allow for Input and Output parameters to be defined which can then be used as a single action within a workflow.

An example of when a UDA might be useful is preconfiguring a web request workflow action and saving it as a UDA which a workflow designer can then drag and drop into their workflow without having to configure any of the settings within the web request workflow action. In addition to that, an input parameter can be defined for a user to provide their credentials for the web request and the output parameter for any values that might be returned by the web request.

Note: Only Site Administrators, Site Collection Administrators and Farm Administrators can manage User Defined Actions.

Managing User Defined Actions

UDA can be defined globally for the farm in SharePoint Central Administration, for a specific site collection or for individual sites.

Note: UDAs must be initially created at a Site level. They can then be used at the:


To manage UDAs for a site:

  1. Navigate to the site home page.
  2. On the top right, click  (Settings), click Nintex Workflow 2013, and then click Manage User Defined Actions

To manage UDAs for the site collection:

  1. Navigate to the top level site home page.
  2. On the top right, click  (Settings), click Nintex Workflow 2013, and then click Manage User Defined Actions.
  3. Click Switch to site collection level settings.

To manage User Defined Actions for the web farm: 

  1. On the Central Administration Home page, click Nintex Workflow Management
  2. Click Manage user defined actions.


Things to note when using UDAs:

Create a User Defined Action

To create a UDA for a site:

To create a UDA for a Site Collection:

To create a UDA for a Web Farm:

Modify a User Defined Action 

UDAs for a Site and Site Collection level can be modified. However, UDAs on the web farm level will need to be modified at the site level and re-imported at the site collection level.

To modify a UDA:

Delete a User Defined Action

UDAs can be removed from a site, site collection or web farm level.

To delete a UDA:

Import and Export User Defined Actions

UDAs can be exported and imported.

To import a UDA:


To export a UDA:

Promote User Defined Actions

This will move the UDA to be managed from the parent scope.  To promote a UDA:

Note: Once a site level UDA has been promoted to the site collection level it cannot be undone. 

Analyze User Defined Actions

This function displays all workflows that currently use the UDA. It provides information such as the Workflow name and Workflow Version that uses the UDA and the version of the UDA it's using.

3.20 Viewing workflow history

A history of the various workflows ran on an item are kept. The workflow history provides a trail on how many workflows have been completed on the item or how many workflows have been cancelled or errored in relation to the item.

To view the item's workflow history:

  • Navigate to the item's location.
  • Click on the context menu , and then click on the dots again to open the extended menu. Select View Workflow History.

  • The Workflow Status page will be loaded. It shows workflows that are Running, Completed and Cancelled & Errored. For more information on the workflow, click on the title of the workflow.

Note: In the Completed Workflows and Cancelled & Errored Workflows sections there could be multiple identical titles, this means the item has been through the same workflow a number of times before. Ensure that the relevant workflow instance is clicked on. Use the Started date to help differentiate workflows.


3.21 Viewing workflow status

When an item is in a workflow, it may be is necessary to know what stage the item has reached in the workflow.

To view the item's workflow status: 

  • Navigate to the item's location.
  • Click on the item to activate the Item Context menu, then click View Workflow History.


Note: In the Completed Workflows and Cancelled & Errored Workflows sections, there could be multiple identical titles: this means the item has been through the same workflow a number of times before. Ensure that the relevant workflow instance is clicked on. Use the Started date to help differentiate workflows. 

  • The workflow will be loaded into the Workflow Viewer, which gives a visual representation of the workflow. A Workflow Information summary is shown in the top left corner. It contains the title of the item in the workflow, the name of the workflow, the initiator of the workflow, the date and time it was initiated and its status. As mentioned above, the possible workflow states are 'Running', 'Completed', 'Cancelled' and 'Errored'.


Note: Clicking the Click here to show detail view will display the workflow history in text format. For more information, please refer to the Viewing workflow history.


Color Coding on Workflow Actions

3.22 Workflow Change Approval

This page is used to configure a change approval workflow for when users modify Nintex Workflows for the current site.

To configure a Workflow Change Approval for a Site: 

To enable workflow change approval:


Once configured, a standard change approval workflow will be displayed and links will appear allowing the user to View approvals in progress and Edit workflow.

3.23 Workflows I have started web part

Use the Workflows I've started web part to display a list of workflows that have been started by the user that is currently logged in on a page within a site.

To use the Workflows I've Started web part:

  • Navigate to the page of the site to which you want to add the web part.
  • In the Settings Icon , in the top right-hand corner, click on Edit Page.

  • Click within the Rich Content area, where the web part is to be inserted.
  • In the Ribbon, click on the Insert tab, then click on Web Part.

  • In the Categories section, click on Nintex Workflow 2013.
  • In the Web Parts section, click on the Workflows I've Started.
  • Click the Add button.


  • The page will reload with the web part in place.

  • The default web part settings will display:
    • Item: The title of the item.
    • Workflow: The name of the workflow.
    • Initiated: When the workflow was initiated.
    • Idle for / Completed: How long it has been idle or completed.
    • Current Action: The action for which the running workflow is waiting (effectively the workflow's status).
  • To use the web part with its default settings, click Stop Editing.

  • To edit the default settings for the web part, click the  to activate the web part menu, then click on Edit Web Part.

  • A series of options will be shown to the right of the page that are specific to this web part.

Web Part Settings: Workflows I've Started

  • Show workflows from: Set to show workflows from the current site or from all the sites in the site collection. Enterprise Licenses version will be provided the option to choose the entire Farm.
  • Paging: Set how many items are displayed on the page by the webpart.
  • Display:
    • Prefer filenames: By default, document titles are displayed in the web part. If there is no document title set, the document's filename is displayed. Checking this option displays filenames instead of document titles.
    • Show workflows that are: Check the various options to display workflows that are either 'Running', 'Completed', 'Errored' or 'Cancelled'. The status will be displayed in the 'Current action' column.
  • Default sorting: Specifies the order that records are displayed in.

4 Administration and Configuration

4.1 Creating support packages

You can create, download, and delete support packages for error-containing workflows and for the entire farm.
 
For more information about support packages, see Support packages.
 

To create a workflow support package

 
To create a farm support package
 
To download a support package
 
To delete a support package


Related topics

Monitoring workflow errors
Support packages

4.2 Preventing excessive looping iterations

Excessive looping iterations can occur when a loop is configured to run for many iterations without a pause or when the environment, variables, or business logic conditions cause workflows to iterate through actions indefinitely (or for a great number of times). This occurrence can reduce performance and starve other workflows of resources.
 
The following farm-wide settings are available to help prevent excessive looping iterations and thus safeguard performance.
 
As administrator, you can change the above settings from Global Settings in Central Administration.

Related topics

Loop 
State Machine
Global Settings

4.3 Monitoring workflow errors

​You can monitor error-containing workflows on the site using Nintex Workflow Support Console.

To access Nintex Workflow Support Console

  1. On the Central Administration Home page, click Nintex Workflow Management
  2. Click Support Console.
 
To view a list of workflow errors on another content database
 
To view a workflow containing errors
 
To access the site for the workflow

Related topics:

Creating support packages
Support packages

4.4 Support packages

Support packages are used to collect key diagnostic information about Nintex products and their configuration for troubleshooting purposes.

Note: Support package information may include configuration information about the SharePoint farm, Nintex products including license details, workflow designs, workflow configuration, and log extracts. Please consider the contents of each support package carefully before passing to a third party. 

Support package types

The following types of support packages are available:

Each support package type contains the following information.

Information Farm support package Workflow support package
SharePoint farm X X
​Nintex configuration ​X ​X
​ULS logs ​X ​X
​Workflow instance ​X

Support package contents

The contents of a support package depends on the support package type.

SharePoint farm information

The SharePoint farm information contains the following data:

Nintex configuration information

The Nintex configuration information contains the following data:

ULS log information

The ULS log information contains a time-bound extract of the farm ULS Logs for each server within the farm as logged via SharePoint.
The level of detail in the ULS logs is determined by the farm logging configuration in SharePoint.

Workflow instance information

The workflow instance information contains the following data:


Related topics 

Monitoring workflow errors
Creating support packages

4.5 SharePoint IDs for Nintex Features

Error messages displayed in SharePoint may reference identifiers for Nintex features. Following is the list of Nintex SharePoint feature IDs for Nintex Workflow 2013.
Note: Some features are hidden. Contact Support if you have further questions.

For the latest, most comprehensive list of SharePoint identifiers for Nintex items, see the Nintex Connect article Quick Reference for Nintex Features, Content Types, and Field IDs
​ 
​Nintex SharePoint Feature ​ID
​NintexLiveAdminLinks ​29e9a673-31a4-46a3-b0d2-d8e1db1dbd92
​NintexWorkflow ​0561d315-d5db-4736-929e-26da142812c5
​NintexWorkflowAdmin ​f7937973-0cf9-4f2d-a549-be2d3c25b772
​NintexWorkflowClaimsMigration ​4db97f4c-e643-4b1b-9f6a-43a9d817e6a2
​NintexWorkflowContentTypeUpgrade ​86c83d16-605d-41b4-bfdd-c75947899ac7
​NintexWorkflowEnterpriseAdmin ​aa61ef91-ee2b-42d5-9911-7c6557ad90c2
​NintexWorkflowEnterpriseWeb ​2fb9d5df-2fb5-403d-b155-535c256be1dc
​NintexWorkflowEnterpriseWebParts ​53164b55-e60f-4bed-b582-a87da32b92f1
​NintexWorkflowInfoPath ​80bf3218-7353-11df-af9f-058bdfd72085
​NintexWorkflowLiveAdminWeb ​485f5158-4b8a-453f-9eeb-7b33f5112adf
​NintexWorkflowLiveSite ​54668547-c03f-4bb5-aaab-d9568ebaf9c9
​NintexWorkflowWeb ​9bf7bf98-5660-498a-9399-bc656a61ed5d
​NintexWorkflowWebParts ​eb657559-be37-4b91-a369-1c201183c779

4.6 External Start URLs page

* This topic applies to Nintex Workflow Enterprise Edition only

This topic describes the selections on the External Start URLs page. Use this page to view all External Start endpoint URLs across the farm and usage statistics. You can also configure endpoint URLs with an account of the required permissions. 

Steps to access this page​

To access the External Start URLs page
  1. On the Central Administration Home page, click Nintex Workflow Management
  2. On the Nintex Workflow Management page, click External Start URLs.

Page reference

The External Start URLs page displays a list of External Start endpoint URLs with the following columns. Each row represents a single endpoint URL. 
Column Description
Site Site corresponding to the endpoint URL.
Workflow name ​Workflow corresponding to the endpoint URL.
Internal URL name for reference ​Optional name specified for the endpoint URL.
Endpoint URL Full address of the endpoint URL. Example: https://run.nintex.io/x-start/weuyj1TkGD​
Status ​Endpoint URL enabled/disabled status. 
Calls Number of calls to the endpoint URL.​
Last called ​Date and time of last call to the endpoint URL.
Created by ​Username used to create the endpoint URL.
Created ​Date and time when the endpoint URL was created. 
Configure Configure button to access the Manage External Start configuration page for the workflow corresponding to the endpoint URL.For more information about this configuration page, see Manage External Start configuration page.
Note: Requires an account with full control permission on the related SharePoint site (noted in the Site column). 

Related topics:
Managing External Start settings

4.7 Nintex Workflow Management page

This topic describes the selections on the Nintex Workflow Management page. 

Steps to access this page​

To access the Nintex Workflow Management page
  • On the Central Administration Home page, click Nintex Workflow Management

Page reference

The Nintex Workflow Management page displays the following links. 
Link Description
Licensing Displays the Nintex Workflow Licensing page. For more information, see Licensing settings.
Database setup ​Displays the Nintex Workflow Database Setup page. For more information, see Database settings.
Web Application activation ​Displays the Web Application Activation page. For more information, see Web Application activation settings.
Manage allowed actions ​Displays the Manage Allowed Actions page. For more information, see Managing workflow actions.
Global settings ​Displays the Global Settings page. For more information, see Global settings
LazyApproval settings ​Displays the LazyApproval Settings page. For more information, see Managing LazyApproval settings.
Message templates ​Displays the Message Templates page. For more information, see Defining message templates.
Manage workflow constants ​Displays the Workflow Constants page. For more information, see Workflow Constants.
Manage user defined actions ​Displays the Manage user defined actions page for the farm. For more information, see User Defined Actions.
External start URLs ​Displays the External Start URLs page for the farm. For more information, see External Start URLs page.
Manage context data ​Displays the Manage Context Data page. For more information, see Manage Context Data.
Manage holidays ​Displays the Manage Holidays page for the farm. Use this page to define public holidays and other special occasions.
Manage workflow reports ​Displays the Manage Reports page.
Administration reports ​Displays the Administration reports page. 
Workflow error notifications ​Displays the Workflow Error & Cancellation Notification Settings page. For more information, see Managing workflow error notification settings.
Purge workflow data ​Displays the Purge workflow data page. For more information, see Purge workflow data.
Support console ​Displays the Nintex Workflow Support Console page. For more information, see Monitoring workflow errors.
Workflow inventory ​Displays the Farm Workflow Inventory page. For more information, see Workflow inventory.
Live settings ​Displays the Nintex Live Workflow Settings page. For more information, see Nintex Live Workflow Settings.
Live catalog settings ​Displays the Nintex Live Catalog Settings page. For more information, see Catalog Settings.

4.8 Managing External Start settings

​​
* This topic applies to Nintex Workflow Enterprise Edition only

This topic describes External Start for Nintex Workflow 2013 and associated administrative tasks. 

Requirements​​

External Start requires a Nintex Workflow 2013 license enabled for the following items. 
  • Enterprise Edition
  • Nintex Live

In addition, internet connectivity is required and the Windows service Nintex Workflow Start Service must be running. To make sure this service is running, on the Central Administration Home page, click System Settings, and then click Manage services on server. Ensure that the status for the service Nintex Workflow Start Service is Started.​

How External Start works​

External Start allows you to initiate site workflows from outside of SharePoint by providing you the ability to generate endpoint URLs pointing to the workflows. Each endpoint URL stores the workflow infomation along with its start variables of supported data types (if any). Endpoint URLs reference run.nintex.io. Example endpoint URL: https://run.nintex.io/x-start/weuyj1TkGD

For example, you could use an external service (integration partner) such as Zapier or Azuqua to monitor Salesforce for new customers and initiate a Nintex workflow to create customer-specific SharePoint sites. You could configure this service to map Salesforce data from another service to Nintex workflow variables for use in the workflow. You could also create your own code to reference the endpoint URLs. When the endpoint URL is called, the associated workflow is initiated. 

To use External Start, an administrator must enable External Start using Central Administration. For variable mapping, a workflow designer configures start variables of supported data types. The workflow designer publishes the site workflow and generates one or more External Start endpoint URLs for this workflow. Nintex stores the generated endpoint URLs and their associated security keys. The workflow designer configures an external service or manual code to reference the External Start endpoint URL and associated security key. When the service or code calls the endpoint URL, the associated workflow is initiated when required conditions exist (such as new Salesforce customers). Once the service or code is set up and monitoring, nothing more needs to be done.​

Instructions

This section describes how to enable or disable External Start and how to view usage of External Start endpoint URLs.

To enable External Start
  1. Ensure that the Nintex Workflow 2013 license meets requirements.
  2. On the Central Administration Home page, click Nintex Workflow Management
  3. On the Nintex Workflow Management page, click Live settings.
  4. On the Nintex Live Workflow Settings page, ensure that the following options are enabled:
    • Enable Nintex Live for Nintex Workflow
    • Enable External Start

To disable External Start
  1. On the Central Administration Home page, click Nintex Workflow Management.
  2. On the Nintex Workflow Management page, click Live settings.
  3. To the right of Enable External Start, click Disable.

To view External Start usage
  1. On the Central Administration Home page, click Nintex Workflow Management​.
  2. On the Nintex Workflow Management page, click External start URLs.
​​​
Related topics:
External Start URLs page
Using External Start

4.9 Manage the configuration database

​​​​This help topic provides instructions for administrators to set up the configuration database for Nintex Workflow. It also describes selections on the Change configuration database page.

Setting up the configuration database

This section provides instructions for setting up the configuration database. 

Each Nintex Workflow installation requires a configuration database to store the server-specific configuration settings required for running the application. The configuration database must be set up before activating the Nintex Workflow feature for the site collection. 

When the configuration database is specified, its connection string is configured. Properties of the connection string include the SQL Server database server, the database name, and the authentication settings.

Note: Configure licensing before configuring database settings.

To set up the configuration database:
  1. On the Nintex Workflow Database Setup page, under Configuration Database, click Create (or Edit).
  2. On the Add Configuration Database or Change configuration database page, enter the database server, name, and other settings. 
  3. If the database already exists, select the check box Connect to an existing database
  4. Click OK
    Note: If you receive an error, see the known issue below. 

Viewing current database settings​

For instructions on viewing current database settings, see Database settings.

Field descriptions: Add Configuration Database and Change configuration database pages

This section describes selections on the Add Configuration Database / Change configuration database page. 
Section Selection Description
Database Name and Authentication Database Server Name of the database server containing the new or existing database that you want to use as the configuration database.
Database Name and Authentication Database Name Name of the new or existing database that you want to use as the configuration database. ​
Database Name and Authentication Connect to an existing database ​When selected, uses an existing database. When cleared, creates a new database. 
Database Name and Authentication Database authentication ​Select one of the following options. 
  • Windows Authentication (recommended)
  • SQL Authentication
Failover server Failover Database Server ​Name of the database server to use for failover.
KNOWN ISSUE: Error establishing connection to SQL Server

​Symptom 

On the Add Configuration Database page, when the default server name of "LOCALSERVERNAME\Microsoft##SSEE" ​​is used, the following error message is displayed.

An error has occurred while establishing a connection to the server. When connecting to SQL Server, this failure may be caused by the fact that under the default settings SQL Server does not allow remote connections. (provider: Named Pipes Provider, error:40 - Could not open a connection to SQL server).

​​Cause 

The "Microsoft##SSEE" portion of the default server name indicates an embedded instance, which is locked down to other applications. This situation occurs when the SharePoint instance was installed as standalone, without connection to any existing installation of SQL Server. 

​​Resolution

Install an additional database instance and then update configuration pages in Nintex Workflow to point to the new database instance. The database instance can coexist on the same server as SharePoint. One option is SQL Server Express 2008, which is free and available from www.microsoft.com

4.10 Workflow inventory

​​​​​​​* This topic applies to Nintex Workflow Enterprise Edition only​.
 
​This help topic provides instructions for server farm administrators on accessing and viewing workflow inventories from the Workflow Inventory page. This page provides a holistic view of the location, depth and breadth of existing workflows across all site collections. 

Accessing the Workflow Inventory page 

On the the Central Administration Home page, click  Nintex Workflow Management; in the Nintex Workflow Management section, click Workflow Inventory.
The Workflow Inventory page opens. The table view shows the name of the workflow including the description, who last modified the workflow, and what list the workflow is assigned to.

Viewing workflow inventories

As a farm adminstrator, you can view and filter workflow inventories based on site collection, site, list, or date. Inventories can be exported as CSV files.​
 
Here are some suggested next steps.

Locate and view workflows across all site collections
You can view the workflows that belong to all site collections.
  1. Configure the list view.
    You can filter a list by showing only the items that meet a certain criteria.
    Site 
    (Site Collection): Lists the Site location of the workflow.
    List Name Lists names of existing lists for the indicated site.
    Workflow NameLists names of existing workflows for the indicated list. Click the name to open the workflow.
    Workflow TypeLists the workflow types of existing workflows by site and list.
    Modified By: Lists the name of the last designer or administrator of the workflow.
    ModifiedLists the modified dates and times for existing workflows. You can pick a date range (last 7 days, for example) from the drop-down menu.
    Published Version: Lists the publication status of existing workflows.​
    Last Saved VersionLists the publication status of the latest saved versions of existing workflows.
    Last Run Time: Lists the last run date of workflows, so you can consider deleting them.
  2. In the table view, click a column header, and select a value from the drop-down menu.​ The list updates and displays the results. From this display, you have the following options:​
    To delete a workflow, click delete (X) next to the workflow. In the confirmation dialog, click OK.
    To add or remove columns in the view, click Modify View. Select the columns that you want to show and click OK​.

View all workflows in a range of days
In the table view, click the Modified filter option, and specify a date range as shown.
 
The list shows all workflows for the specified date range. 
Note: You can sort the data in a view. For example, you can choose to rearrange items, so that they are viewed in alphabetical or numerical order.​

View version information
In the table view, sort by Published Versions or Last Saved Version
The list shows all the currently published workflows and last saved versions.
To unpublish a workflow, see Managing workflows.

View statistics
You can view the statistics of a particular workflow.
  1. Click View statistics on the Workflow Inventory page.
  2. Select a workflow.
  3. View and interpret the statistics, such as Total Runs and In Progress.​

Take an inventory of your workflows
You can take an inventory of the workflows that exist in the site, site collection, or farm.
  1. In the workflow inventory table, click the Last Run Date filter, and specify a date range, for example > 365 Days​ (more than). The list displays all workflows that were run more than a year ago.
  2. Review and delete unused workflows.​ You can have lists open in another tab while looking at the inventory list.
​​
Export workflow inventories to a CSV file
You can export workflow inventories to a spreadsheet for further review​.
  1. Click Export table to CSV on the Workflow Inventory page.
  2. From the downloads prompt, open the file. The data opens in a tabular format.
  3. Save the file to a location​.

Determine the status of your workflows
You can open a workflow preview, evaluate the status, and track issues.
  1. In the workflow inventory table, click the workflow name.
  2. ​View the workflow preview diagram and determine its status.
    Scrolling over each workflow action provides information on how the workflow action is configured.
    From this view, you have the following options:

    Export a workflow:
     
    Exports the workflow to .nwf which can be reused in another site.
    Edit a workflow:
     
    Displays the workflow in Workflow Designer, ready for editing.
    View history:
     
    Displays the history of the workflow such as Total Runs, In progress, Cancelled, Max. Duration.
    View statistics
    : Displays the statistics of the workflow executions. (Displayed after the workflow has run.)

4.11 Licensing settings

Nintex Workflow uses a license file (.nlf) for server licensing. A single license file is used to store information about all servers in your organisation that are licensed for Nintex Workflow.

Nintex Licensing Options

Nintex Workflow 2013 is available in three editions – Workgroup, Standard and Enterprise.

Nintex Workflow 2013 – Enterprise Edition and Standard Edition

A license is required for each SharePoint front-end server where user interaction with Nintex Workflow 2013 components occurs.

Please contact our sales team if you need advice at sales@nintex.com.

Nintex Workflow 2013 – Workgroup Edition

This license covers a single SharePoint front-end server environment with up to five team sites. Only one Workgroup Edition license can be purchased. If more than five site activations or multiple front-end servers are required, a Standard or Enterprise Edition license is required.

Note: Administrators are able to manage which sites Nintex Workflow has been activated on and deactivate Nintex Workflow on sites that no longer require Nintex Workflow functionality.

Please contact our sales team if you need advice at sales@nintex.com.

Software Assurance

Valid Software Assurance is required in order to update to the latest version of Nintex Workflow.

4.12 Database settings

​​​​​This help topic provides instructions for administrators to view and configure database settings for Nintex Workflow. It also describes selections on related pages.

​Viewing current database settings

​This section provides instructions for viewing current database settings. 

To view current database settings:

  1. On the Central Administration Home page, click Nintex Workflow Management
  2. In the Nintex Workflow Management section, click Database setup
    The Nintex Workflow Database Setup page is displayed. From this page, you can specify the configuration database and map content databases. Instructions are provided in the following sections. 

Adding content databases

This section provides instructions for adding Nintex Workflow content databases. 

To add a Nintex Workflow content database: 
Note: You can also add Nintex Workflow content databases from the Manage Database Settings page. 

  1. Access the Nintex Workflow Database Setup page: On the Central Administration Home page, click Nintex Workflow Management; in the Nintex Workflow Management section, click Database setup. ​
  2. On the Nintex Workflow Database Setup page, under Content Databases, click Add content database.
  3. On the Add content database page, enter the database server, name, and other settings.
  4. If the database already exists, select the check box Connect to an existing database.
  5. Click OK.

Setting up the configuration database

For instructions on setting up the configuration database, see Manage the configuration database.

Mapping content databases

For instructions on mapping SharePoint content​ databases to Nintex Workflow content databases, see Manage content databases.

Field descriptions

This section describes selections on the following pages. 
  • Nintex Workflow Database Setup
  • ​Add content database

For descriptions of selections on the View Database Mappings and Manage Database Mappings pages, see Manage content databases.
For descriptions of selections on the Change configuration database page, see Manage the configuration database.

Nintex Workflow Database Setup page

This section describes selections on the Nintex Workflow Database Setup page.
Section Selection Description
Configuration Database Create (Available when the configuration database has not yet been defined.) Displays the Add Configuration Database page. See Manage the configuration database.
Configuration Database Edit ​(Available when the configuration database has already been defined.) Displays the Change configuration database page. See Manage the configuration database.​
Content Databases Content Database ​Lists Nintex Workflow content databases.
Content Databases
Connection String ​Lists the connection strings for the Nintex Workflow content databases. Parameters are listed here. For instructions on setting parameters of content databases, see Manage content databases.​
Content Databases Add content database ​Displays the Add content database page for adding Nintex Workflow content databases. 
Content Databases View database mappings ​Displays the View Database Mappings page that lists the Nintex Workflow content databases mapped to the site collections. 
Content Databases Manage database mappings ​Displays the Manage Database Mappings page for mapping Nintex Workflow content databases to SharePoint content databases.​

Add content database page

This section describes selections on the Add content database page.
Section Selection Description
Database Name and Authentication Database Server Name of the database server containing the new or existing database that you want to use as a content database. 
Default value: 
The name of the default SharePoint database server.
Database Name and Authentication Database Name ​Name of the new or existing database that you want to use as a content database.
Database Name and Authentication Connect to an existing database When selected, uses an existing database. When cleared, creates a new database. 
Database Name and Authentication​ Database authentication Select one of the following options. 
  • Windows Authentication (recommended)
  • SQL Authentication
Failover server Failover Database Server ​​Name of the database server to use for failover. 
Service account access Grant service account access ​When Yes is selected, grants access to all content web application service accounts. When No is selected, web applications do not have access to the content database until access is granted using the Web Application activation page.

4.13 Manage content databases

This help topic provides instructions for administrators on viewing existing database mappings and changing the mappings. It also describes selections on related pages. 

Viewing database mappings for site collections 

This section provides instructions for viewing the Nintex Workflow content databases mapped to the SharePoint site collections. 

To view database mappings for site collections: 
  1. Access the Nintex Workflow Database Setup page: On the Central Administration Home page, click Nintex Workflow Management; in the Nintex Workflow Management section, click Database setup
  2. On the Nintex Workflow Database Setup page, under Content Databases, click View database mappings.

Mapping content databases

This section provides instructions for mapping SharePoint content databases to Nintex Workflow content databases. 

Each SharePoint content database corresponding to site collections using Nintex Workflow must be mapped to a Nintex Workflow content database. The Nintex Workflow content database that you map to a given SharePoint content database affects all site collections within that SharePoint content database. The mapping you specify is applied when the Nintex Workflow feature is activated on site collections within the SharePoint content database. Changing the mapping affects new site collections only; original mapping is retained for existing site collections in the SharePoint content database. 

To change the mapping for existing site collections on a given SharePoint content database, use the NWAdmin operation MoveData. This operation moves existing workflow progress data to a different Nintex Workflow content database. Using this operation is helpful when you want to keep all site collection data together. For instructions on how to implement a 1-to-1 mapping for an existing site collection already using Nintex Workflow, see the Nintex Connect article Splitting existing SharePoint and Nintex Content Databases. For more information on the MoveData operation, see NWAdmin Operations - Nintex Workflow 2013 on Nintex Connect. 

You can view mapping by site collection using the View database mappings page. 

All data generated from a given site collection is stored within the mapped Nintex Workflow content database. By default (if automatic mapping is enabled via Global Settings), when a workflow is first run on a site collection, a content database is selected automatically based on how many site collections it already contains.

When each mapped Nintex Workflow content database is specified, its connection string is configured. Properties of the connection string include the SQL Server database server, the database name, and the authentication settings.

Note: Using multiple content databases helps spread the load for environments with complex or high-traffic workflows running on multiple SharePoint content databasesIn small farm scenarios it is reasonable to use the same database for the content and configuration databases.

Note: Configure licensing before configuring database settings.

To map content databases: 
  1. Access the Nintex Workflow Database Setup page: On the Central Administration Home page, click Nintex Workflow Management; in the Nintex Workflow Management section, click Database setup
  2. On the Nintex Workflow Database Setup page, under Content Databases, click Manage database mappings.
  3. The SharePoint content databases are listed on the page. You can map each one to an existing or new Nintex Workflow content database. 
  4. To map a SharePoint content database to an existing Nintex Workflow content database, select the database from the drop-down list under ​Map to Workflow Content Database.
  5. ​To map a SharePoint content database to a new Nintex Workflow content database, do the following. 
    1. Select ​Add content database from the drop-down list under Map to Workflow Content Database. 
    2. In the Add content database page, enter the database server, name, and other settings. 
    3. Click OK to go back to the Manage Database Mappings page. 
      The added content database is mapped.
  6. Click OK.

Adding content databases

For instructions on adding content databases, see Database settings.

Note: You can also add Nintex Workflow content databases from the Manage Database Settings page. See the previous section. ​

Setting parameters of content databases

You can set parameters of Nintex Workflow content databases, including the MultiSubnetFailover parameter for AlwaysOn, using the NWAdmin operation UpdateContentDatabaseParameters. For more information on this and other NWAdmin operations, see the NWAdmin Guide at https://community.nintex.com/docs/DOC-1026.

To set parameters for a content database

  1. Run the NWAdmin operation UpdateContentDatabaseParameters for your database name, server, and parameters.
    For example, to set the
    content database "MyContentDB" on the server "MyServer" to AlwaysOn, run the operation as follows. 
    NWAdmin.exe –o UpdateContentDatabaseParameters –serverName MyServer -databaseName MyContentDB -newParameters "MultiSubnetFailover=True"​
  2. Run the IISreset command to implement the changes.
    Parameters for content databases are listed on the Database Setup page in Central Administration. For more information on this page, 
    see Database settings.

Field descriptions

This section describes selections on the following pages. 
  • View Database Mappings
  • Manage Database Mappings 

For descriptions of selections on the Nintex Workflow Database Setup and Add content database pages, see Database settings.
For descriptions of selections on the Change configuration database page, see Manage the configuration database.

View Database Mappings page

This section describes the View Database Mappings page.
Use this page to determine which Nintex Workflow content database stores the data for each SharePoint site collection. 
Section Description
Site
Lists SharePoint site collections. 
Workflow Database Lists the Nintex Workflow content database that are mapped​ to the SharePoint site collections.

Manage Database Mappings page

This section describes selections on the Manage Database Mappings page.
Use this page to map content databases. 
Section Selection Description
​​SharePoint Content Database
(N/A) Lists SharePoint content databases.
Map to Workflow Content Database Any available workflow content database ​Maps the SharePoint content database to any available Nintex Workflow content database. 
Note: Availability of this selection is controlled by Global Settings.
Map to Workflow Content Database Add content database ​Displays the Add content database page for adding Nintex Workflow content databases.
Map to Workflow Content Database​ ​(existing Nintex Workflow content database) ​Maps the SharePoint content database to the selected Nintex Workflow content database.

4.14 Web Application activation settings

​The Web Application Activation page provides the option to activate the Nintex Workflow solution on the web farm. These settings must be configured after importing the Nintex Workflow license and configuring the database settings.

To activate Nintex Workflow on the web farm:

  1. On the Central Administration Home page, click Nintex Workflow Management.
  2. Click Web Application activation
    The default web application is automatically selected.  

  3. To select another web application, use the drop-down list for Web Application.
  4. To activate Nintex Workflow across the web farm, select the check box All content web applications.
  5. Click Activate.
  6. ​It is now best to configure the email-related Global Settings.

4.15 Managing workflow actions

This page is used to manage the Nintex Workflow actions that are available to workflow designers for the current farm, site collection or site. Workflow actions can either be restricted by permissions or not be made available at all to all users by unchecking the workflow action.

To modify the settings for the web farm:

  • Navigate to SharePoint Central Administration.
  • In the Quick Launch, click on Nintex Workflow Management, click on Manage allowed actions.
  • By default, actions are accessible to all users. Permissions can be set individually for each action by selecting the workflow action's row and clicking the Edit permissions in the Ribbon.


To modify the settings for a site collection or site:

  • Navigate to the Site Collection or Site.
  • In the Settings Icon , click on Site Settings.
  • In the Nintex Workflow Management group, click on Managed allowed actions.
  • To set permissions for a workflow action:
    • Select the workflow action's row, in the Ribbon, click on Stop inheriting actions.


Note: If an action is not checked it will not be selectable in the workflow designer. If an imported workflow contains an action that is not allowed, the workflow cannot be saved or published.

Enforce allowed actions at run time

The Enforce allowed actions at run time option is available in the Global Settings from the Nintex Workflow Management section in Central Administration. When this option is enabled, a workflow that contains an action that is not marked as Allowed will cause the workflow to error. However, not all actions are affected by this option. Actions that don't apply to this option are actions that are native within Microsoft SharePoint Server 2013. 

4.16 Global Settings

​​​​

The Global Settings page is used to set Nintex Workflow settings including email, verbose logging, allowed actions, and other application options for the web farm.

Configuring Global Settings

Prerequisites: Import Nintex Workflow licensing, configure database settings, and configure  web application activation.

To configure the Global Settings:

  1. Navigate to SharePoint Central Administration.
  2. In the Quick Launch, click Nintex Workflow Management and then click Global settings.
  3. Fill in the appropriate details for your environment and then click OK.

It is now possible to Activate Nintex Workflow.

Field descriptions

The Global Settings page has fields in the form of the following section labels and selections.

Section Selection Description
Email settings Outbound SMTP Server Name of outbound SMTP server for sending emails from workflows.
Email settings SMTP server requires authentication Passes the specified username and password to the SMTP server.
Email settings Username Username to pass to the SMTP server. (Available when the option SMTP server requires authentication is selected.)
Email settings Password Password to pass to the SMTP server. (Available when the option SMTP server requires authentication is selected.)
Email settings From Address Email address to use as "From" address in emails.
Email settings Reply To Address Email address to use as "Reply To" address in emails.
Email settings Character Set Character encoding to use in emails. Example: 65001 (Unicode UTF-8).
Email settings Specify different encoding for plain text emails Character encoding to use in emails that are plain text format.
Email settings Specify different encoding for SMS messages Character encoding to use in SMS messages.
Email settings Use css styles in HTML emails Uses styles from Cascading Style Sheets (CSSs) in emails that are HTML format.
Email settings Location of stylesheet containing email styles Path (after "/_layouts/") to Cascading Style Sheet (CSS) used in HTML emails. Default: NintexWorkflow/htmleditorstyles.css
Instant messaging settings

When OCS/Lync is selected, provides the following settings.

  • From sip address
  • From domain user (domain\username)
  • Password
  • OCS/Lync server
  • Transport

Configure the server settings to allow Nintex Workflow 2013 to integrate with OCS/Lync. Enabling OCS/Lync integration allows the Get user status action, the Get users by status action and LazyApproval via instant messaging to be used.

Upgrade note: If the Nintex Workflow 2013 OCS Integration component is installed and configured for the web farm, the Instant messaging settings section will be configured to use LCS by default. If Office Communication Server 2007 is used, select the option OCS/Lync to enable the new functionality. If Live Communications Server 2003/2007 is used, leave the setting as LCS. The Get current status action, Get users by status action and LazyApproval via instant messaging is not compatible with Live Communications Server 2003/2007.

Allow automatic mapping of Nintex Workflow Content Databases Enable automatic database mapping ​When enabled, displays the option “Any available workflow content database” on the Manage Database Mappings page; when this option is selected on the Manage Database Mappings page, the system automatically maps the indicated SharePoint content database to any available Nintex Workflow content database the first time a workflow is run. When disabled, requires explicit selection of a Nintex Workflow content database for mapping to each SharePoint content database. 
Conditional workflow settings Allow "System Account" to trigger conditional workflows

​When enabled, allows the SharePoint Runtime account "System Account" to initiate workflows that have conditional start configurations. For more information on conditional start configurations, see Workflow Settings.

Default: Enabled.

Enforce safe looping

Enforce safe looping

Helps prevent excessive looping iterations by automatically adding a hidden delay at the end of each iteration of the action Loop. For more information, see Preventing excessive looping iterations.

Enable maximum loop threshold

Enable maximum loop threshold

When enabled, stops workflow instances containing loop actions (​Loop or State Machine) that iterate beyond the specified threshold. For more information, see Preventing excessive looping iterations.

Enable maximum loop threshold

Maximum loop iterations per action instance per day

Number of loop iterations to use as threshold.

Enforce allowed actions at run time


Executes actions only if they are marked "Allowed" (if the action has this option).

When the Enforce allowed actions at run time option is enabled, a workflow that contains an action that is not marked as Allowed will cause the workflow to error. However, not all actions are affected by this option. Actions that don't apply to this option are actions that are native within Microsoft SharePoint Server 2013. 

Global settings are cached and refreshed automatically every 15 minutes. For changes take effect immediately, perform an IISRESET and restart the Windows SharePoint Services timer service.

Allow the Execute SQL action to impersonate the application pool identity

Allow Execute SQL action to use the application pool identity

Allows the workflow action Execute SQL to connect to the database as the application pool identity.

Allow workflow schedules to impersonate the system account

Allow workflow schedules to impersonate the system account

Allows workflow schedules to execute using a system account identity.

Allow entry of user credentials

Allow entry of user credentials in

Allows entry of manually defined credentials in the indicated areas.

  • Constants page only : Manage workflow constants page.
  • Constants page and action dialog : Manage workflow constants page and action configuration dialog box.
  • Neither : No entry of manually defined credentials is allowed.

For more information, see Workflow Constants.

Allow sending notifications on behalf of another user

Allow sending on behalf of another user

Allows configuration of "From" field in actions that send emails.

Allow 'Run now' on actions that interact with external data

Allow 'Run now' on actions that interact with external data

Makes "Run now" feature available in actions that interact with data or systems outside of the workflow.

Allow 'Run now' on actions that interact with external data

Allow on sites that use workflow change approval

Allows "Run now" on sites that use workflow change approval.

Allow verbose workflow logging

Allow verbose workflow logging

Provides option to enable verbose workflow logging to assist with debugging workflows.

Allow verbose workflow logging

Number of days to keep verbose logs

Number of days to keep verbose logs.

Enforce message header and footer

Enforce message header and footer

Includes the configured header and footer in all email notifications.

Specify a default task list name

Default task list name

Name for the default task list used with Nintex Workflow. Default value: Workflow Tasks.

Specify a default task list name

Edit the default task list name for other languages

Displays the Manage the default task list name page for editing names by language.

Long term delegation

Allow long term task delegation

Allows users to set tasks to be delegated for a time period.

Site administrators long term delegation

Allow site administrators to set long term delegation for other users

Allows site administrators to set tasks to be delegated for a time period for other site users.

Notification preferences

Allow user notification preferences

Allows users to set their message notification preferences.

Workflow schedule permissions

Require designer permissions to work with workflow schedules

Requires Web Designer permissions to modify or create a workflow schedule. If disabled, only contribute permissions are required.

Task form properties view

View name for the task page to use

Name of view for the approval and review task pages to use when displaying item properties.

Default workflow start page

Default start workflow page URL

URL of page to use for starting workflows.

Default task edit page

Default task edit page URL

URL of page to use for editing workflow approval and reviewing tasks.

Default task view page

Default task view page URL

URL of page to use for viewing workflow approval and reviewing tasks.

Default task edit page for Flexi tasks

Default task edit page URL

URL of page to use for editing workflow Flexi tasks.

Default task view page for Flexi tasks

Default task view page URL

URL of page to use for viewing workflow Flexi tasks.

Workflow statistics permissions

Who can see workflow statistics

Allows the selected type of user to view workflow statistics.

  • No one
  • Site readers
  • Site administrators

Related topics

Preventing excessive looping iterations
Workflow Constants

4.17 Managing LazyApproval settings

This page is used to manage the LazyApproval feature of Nintex Workflow. It provides the options to edit the current list of recognized terms or add others, edit the LazyApproval notification footer and set phrases to ignore. LazyApproval must first be enabled for the system. Please refer to the About LazyApproval for more information. 

Enabling / Disabling LazyApproval 

There are two LazyApproval methods that can be enabled for Nintex Workflow:

To enable LazyApproval for the farm:

LazyApproval via email

Note: If the link Configure server incoming mail settings is shown in the Enable or disable LazyApproval via email option then those settings are not configured for SharePoint. Please configure them according to your SharePoint configuration documentation. Return to this page after completing your configuration. If those settings are configured, the link Enable / Disable LazyApproval which be shown instead.

To configure LazyApproval via email


LazyApproval via instant message

Note: If the Enable or disable LazyApproval via instant message option is not available, please ensure that Instant messaging settings have been configured in the Global Settings.

To configure LazyApproval via instant message:


Managing Phrases

A list of allowed words will appear which are those that will be recognized by the LazyApproval process. Phrases or terms can be added or removed as required.

To create a new phrase:


To edit or delete an existing phrase:


Managing Phrases to Ignore

By creating a phrase to ignore, the LazyApproval will discard email messages that contain the phrase in the subject line. This is useful for out of office and automated replies that an approver may have. If this is not configured, when a automated reply is sent to the LazyApproval alias it will cause the LazyApproval feature to go into a loop where the LazyApproval alias will send a response to the sender each time the sender sends an automated reply.

To create a phrase to ignore:


To delete an existing phrase to ignore:


4.18 Defining message templates

Message templates used by the 'Request approval' action can be defined globally for the farm in SharePoint Central Administration, for a specific site collection or for individual sites.

To change the Message Template for the Web Farm:

  • Navigate to SharePoint Central Administration.
  • In the Quick Launch, click on Nintex Workflow Management, click on Message Templates.

To change the Message Template for the Site Collection:


    To change the Message Template for a Site:

    The Message Templates page displays:

    Note: Changes made to the message templates will not affect workflows in progress.  Changes will only be seen when new instances of the workflow are started. 

    4.19 Activating Nintex Workflow

    In order to design workflows and interact with Nintex Workflow the product needs to be activated in the site where the functionality is required.

    The first step is to activate the product for the Site Collection (see Step 1 below) and the second step is to activate Nintex Workflow per site (see Step 2 below).

    1. Activating Nintex Workflow for the Site Collection

    To activate Nintex Workflow in a site collection:

    • Navigate to the Top Site level home page.
    • In the Settings Icon , found on the top right-hand side, click on Site Settings.


    It is now possible to activate Nintex Workflow 2013 features in the sites within this site collection.

    2. Activating Nintex Workflow in a site

    Nintex Workflow must be activated at the site collection level before it can be activated on the site level.

    To activate Nintex Workflow in a site:

     It is now possible to start using Nintex Workflow within this site.

    4.20 Configuring user preferences

    Nintex Workflow notifications can be sent via email, Office Communication Server (OCS) or SMS, depending on how the SharePoint environment is configured. Each user can then set their preferred method of notification for both business hours and after hours.

    To set your personal preferences:

    • Activate the drop-down from the logged-in user name link at the top of a page.
    • Mouse-over Nintex Workflow 2013 then click on Manage Notification Preferences.

    • There are sections for Business hours notification preference and After hours notification preference. The default settings are set to Email.
    • In the drop-down, select an option that is available within the current network setup.

    • The values for Email and OCS are automatically determined by the user account currently signed in as. 
    • If selecting SMS, enter the SMS address in the textbox provided.

    • The SMS address is often something like a mobile telephone number plus a domain. However, to ensure the correct address is provided, please contact the System Administrator or equivalent for the right format and settings.
    • Note: Nintex does not provide support for troubleshooting Email, SMS or OCS systems.
    • When all settings are configured, click the OK button.

    4.21 Security Settings

    ​​According to how a user is required to interact with Nintex Workflow there are different security considerations to be made. The table below outlines the minimum permissions required to perform the actions described. In general, the runtime permissions can be inherited from the site or the parent site but must be the effective permissions for the given user at the list level.

    Nintex Role Required "SharePoint Permission Level" Note
    Approver/Reviewer Contribute (at the item level at least) This role includes all users who will be able to perform their assigned human task as part of the workflow from the SharePoint site. Users may be assigned tasks even without these permissions.
    Lazy Approver None This role includes all users who will be able to use LazyApproval to respond to their assigned task. The user however will need at least "Read" permissions if they wish to visit the site.
    Workflow Designer Design This role includes all users who are responsible for creating and maintaining workflows. With these permissions the user can use the Nintex Workflow designer as well as the related tools and pages. In order to be able to publish a workflow, the user will need to be configured as a Workflow Designer.
    Site Administrator Full Control (on the site) This role is responsible for activating and configuring the site level Nintex Workflow settings from the "Site Settings" page.
    Server/Farm Administrator Full Control (on the central administration site and across site collections)
    Nintex Workflow Enterprise Edition is required.
    This role is responsible for the installation and the server level configuration of Nintex Workflow.

    Site Collection Administrator Full Control (on the site collection)
    Nintex Workflow Enterprise Edition is required.
    This role is responsible for managing workflows that exist within the site collection and from each site and list.
    ​Workflow user ​Contribute ​Can start workflows, add schedules, view history and progress reports.


    Configuring Allowed Workflow Designers

    There is a known permissions quirk with SharePoint 2013 workflows created using either Nintex Workflow or SharePoint Designer (SPD).

    A Workflows list is used to hold all defined workflows for a team site. Upon creating your first workflow in SPD or activating the "Nintex Workflow 2013" feature, this list is given unique permissions, which copies the current permissions assigned within the site.  As a result, the only people who will be able to modify permissions on this list are site owners or those who were given explicit 'Full Control' access before the list was created.

    Nintex have exposed the list through the user interface to work around the permission quirk described. To add/remove users as designers, the user assigning the permissions must be a site owner or have Full Control access to the Workflows list. 

    To add a user or group to the Workflow designers group:

    1. Navigate to the site.
    2. On the top right, click  (Settings) and then click Site Settings.
    3. On the Site Settings page, under Nintex Workflow, click Allowed workflow designers. 

    From the permissions page the members can be maintained by adding them in the standard SharePoint manner. Ensure that users who require full access to the designer have "Full Control" set for their permissions.

    Configuring Workflow Action Security

    Permissions for each workflow action can be configured in the Manage workflow actions page.

    4.22 Manage Context Data

    This page is used to manage context data that are available when designing Nintex Workflows. Users can edit existing context data or create new custom context data and deploy them using this settings page.
     
    To configure context data: 
     
    • Navigate to SharePoint Central Administration.
    • In the Quick Launch, click on Nintex Workflow Management, click on Manage context data.

    Add new Context Data

    To add a new Context Data item:


    Edit/Delete Context Data

     
    To edit an existing item:
     
    Note: If other languages are available in the SharePoint environment, the Display Name and Description for the Context Data can be set for a specific language. Click on the Edit Display Name and Description for other languages link to edit the details for other languages.
     
    To delete an existing item:


    Edit Display Name and Description for other languages

    Configure Display and Description labels for the context data item when used in sites of a non default language.
     
    To edit the Display Name and Description for other languages:
    • Click on the Context Data Display Name link in the Manage Context Data screen
    • Click on the Edit Display Name and Description for other languages
    • In the Language drop-down, select the language of the Context Data to be edited
    • Make the changes required and when complete, click the OK button.
     

    4.23 Purge workflow data

     The Purge workflow data provides the option to delete historic data from the Nintex Workflow database. This option is also available as a NWAdmin operation. Reasons that data may need to be removed:

    Workflow data can be purged globally for the web farm, a specific site collection or individual sites.

    To purge workflow data for the web farm:

    To purge workflow data for the site collection:

    Navigate to the top level site home page.

    To purge workflow data for a site: 


    To purge workflow data:


    Note: Once data has been purged, it cannot be recovered without restoring a backed up version of the Nintex Workflow content database.


    4.24 Managing workflow error notification settings

    The Workflow error notification settings provides the options to specify to whom workflow error and cancellation notifications are sent.

    Workflow error and cancellation notification can be set globally for the web farm, a specific site collection or individual sites.

    To set the workflow notification settings for the web farm:

    Note: By default the settings will inherit from the parent settings. A site will inherit its settings from the site collection and a site collection from the farm. If the setting is changed at a specific level, it will no longer inherit the settings from the parent.

    To set the workflow notification settings for the site collection:


    To set the workflow notification settings for a site:

    Workflow Error and Cancellation Notification Settings

    The Send notifications to the workflow initiator option notifies the user who started the workflow if the workflow errors or is cancelled.

    For additional users to be notified when a workflow errors or is cancelled, specify the email address of the user in the Specify other email addresses that will receive the notifications text field.

    Notifications can be turned off by selecting No for Send notifications to the workflow initiator and leaving the Specify other email addresses that will receive the notifications text field empty.


    5 Using the Workflow Designer

    5.1 Getting started with the Nintex Workflow designer

    Getting started with the Nintex Workflow designer.

    Creating a workflow

    A workflow can be created in one of two ways.

    To create a new workflow from within a Document Library:

    1. Select the Library tab on the Ribbon.
    2. Click the Workflow Settings button and select Create a Workflow in Nintex Workflow from the menu options. 

    To create a new workflow from the Workflow Gallery: 

    1. Click the Workflow Settings button in the Ribbon and select Manage Workflows with Nintex Workflow.
    2. Click the Create link above the Published Workflows list.

    Note: If the Show template page when creating a new workflow box ix checked (the default setting) the template selector will appear. To design a new workflow on a blank canvas, select Blank, or alternatively select a template from one of the categories.

    The Nintex Workflow designer will open in the current window.

    The Nintex Workflow Designer

    The Nintex Workflow designer page has three main areas; the Workflow Actions toolbox on the left, the Ribbon at the top and the design canvas in the center.

    The Workflow Actions toolbox

    The Workflow Actions toolbox lists the actions that can be used in the design canvas to create workflows. The actions are divided into groups of related actions. Click the heading of a group to view the actions in that group. The default groupings are:

    • Commonly used
    • Integration
    • Libraries and lists
    • Logic and flow
    • Operations
    • Provisioning
    • User Defined Actions (shown only if the User Defined Actions have been created)
    • User interaction
    • My snippets (shown only if snippets have been created)


    The names of workflow actions and the groupings can be edited by the Administrator. For more information please refer to the Managing workflow actions.

    Resizing the Actions toolbox

    To resize the toolbox: Click and drag on the expander bar on the inside edge of the toolbox.


    Adding actions to the design canvas


    To design a workflow, add the desired actions onto the design canvas and configure each action. An action can be placed onto the design canvas by one of two methods:

    Configuring actions


    To configure an action, select the drop-down menu in the title bar of the workflow action once it is on the design canvas.  

    Configure: Open the action settings dialog to configure the settings of an action.

    Copy: Select to copy an action (includes all its configuration settings) and paste in to another location on the design canvas. Once the action has been copied, find the desired location on the design canvas, right-click on a drop zone and select Paste.

    Note: The configuration of the pasted action can then be modified independently of the original.

    Delete: Select to remove the action and any modifications made to it from the workflow.

    Disable: Select to disable the action from the workflow. Once the action is disabled it will be omitted when the workflow is run and hidden from status views. The action will appear dimmed when it is disabled.

    Note: When an action is disabled, its child actions are also disabled.

    The workflow action can also be disabled from the Actions dialog box. To do this, click Common in the Ribbon and check the Disable box.

    The Ribbon Menu

    The Ribbon menu can be found at the top of the design canvas. The options and related Help files are all listed below.


    5.2 About connections

    Connections are sets of connection parameters to external providers. When a connection to an external provider is defined, you can use that connection in workflows anywhere on the SharePoint site.
     
    You can limit connections to your user account if desired. Permissions checks for user-specific connections are performed during selection of connections in action configuration and during publishing of workflows.
     
    External providers that use connections include DocuSign, Microsoft Dynamics CRM, and Salesforce. This list is not exhaustive; connection-specific providers are subject to change between releases of this product.
     
    If a connection is deleted, then any currently running workflows that reference the connection are stopped and the workflows cannot be republished until a valid connection is selected for the affected actions.
     
    Related topics
    Managing connections to external providers
    Connection Manager dialog box
    Create Connection dialog box

    5.3 Association columns

    The Association Columns feature is used to associate site columns with the workflow definition. Association columns are useful where you may need to reference columns for the 'current item' from within a reusable workflow. Association columns are automatically added to a list or library when a reusable workflow is associated to that list or library.

    The Association Columns dialog allows associations to site columns to be created, added, deleted or modified.
     
    Each Association Column is defined within the workflow definition. If these columns exist in the target library or list, they will be used. If they do not exist, they will be added to the target library or modified and deleted. Whilst Association Columns are predominantly used in reusable workflows associated with content types, they do not associate with the content type itself, instead any defined columns are added to the relevant list or library where the content type is deployed.
     
    Please note: Association columns do not work on site workflows.

    To access the Association Column dialog box:

    1. Navigate to the List Workflow you want to create Association Columns on.
    2. Click on Workflow Settings in the Ribbon.
    3. Select Association Columns.


    Create New Site Column

    To create a new site column and associate it with this workflow, click the New Site Column button in the Ribbon. 


    Set the column properties as described below: 


    Once the workflow is published, the new site column will be created.

    Associate the workflow with a site column that already exists

    1. Select Existing Site Column to associate the workflow with a site column that already exists in the SharePoint site.
    2. In the Add existing site column dialog, select the desired site column from the list.
    3. Click the OK button.

    Other Options

     
    Delete
    To delete an association with a site column:
    1. Select the site column from the list
    2. Click the Delete button in the Ribbon.
    3. And then OK.

    Please note: This does not delete the site column itself, only the association between the site column and this workflow. In the case of a New site column association that has not yet been published, the site column has not been created in the SharePoint site yet, and the site column definition will be lost when the association is deleted.
     
    Modify

    Only a New site column definition can be modified.
    1. Select the New site column from the list and click the Modify button.
    2. The Modify site column dialog will appear with the same configuration options as the Create New Site Column dialog, above. 

    5.4 Connection Manager dialog box

    The Connection Manager dialog box allows you to manage connections to external providers, such as DocuSign, Microsoft Dynamics CRM, and Salesforce. This dialog box contains the following buttons in the ribbon.

    Button Description
    Close Closes the dialog box.
    New Displays the Create Connection dialog box. For more information, see Create Connection dialog box.
    Delete ​Deletes the selected connection.
    Help ​Displays the Help.

    Related topics
    Create Connection dialog box
    Managing connections to external providers

    5.5 Create Connection dialog box

    The Create Connection dialog box allows you to create connections to external providers, such as DocuSign, Microsoft Dynamics CRM, and Salesforce. This dialog box contains the following buttons and fields.

    Button or field Description
    Save Saves changes to the current connection.
    Cancel ​Cancels changes and closes the dialog box.
    Help ​Displays the Help.
    Scope

    ​Select one of the following options.

    • User: Limits availability of this connection to the current user account.
    • Site: Does not limit availability of this connection. Any user on the site can use the connection.
    Provider

    ​Select one of the following options.

    • DocuSign
    • Dynamics CRM
    • Salesforce

    Additional fields are displayed for the selected provider.

    Connection name ​Name of this connection to be displayed for selection when configuring workflow actions associated with the provider.

    Related topics
    Connection Manager dialog box
    Managing connections to external providers

    5.6 Error Handling

    The error handling panel is available in some actions. It allows the workflow designer to capture errors that occur during the execution of the action and create custom logic to handle it.

    Error handling options

    Capture Errors

    This option specifies whether or not to turn on the capturing of errors. If this option is set to 'Yes', an error in the action will no longer cause the workflow to fail. Instead, the values described in the next two sections will be populated. Apart from using the values provided in the drop-down, a Yes/No workflow variable can be used.

    Store error occurrence in

    Specify a Yes/No workflow variable that will store whether or not an error has occurred. The variable will be set to Yes if an error occurred and No if the action execution completed.

    Store error text in

    Specify a text workflow variable that will store the details of an error if one occurs. This value will be set to empty if no error occurs.

    Note: The Store error occurrence in and Store error text in workflow variables will not be modified if Capture Errors is set to No.

    5.7 Importing and exporting workflows

    ​Nintex workflows can be imported and exported to the local file system as .nwf files. Use this feature to copy workflows from one server to another or in other file transfer scenarios.

    Note: External Start endpoint URLs are not included in exported workflows. To use External Start with imported workflows, generate new endpoint URLs after import.

    Exporting workflow​​s

    You can export Nintex 2013 workflows to .nwf files. Reusable workflows can also be exported to .wsp files for use in Visual Studio.

    To export a workflow (.nwf)

    1. Click Export in the ribbon.
      The browser determines if the site is trusted and then initiates the file download process.
    2. Respond to prompts from the web browser to download and save the workflow.
      Consult the web browser documentation for more information on downloading and saving files.

    To export a workflow to a Visual Studio 2012 solution file (.wsp)

    • Click the arrow under Export and then select Export to Visual Studio.
      Note: Not all workflow types such as list workflows or site workflows can be exported to Visual Studio. Only Reusable Workflows created in Nintex Workflow 2013 can be exported to Visual Studio 2012.

    Importing workflows

    You can import workflows that were created in Nintex Workflow 2010 and Nintex Workflow 2013. 

    To import a workflow

    1. Click Import in the ribbon.
    2. In the Import Workflow dialog box, click Browse and then locate and select the workflow file (.nwf).
      The workflow opens in the Nintex Workflow designer.

    5.8 Inline functions

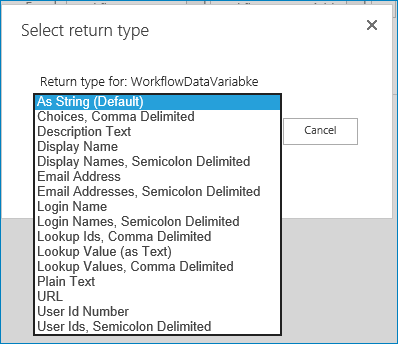
    In any text input that supports Inserting reference fields, an inline function can be entered that will be resolved at workflow run-time.

    A number of functions are provided out of the box, and additional functions can be added with the NWAdmin.exe tool.

    Functions can also be used as arguments for other functions.

    Example:

    Function behavior

    The parsing engine first replaces any inserted reference tokens, and then the resulting text is evaluated for functions.

    If a function contains another function as an argument, the inner most function will be evaluated first.

    As reference tokens are replaced first, the reference token can also contain function syntax that will be evaluated.

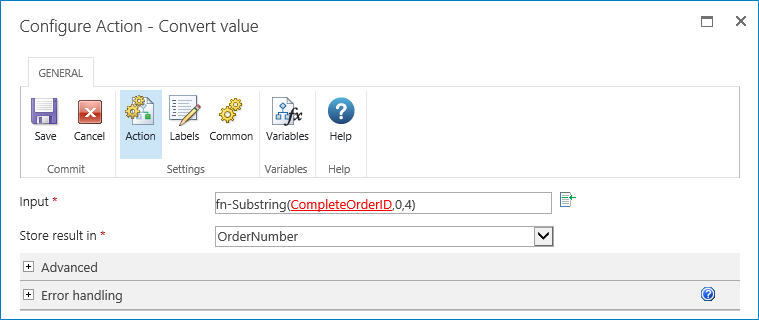
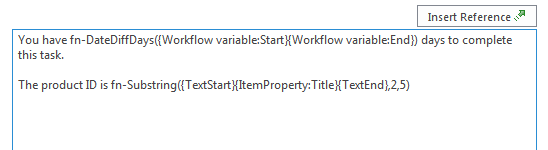
    If text used for a function argument contains function syntax (i.e. a brace or comma character) wrap the argument with {TextStart} and {TextEnd} to indicate a block of text that should not be parsed further.

    For example, if a number variable that contains a decimal value is passed to the function, and the decimal separator for your region is a comma, the {TextStart} and {TextEnd} tokens will need to be used.
     
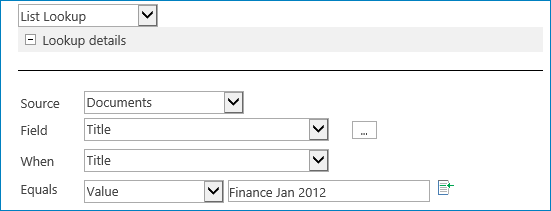
    In the example shown above, when the "Title" of the item is returned, if it were to contain a comma, and the {TextStart}{TextEnd} blocks were not used, then the Substring function would treat the text after the first comma as the second argument, instead of the number "2" provided, and the function would error.

    Function reference

    fn-Abs

    Returns the absolute value of a number.

    Example

    fn-Abs({WorkflowVariable:Number})

    Arguments

    • Number The number to return the absolute value of.

    fn-Currency

    Represents a numeric value as a currency formatted text.

    Example

    fn-Currency({WorkflowVariable:Cost})

    Arguments

    • Number A variable containing a numeric value.

    fn-DateDiffDays

    Determines the number of days between two dates. The result can be a decimal value including partial days.

    Example

    fn-DateDiffDays({WorkflowVariable:StartDate}, {WorkflowVariable:EndDate})

    Arguments

    • Start date The starting date and time to calculate the difference between.
    • End date The end date and time to calculate the difference between.

    fn-DateDiffHours

    Determines the number of hours between two dates. The result can be a decimal value including partial hours.

    Example

    fn-DateDiffHours({WorkflowVariable:StartDate}, {WorkflowVariable:EndDate})

    Arguments

    • Start date The starting date and time to calculate the difference between.
    • End date The end and time date to calculate the difference between.

    fn-DateDiffMinutes

    Determines the number of minutes between two dates. The result can be a decimal value including partial minutes.

    Example

    fn-DateDiffMinutes({WorkflowVariable:StartDate}, {WorkflowVariable:EndDate})

    Arguments

    • Start date The starting date and time to calculate the difference between.
    • End date The end and time date to calculate the difference between.

    fn-DateDiffSeconds

    Determines the number of seconds between two dates. The result can be a decimal value including partial seconds.

    Example

    fn-DateDiffSeconds({WorkflowVariable:StartDate}, {WorkflowVariable:EndDate})

    Arguments

    • Start date The starting date and time to calculate the difference between.
    • End date The end and time date to calculate the difference between.

    fn-FormatDate

    Represents a date time value in text of a specific format.

    Example

    fn-FormatDate({WorkflowVariable:MyDate}, d)

    Arguments

    fn-Insert

    Adds text in to a larger string.

    Example

    fn-Insert({WorkflowVariable:Text}, 4, {ItemProperty:Title})

    Arguments

    • Text The text to modify.
    • Start position The character position to insert the new text at. The first character in the string is at position 0.
    • New text The additional text that will be added at the start position.

    fn-Length

    Returns the number of characters in a string.

    Example

    fn-Length({WorkflowVariable:Text})

    Arguments

    • Text The string to count the characters of.

    fn-Max

    Returns the greater of two numbers.

    Example

    fn-Max({WorkflowVariable:Number1}, {WorkflowVariable:Number2})

    Arguments

    • Number 1 The first number to compare.
    • Number 2 The second number to compare.

    fn-Min

    Returns the lesser of two numbers.

    Example

    fn-Min({WorkflowVariable:Number1}, {WorkflowVariable:Number2})

    Arguments

    • Number 1 The first number to compare.
    • Number 2 The second number to compare.

    fn-NewGuid

    Generate a globally unique identifier.

    Example

    fn-NewGuid()

    fn-PadLeft

    Returns the provided string right aligned and padded to the total length with a specific character.

    Example

    fn-PadLeft({WorkflowVariable:Text}, 6)

    fn-PadLeft({WorkflowVariable:Text}, 6,-)

    Arguments

    • Text The string to pad.
    • Length The target total length of the padded result.
    • Character Optional. The character to pad the original string with. A space character is used by default.

    fn-PadRight

    Returns the provided string left aligned and padded to the total length with a specific character.

    Example

    fn-PadRight({WorkflowVariable:Text}, 6)

    fn-PadRight({WorkflowVariable:Text}, 6,-)

    Arguments

    • Text The string to pad.
    • Length The target total length of the padded result.
    • Character Optional. The character to pad the original string with. A space character is used by default.

    fn-Power

    Raises a number to the specified power.

    Example

    fn-Power({WorkflowVariable:Number}, {WorkflowVariable:Power})

    Arguments

    • Number The number to raise to the power.
    • Number The power to raise number to.

    fn-Remove

    Removes a section of text in a larger string.

    Example

    fn-Remove({WorkflowVariable:Text},0,3)

    Arguments

    • Text The text to modify.
    • Start position The character position from which to remove the following characters. The first character in the string is at position 0.
    • Length Optional. The number of characters from the start position to remove. All remaining characters will be removed by default.

    fn-Replace

    Replaces a section of text in a larger string.

    Example

    fn-Replace({WorkflowVariable:Text},abc,{ItemProperty:Title})

    Arguments

    • Text The text to modify.
    • Old value The text to search for and replace.
    • New value The text to replace Old value with.

    fn-Round

    Rounds a decimal value to the nearest integer.

    Example

    fn-Round({WorkflowVariable:Number})

    Arguments

    • Number The decimal number to round.

    fn-SubString

    Extracts a portion of text from a string.

    Example

    fn-SubString({WorkflowVariable:Text},5,10)

    Arguments

    • Text The text to extract a value from
    • Start index The position in the text of the first character to retrieve. The first character in the string is at position 0.
    • Number of characters The number of characters to retrieve from the start index.

    fn-ToLower

    Formats text in a string to all lower case.

    Example

    fn-ToLower({WorkflowVariable:Text})

    Arguments

    • Text The string to convert to all lower case.

    fn-ToTitleCase

    Formats text in a string to title case.

    Example

    fn-ToTitleCase({WorkflowVariable:Text})

    Arguments

    • Text The string to convert to title case.

    fn-ToUpper

    Formats text in a string to all upper case.

    Example

    fn-ToUpper({WorkflowVariable:Text})

    Arguments

    • Text The string to convert to all upper case.

    fn-Trim

    Removes leading and trailing whitespace from a string.

    Example

    fn-Trim({WorkflowVariable:Text})

    Arguments

    • Text The text to remove leading and trailing whitespace characters from.

    fn-XmlEncode

    Encodes a string to make it safe for viewing in html.

    Example

    fn-XmlEncode({WorkflowVariable:Text})

    Arguments

    • Text The text to encode.

    fn-XmlDecode

    Decodes a html safe string to regular text.

    Example

    fn-XmlDecode({WorkflowVariable:Text})

    Arguments

    • Text The text to decode.

    5.9 Inserting reference fields

    By using references, content containing context specific information pertaining to the list item and this instance of the workflow can be constructed for use within workflow actions.

    To insert a reference:

    • In the Insert Reference dialog, select the reference and double click on an item from the list; OR
    • Select the item and click on the OK button.


    Reference information is divided into different categories:

    • Common: These are lookup values specific to the workflow, the context of the item and the current task within the workflow.
    • Item Properties: These are metadata columns for the item for which the workflow is associated.
    • Workflow Constants: These are values that have been set globally either on a web farm, site collection or site level that can be used within the workflow. Refer to Workflow Constants for more information.
    • Inline Functions: Allows for additional processing to be done on a text or value. Refer to Inline functions for more information.
    • Workflow Variables: these are the Workflow variables configured for the workflow.

    Note: Available tabs on the Insert Reference dialog may change depending on the options available within the workflow action from which the Insert Reference link was clicked.

    'Common' Lookup References

    The following are references available in the Common tab:

    The following references are available from within request approval notifications:

    Create a hyperlink using a reference

    When inserting a reference into a Rich Text box, the reference can be inserted as a hyperlink.

    To insert a reference as a hyperlink:

    Note: By placing the cursor in either Address or Hyperlink text to display textboxes, a combination of lookup data and manually typed plain text can be used.

    Other uses for inserting a hyperlink using the reference:

    5.10 LDAP Picker

    LDAP Picker, Home Server Picker and Mailbox Picker within Workflow Actions

    Some workflow actions require connection information to lookup Active Directory.

    To configure the settings for the LDAP Path, Primary home server or Mailbox Store, click on .

    Using the LDAP Picker

    Workflow actions such as 'Query LDAP' and 'Create AD User' require an LDAP address in order to connect to an Active Directory data store.

    When the LDAP Picker is initially opened, it will attempt to connect to Active Directory using the information in the workflow action's dialog 'LDAP Path' text box. An error will occur if further credentials are required.

    To configure the Active Directory details for the LDAP Path:

    Using the Home Server Picker

    * This topic applies to Nintex Workflow Enterprise Edition only

    The Enable OCS workflow action requires an LDAP address in order to specify the Primary Home Server. Generally, this will be an object called 'LC Services'.

    When the Home Server Picker dialog is initially opened, it will attempt to connect to Active Directory using the information in the workflow action's dialog 'LDAP Path' text box. It will then attempt to find any available 'LC Services' folders. An error will occur if further credentials are required.

    To configure the Active Directory details for the Primary Home Server:

    • Select an 'LC Services' object by clicking on it.
    • Then click the Close button. The selected object's LDAP path will be inserted into the appropriate section within the workflow action dialog.

    Using the Mailbox Picker

    * This topic applies to Nintex Workflow Enterprise Edition only

    The Provision User in Exchange workflow action requires an LDAP address in order to specify the Mailbox Container (or Exchange Database if provisioning an Exchange 2007/2010 mailbox). Generally, this will be an object called 'Mailbox Database', residing under a 'Storage Group' object

    When the MailStore Picker dialog is initially opened, it will attempt to connect to Active Directory using the information in the workflow action's dialog 'LDAP Path' text box. It will then attempt to find any available 'Mailbox Database' folders. An error will occur if further credentials are required.

    To configure the Active Directory Details for the Mailbox Store:

    • Select a 'Mailbox Database' object (or another location in which you want the mailbox to reside) by clicking on it.
    • Then click the Close button. The selected object's LDAP path will be inserted into the appropriate section within the workflow action dialog.


    Options within LDAP Picker, Home Server Picker and Mailbox Store

    LDAP Path

    An LDAP path specifying the Active Directory location. E.g. LDAP://MyPortal.com/DC=nintex,DC=com

    If the domain name is MyCompany.com, then the LDAP Path will be LDAP://MyCompany.com/DC=MyCompany,DC=com

    Containers or Organizational Units (OU) may be specified by adding "CN=" or "OU=". E.g.:

    Note: To access 'Exchange MailStore' objects, it must be connected to a Configuration Container. E.g.:

    Username

    A username with the required permissions to access the LDAP Path entered.

    Password

    A password for the above username.

    Click on the padlock to select from a list of Credential Workflow Constants.

    5.11 Manage External Start configuration page

    * This topic applies to Nintex Workflow Enterprise Edition only

    This topic describes the selections on the Manage External Start configuration page. Use this page to generate and manage External Start endpoint URLs for a selected workflow. For instructions on adding, deleting, disabling, enabling, and copying endpoint URLs and security keys, see Using External Start

    Note: To view endpoint URLs across the farm, access the External start URLs page from Central Administration. For more information, see External Start URLs page.

    Steps to access this page​

    To access the Manage External Start configuration page
    1. Access the Manage External Start page using one of the following methods. 
      • ​​Click the Settings icon on the upper right of the page, select Nintex Workflow 2013, and then select Manage External Start
      • On the Site Settings page, in the Nintex Workflow section, click Manage External Start.
    2. On the Manage External Start page, click Configure for the workflow of interest. 
      The Manage External Start configuration page for the selected workflow is displayed. The selected workflow is indicated in the page title. 

    Page reference

    The Manage External Start configuration page lists endpoint URLs for the workflow indicated in the page titleEach row represents a single endpoint URL. The page contains columns as well as buttons and links.

    Column descriptions

    This section describes the columns and their contents.
    Column Description
    Internal URL name for reference ​Optional name specified for the endpoint URL.
    Status ​Endpoint URL enabled/disabled status. 
    URL and security key View details button to display ​the endpoint URL and security key for viewing and copying. 
    Calls Number of calls to the endpoint URL.​
    Last called ​Date and time of last call to the endpoint URL.
    Created by ​Username used to create the endpoint URL.
    Created ​Date and time when the endpoint URL was created. 
    Delete X (Delete) button to permanently remove the endpoint URL from storage. 

    Button and link descriptions​

    This section describes buttons and links outside the columns.
    Button/link Description
    Enable selected ​Enables all selected endpoint URLs (rows). 
    Disable selected ​Disables all selected endpoint URLs (rows).
    Delete selected Deletes all selected endpoint URLs (rows).
    Add URL ​Generates a new endpoint URL for the workflow.
    Save Saves changes to endpoint URL configuration.

    Related topics:
    Using External Start​

    5.12 Manage External Start page

    * This topic applies to Nintex Workflow Enterprise Edition only

    This topic describes the selections on the Manage External Start page. Use this page to view published site workflows on the site and to access the Manage External Start configuration page to generate and configure External Start endpoint URLs. 

    Note: To view endpoint URLs across the farm, access the External start URLs page from Central Administration. For more information, see External Start URLs page.

    Steps to access this page​

    To access the Manage External Start page, do one of the following
    • ​​Click the Settings icon on the upper right of the page, select Nintex Workflow 2013, and then select Manage External Start
    • On the Site Settings page, in the Nintex Workflow section, click Manage External Start.

    Page reference

    The Manage External Start page lists published site workflows along with statistics related to External Start endpoint URLs. Each row represents a single workflow. 
    Column Description
    Workflow name ​Workflow for which External Start functionality is available. 
    Endpoint URLs Number of External Start endpoint URLs defined for the workflow. 
    Calls Number of calls to endpoint URLs for this workflow.​
    Last called ​Date and time of last call to an endpoint URL defined for this workflow.
    Configure Configure button to access the Manage External Start configuration page for the workflow. For more information about this configuration page, see Manage External Start configuration page.

    Related topics:
    Using External Start

    5.13 Managing connections to external providers

    You can add, test, select, and delete connections to external providers, such as DocuSign, Microsoft Dynamics CRM, and Salesforce.

    To access the Connection Manager dialog box:

    To add a connection:

    1. In the Connection Manager dialog box, click New.
    2. In the Create Connection dialog box, specify the following properties (fields) and then click Save.
      • Scope (User or Site)
      • Provider
      • Connection name
      • Provider-specific fields

    For more information about these fields, see Create Connection dialog box.
    The connection is now available for selection when configuring actions associated with the selected provider. For example, if you added a Salesforce connection, then the new connection is available when configuring the action Salesforce change user status.

    To test an existing connection:

    The message "Testing connection" appears briefly, and then an image representing the test results is displayed to the right of the Test button for the selected connection.

    : Connection is working

    : Error encountered during test; hover over image for more details

    To select a connection for use during action configuration:

    To delete a connection:

    Related topics
    About connections
    Connection Manager dialog box
    Create Connection dialog box

    5.14 Managing Start Variable Order

    The Manage Start Variable Order page allows you to change the display order of variables on the Start Workflow page. Any variables which have been enabled to show on the start form will appear on the Manage Start Variable Order page.
    Note: Start Variables (Start data) will only appear if the workflow is set to start manually, if the workflow starts automatically, the start variables fields will not appear and if default values are set, they will be used for the variables.  
     
    To access the Manage Start Variable Order page;
     
    Or


    In the Manage Start Variable Order page, change the order of the start variables with the Change Order arrows.
     
    The changes to the start variable order will be reflected:

    5.15 Managing workflows

    ​​​​​​​​​​​​​​​​​​​​​​​​​​​​​​​​​​​​​​​​​This help topic provides instructions for administrators on managing workflows from the Manage workflow option.

    Managing workflows

    The Manage workflow option allows both published and unpublished workflows to be viewed. Workflows can also be managed for the list or library. You can access this option as follows:
    1. ​Select the Library tab on the Ribbon toolbar.
    2. Click the Workflow Settings button and select Manage Workflows with Nintex Workflow from the menu.​
      The Workflow Inventory page displays all workflows that belong to the current list. 


    To view, filter, or track information on this page, see Viewing workflow inventories. 

    Here are some suggested next steps.

    Unpublish a workflow

    The list of workflows are divided into workflows that are published (available for selection by users) as well as those which are unpublished (saved but unavailable for selection by users).

    • Navigate to the list or library, that the workflow is to be unpublished from.
    • Select the Library tab on the Ribbon toolbar.
    • Click the Workflow Settings button, then select Workflow Settings from the menu options.


    • A list of all published versions of the active workflows within the list or library with the number of currently running workflows are displayed.
    • To remove one or more workflows from the 'Published' list, click on Remove a workflow.


    • In the Remove workflows page, select the Remove radio button to the right of the workflow title to remove it.

    Note: When removing a workflow, it is not removed from the system, only from the list of workflows available to users (published workflows).


    • When all settings have been made, click the OK button to commit the changes. 

    5.16 Opening and saving workflows

    This help topic describes how to open and save workflows. For information about making a workflow available to users in libraries and lists, please refer to the Publishing a workflow.

    Opening a workflow

    There are two ways to open an existing workflow:

    1. Using Workflow Designer:

    • While in the Workflow Designer window, click the Open button on the ribbon toolbar.


    2. Existing workflows can also be opened from the Manage Workflows page. For more information, please refer to the Managing Workflows.

    Versioning

    The Open Workflow dialog supports opening a previous version of a workflow. To see the available versions click the plus symbol (+) located to the left of the workflow title. A minor version is created every time the workflow is saved and a major version when published. Double clicking the workflow title will open the latest version, which may not be the current published version. To open a previous version, select one of the versions from the list and click the Select button (or double click the version row). The version selected will open in the workflow designer. If this workflow is then modified and published, a new version will be created and this new version will be the current version that is used when a workflow is started.

    Saving a workflow

    A workflow can be saved at any point in the design process and edited again at a later time.

    To save a workflow:

    The workflow Title will default to New Workflow, and a warning message will appear if a workflow with the same name already exists. To overwrite an existing saved workflow, check the Overwrite existing version checkbox.

    The Description field can be used to add comments about the workings and purpose of the workflow. These comments are displayed in the Open Workflow dialog, and on the Manage Workflows page.

    The Change comments field can be used to add comments about the changes made to the latest saved version of the workflow. These comments are displayed in the Open Workflow dialog as a tooltip, and displayed to the Approver of a Workflow Change Approval process.

    When all of the desired information is complete, click the Submit button to save the workflow. A progress indicator will display while the saving process occurs, and then the following message will be displayed:

    Save As options

    A workflow can be saved for different usages.

    To save the workflow with a different name:


    Save As Snippet: see Workflow Snippets

    Save As Template: see Workflow templates

    5.17 Printing

    Use the Print button on the main ribbon toolbar to print the workflow design. 

    Note: the Print feature prepares the workflow design page for printer-friendly viewing in the web browser. The browser's standard printing function is then used to send the page to the printer.

    The Print button contains two menu options:


    Click the Print icon on the page to launch the browser's standard print functions.

    5.18 Publishing a workflow

    Before a workflow becomes available to users within SharePoint lists and libraries it must be published.

    To publish a workflow:

    • Click the Publish button on the main Ribbon toolbar.
    • The application will then validate the workflow and publish it.
      Note: the workflow is automatically saved before it is published, so it is not necessary to Save and then Publish a workflow.

    Note: Not all users have permission to publish workflows. For information about which users can publish workflows, please refer to the Security Settings.

    The process of validation and publishing may take a few seconds before the published message is shown: 

    If there are errors in the workflow, including actions that are not configured, the workflow will not publish, and the following message is displayed:

    Once the workflow is published it can be managed from the Managing Workflows page.
     

    5.19 Run Now

    Use the Run Now button to test an action without republishing the whole workflow design. Click on the Run Now button in the action Ribbon to open the Run Now dialog. 

    Run Now dialog

    Note: Run Now is not a simulation, any executions such as create, query, update and delete that are made will be committed when executing the Run Now. Use this page to temporarily change parameter values and test the configuration settings of the action.  

    The Run Now dialog shows the current configurations for the action and allows reference tokens to be replaced before the Run Now dialog is executed.

    By default, the Run Now dialog will:

    Note: The replacements and changes made to parameter values used in the Run Now is only temporary; these parameter values are not saved to the action once the Run Now dialog is closed.

    Parameters

    The parameters will reflect the available configuration settings of the action the Run Now dialog is launched from. 

    Test connection 

    This will verify that the connection details to an external system are correct. This option appears on selected Run Now dialogs depending on the action it is launched from.

    Result

    Displays the output of the action once the Run Now has been executed.

    Some actions with Run Now, interact with data or systems outside of the workflow. By default, the Run Now feature is allowed on all sites that do not have workflow change approval enabled.

    To change the Run Now preferences:

    1. Navigate to Central Administration, click on Nintex Workflow Management.
    2. Click on Global settings.
    3. Locate Allow ‘Run now’ on actions that interact with external data and make the desired change.
    4. Click OK.

    Actions that support Run Now and only operate on workflow context data will always have the Run Now feature available. 


    5.20 Set action labels

    The text displayed around an activity can be configured. Adding labels to a workflow action provides a user with more context around what the action is doing without the need to see the workflow action configuration.

    Editing the Labels

    There are two ways to edit the labels for a workflow action.

    1. To edit the label in-line on the workflow action itself:

    • In the design canvas where the workflow action is located, click on the title bar.
    • Enter the text desired in the different label areas on the workflow action.
    • Click away from the workflow action to commit changes to the label.

    2. To edit the label within the 'Configure action' dialog:


          Note: The action title is used in workflow reports to indicate the current status of a running workflow.


    Action Notes

    The action notes are displayed in the print with notes view.

    Notes to display:


    User defined notes

    The textbox is only enabled when the Notes to display selected is User defined or System generated and user defined. Entering a value will display the custom notes in the print with notes view and when a user hovers over the workflow action.


    5.21 Using External Start

    ​​​​* This topic applies to Nintex Workflow Enterprise Edition only

    This topic describes External Start for Nintex Workflow 2013 and provides instructions for use with workflows. 

    External Start allows you to initiate site workflows from outside of SharePoint. You can configure workflows for External Start; generate (add) External Start endpoint URLs; delete, disable, and enable External Start URLs; connect external services; and view External Start usage. This topic also provides troubleshooting tips. 

    For administrative settings, see Managing External Start settings.

    How External Start works​​​

    External Start allows you to initiate site workflows from outside of SharePoint by providing you the ability to generate endpoint URLs pointing to the workflows. Each endpoint URL stores the workflow infomation along with its start variables of supported data types (if any). Endpoint URLs reference run.nintex.io. Example endpoint URL: https://run.nintex.io/x-start/weuyj1TkGD​​

    For example, you could use an external service (integration partner) such as Zapier or Azuqua to monitor Salesforce for new customers and initiate a Nintex workflow to create customer-specific SharePoint sites. You could configure this service to map Salesforce data from another service to Nintex workflow variables for use in the workflow. You could also create your own code to reference the endpoint URLs. When the endpoint URL is called, the associated workflow is initiated. 

    To use External Start, an administrator must enable External Start using Central Administration. For variable mapping, a workflow designer configures start variables of supported data types. The workflow designer publishes the site workflow and generates one or more External Start endpoint URLs for this workflow. Nintex stores the generated endpoint URLs and their associated security keys. The workflow designer configures an external service or manual code to reference the External Start endpoint URL and associated security key. When the service or code calls the endpoint URL, the associated workflow is initiated when required conditions exist (such as new Salesforce customers). Once the service or code is set up and monitoring, nothing more needs to be done.​

    Configuring workflows for External Start​

    Published site workflows have External Start functionality available. If you want to make variables available for mapping to another service, such as Salesforce, then configure variables to show on start; select Yes for Show on start form. Variables can be mapped using configuration screens in external services such as Zapier or Azuqua. 

    Data types supported for variables used with External Start: 
    • Single line of text
    • Multiple lines of text
    • Choice
    • Number
    • Date and Time
    • Yes/No

    No workflow settings are required for External Start. It is acceptable to select the option Start manually. 

    Adding and deleting External Start URLs​​

    You can add and delete multiple External Start endpoint URLs per workflow. Delete endpoint URLs when the associated workflow or external service will no longer be used. For example, if you change accounting providers, then any endpoint URLs created specifically for the old provider can be deleted. If you only want to temporarily ignore calls to the endpoint URL, you can disable the URL. See instructions later in this topic. 

    Note: Only published site workflows can use External Start. 

    To add an External Start endpoint URL
    1. Access the Manage External Start page using one of the following methods. 
      • ​​Click the Settings icon on the upper right of the page, select Nintex Workflow 2013, and then select Manage External Start
      • On the Site Settings page, in the Nintex Workflow section, click Manage External Start.
    2. On the Manage External Start page, click Configure for the workflow of interest. 
      The Manage External Start configuration page for the selected workflow is displayed. The selected workflow is indicated in the page title. 
    3. On the Manage External Start configuration page, click Add URL
      After a moment, the new endpoint URL is displayed on the page. By default, the new endpoint URL is enabled. ​The endpoint URL references run.nintex.io. Example endpoint URL: https://run.nintex.io/x-start/weuyj1TkGD​​
      A security key is generated at the same time as the endpoint URL; both items are stored securely by Nintex. 
    4. (Optional.) Enter a name for the endpoint URL using the text box under the column Internal URL name for reference. 
      The endpoint URL is now available for connecting to external services. 
      Note: Keep External Start URLs secure. Variable names and data types can be identified from the URLs when used outside the Nintex platform. 

    To delete an External Start endpoint URL
    1. Access the Manage External Start page using one of the following methods. 
      • ​​Click the Settings icon on the upper right of the page, select Nintex Workflow 2013, and then select Manage External Start
      • On the Site Settings page, in the Nintex Workflow section, click Manage External Start.
    2. On the Manage External Start page, click Configure for the workflow of interest. 
      The Manage External Start configuration page for the selected workflow is displayed. The selected workflow is indicated in the page title. 
    3. On the Manage External Start configuration page, under the Delete column for the endpoint URL of interest, click X (Delete) and then click OK to confirm. 
      After a moment, the page refreshes and the deleted endpoint URL is no longer displayed

    ​​Tracking variables​​

    The best practice for tracking variables in the initiated workflow is to use the Log in the History List workflow action to log the variable values to history. For more information about this action, see Log in the History List.

    Connecting external services​​​​

    You can connect external services to an endpoint URL by copying and pasting the URL and its associated security key to the external service configuration. 

    To copy an endpoint URL to an external service
    1. Access the Manage External Start page using one of the following methods. 
      • ​​Click the Settings icon on the upper right of the page, select Nintex Workflow 2013, and then select Manage External Start
      • On the Site Settings page, in the Nintex Workflow section, click Manage External Start.
    2. On the Manage External Start page, click Configure for the workflow of interest. 
      The Manage External Start configuration page for the selected workflow is displayed. The selected workflow is indicated in the page title. 
    3. On the Manage External Start configuration page, under the URL and security key column for the endpoint URL of interest, click View Details
      Note: Keep External Start URLs secure. Variable names and data types can be identified from the URLs when used outside the Nintex platform. 
    4. In the View details dialog box, click Copy URL to copy the endpoint URL. 
      Example endpoint URL: https://run.nintex.io/x-start/weuyj1TkGD​​
    5. In the external service configuration, paste the copied endpoint URL.
    6. In the View details dialog box, click Copy security key to copy the security key.
    7. In the external service configuration, paste the copied security key.
      For instructions on selecting services for monitoring (such as Salesforce), mapping variables, and other configuration details, see the documentation for the external service. For example, see Zapier help at https://zapier.com/help/ or Azuqua help at http://help.azuqua.com/help. For more information about using External Start with external services such as Zapier or Azuqua or with a code-based solution, see the following page on Nintex Connect: https://community.nintex.com/docs/DOC-3167.

    Disabling and enabling External Start URLs​​

    Disable External Start endpoint URLs when you want to temporarily avoid use. When an endpoint URL is disabled, the associated workflow does not get initiated by any calls to that endpoint URL. If you want to stop all use of an endpoint URL, you can delete the URL. See instructions earlier in this topic. 

    To disable or enable an endpoint URL
    1. Access the Manage External Start page using one of the following methods. 
      • ​​Click the Settings icon on the upper right of the page, select Nintex Workflow 2013, and then select Manage External Start
      • On the Site Settings page, in the Nintex Workflow section, click Manage External Start.
    2. On the Manage External Start page, click Configure for the workflow of interest. 
      The Manage External Start configuration page for the selected workflow is displayed. The selected workflow is indicated in the page title. 
    3. On the Manage External Start configuration page, under the Status column for the endpoint URL of interest, select the desired status.  
    4. Click Save.

    Viewing External Start usage

    View External Start usage to determine which published site workflows on the current site have endpoint URLs and understand usage of those endpoint URLs.

    To view External Start usage for a site
    • ​Access the Manage External Start page using one of the following methods. 
      • ​​Click the Settings icon on the upper right of the page, select Nintex Workflow 2013, and then select Manage External Start
      • On the Site Settings page, in the Nintex Workflow section, click Manage External Start.

    Troubleshooting

    External Start opti​ons not available

    This section provides information for troubleshooting unavailability of External Start.

    ·         Do you have the required license? Your license must be enabled for Enterprise Edition and Nintex Live.

    ·         Are both Nintex Live and External Start enabled? To enable Nintex Live and External Start, go to the Central Administration Home page, click Nintex Workflow Management, click Live settings, and then click Enable for both settings.

    ·         Was the workflow last published before External Start was enabled? External Start options continue to be unavailable for existing published site workflows. To make External Start options available for these workflows, republish them after enabling External Start.

    ·         Did you update the workflow recently without publishing? If you recently updated variables for the workflow, make sure you republish. External Start is available for published site workflows only.

    Workflow doesn’t start

    If the workflow didn’t start after you ran a service pointed to the External Start URL, review the possible causes below.

    Cause

    Resolution

    Workflow error. The External Start URL was successfully called and the workflow started, but the workflow ran into issues before expected actions completed.

    See External Start URLs page. An incremented value in the Calls column indicates that an External Start URL for this workflow was called. You can also check workflow history for workflow errors.

    Service monitoring frequency. The External Start URL is not yet called because the service is subject to a monitoring frequency.

    See the service documentation on monitoring frequency. For example, some Zapier plans monitor every 15 minutes.

    Service connection issue. The External Start URL was not called because the service could not connect.

    See the service logs and documentation.

    Service configuration variable mismatch. The variables specified in the service configuration do not match the variables configured in the workflow. This issue can occur when you update the workflow after configuring the service.

    Compare the service configuration to the workflow configuration to ensure that variables match.

    Required service not running. The Windows service Nintex Workflow Start Service is not running on the Central Administration server.

    On the Central Administration Home page, click System Settings, and then click Manage services on server. Ensure that the status for the service Nintex Workflow Start Service is Started. 


    Related topics:
    Manage External Start page
    Manage External Start configuration page

    5.22 Using lookups

    In many workflow actions within Nintex Workflow, values can be set at run time with lookups. A lookup provides the ability to reference and use a value within the workflow action. When the option to select a lookup is available, four options will be presented in a drop down menu.

    Value

    The Value option allows a literal value to be entered, or use Insert Reference to build the value dynamically at run time.

    Workflow Data

    The Workflow Data source allows a workflow variable to be referenced.

    Click the  button to set the return type for the Workflow Data.

    The Select return type dialog will appear:

    Select the Return type for the workflow data from the drop down provided.

    When all settings have been made, click the OK button. 

    List Lookup

    The List Lookup source allows a reference to be made to any property of the current item or any item within a list or library in the current site. When List Lookup is selected, additional options are provided where the Source and Field of the List Lookup will need to be set.

    The default source is set to use the current item. All available properties that are defined for the Source will be listed in the Field list.

    Alternatively, a property on another item in any list within the site can be set. After selecting a Source, select a Field containing the value to be used. Using the When and Equals options, an item in the source list can be located.

    E.g. In the Shared Documents library, select the ID of an item where the Name of the item is Finance Jan 2012.

    Note: Using a List Lookup is a useful solution for solving the problem of environment-specific configuration values. By creating a list to hold the configuration variables, lookups can be used to retrieve the settings at runtime that may differ between the different environments such as 'Development' and 'Production'. This helps to avoid hard-coding these settings into the workflow templates and having to change them as they are deployed between the environments.

    For information about lookups used in the Nintex Workflow Message Templates, please refer to Defining message templates.  

    Workflow Context

    The Workflow Context option allows a value associated with the current workflow to be set and used within the workflow action.
     
     
    The available values selectable within the Workflow Context is the same as the values provided in the 'Common' tab when  Insert Reference is used within the Value source.
     
    The main difference in using the Workflow Context vs Value is that the Workflow Context method allows the returned value to be set as a different data type (string, number, etc.); whereas selecting a value through the Insert Reference function within the Value source sets the value returned with its default type with no ability to change the data type.

    User Profiles

    The User Profiles source allows a reference to be made to a user profile property of the specified Account Name. When User Profiles is selected, additional options are provided where the Source and Account Name value will need to be set.

    The Source is the value that will be retrieved based on the value of the Account Name. All available user profile properties will be listed in the Source field.

    E.g. John Smith has the Account Name of 'jsmith'. The following example will return John Smith's department value specified in his SharePoint user profile property.


    User Profile lookups are only available in environments that have Microsoft SharePoint Server 2013, and not available in Microsoft SharePoint Foundation 2013.

    Workflow Constant

    The Workflow Constant option allows a value that has been set globally either at the Farm, Site Collection or Site level to be used within the workflow action.


    The values contained within the workflow constant are not made visible to a user when designing the workflow. Users are only shown the name of the workflow constant.

    5.23 Verbose logging

    Verbose logging adds increased context data when viewing the history of a workflow instance. The value of all workflow variables and item properties are stored before and after each workflow action, along with additional diagnostics information such as the process the workflow was running in and the server which was executing the workflow.

    Enabling verbose logging

    Verbose logging must first be enabled in the farm before it can be enabled in a workflow.

    To enable verbose logging:

    • Navigate to Global Settings page.
    • In the Allow verbose workflow logging section, set to Yes.
    • In the Number of days to keep verbose logs, set the number of days to keep verbose workflow logs. Logs will be deleted when the workflow completes after the specified number of days.

    Note: A workflow with verbose logging enabled will add more data to the workflow database than one without, therefore there is an automatic purge process to remove verbose information after a number of days. 

    Global settings are cached and refreshed automatically every 15 minutes. For changes to take affect immediately, perform an IISRESET and restart the Windows SharePoint Services timer service.

    Once verbose logging is enabled on the web farm, it can be enabled on a workflow.

    To enable verbose logging for a workflow:


    Viewing verbose logs

    Verbose information is available from the Viewing workflow status of a workflow. If the instance is run with verbose logging enabled, and the verbose data has not yet been cleared, a message in the workflow information panel will state that verbose logging information is available. If verbose data is available, each workflow action can be clicked on to bring up the verbose information panel. The panel shows each data item available to the workflow, with the values before and after the action executed. If any value changed, it will be highlighted.

    There are options to export the verbose information for a particular action or the entire verbose log to an xml file.

    Considerations when using verbose logging

    Verbose logging adds a significant amount of data to the Nintex Workflow database. The data is not intended to be kept for a long time. The verbose logging feature is intended as an assistant for workflow development and testing, and is not intended to be left on in production.

    5.24 Viewing workflow inventories

    ​​​​​​​* The Site Collection view described in this topic applies to the Nintex Workflow Enterprise Edition. The Site view applies to all editions.​​​

    This help topic provides instructions for administrators on accessing and viewing workflow inventories from the Workflow Inventory page. This page provides a holistic view of the location, depth and breadth of existing workflows across a site collection or site.

    Accessing workflow inventories

    You can access the Workflow Inventory page in the following ways:
    • On the Site Settings page, under Nintex Workflow, click Workflow inventory.
    • Navigate to the site. On the top right, click Settingsand select Nintex Workflows 2013, Manage Workflow Inventory from the drop-down menu.

    The Workflow Inventory page opens and displays all workflows that have been created within the site.

    The table view shows the name of the workflow including the description, who last modified the workflow, and what list the workflow is assigned to.

    Viewing workflow inventories

    With the appropriate administrator rights, you can view and filter workflow inventories based on site collection, site, list, or date. ​​​Inventories can be exported as CSV files.
    Note: The ability to view a workflow, list, site, site collection is based on your SharePoint administrator access permissions. For more information about permissions to perform the actions described, see Security Settings.​​
    ​​​​​​​​​​​​​​​​​​​​​​​​​​​​​​​​​​​
    Here are some suggested next steps.
     
    Configure the list view
    You can change the list view as needed.
    1. You can filter a list by showing only the items that meet a certain criteria.
      The following columns appear in the list view by default:
      Site (Site Collection): Lists the site location of the workflow.
      List Name Lists names of existing lists for the indicated site.
      Workflow NameLists names of existing workflows for the indicated list. Click the name to open the workflow.
      Workflow TypeLists the workflow types of existing workflows by site and list.
      Modified By: Lists the name of the last designer or administrator of the workflow.
      ModifiedLists the modified dates and times for existing workflows. You can pick a date range (last 7 days, for example) from the drop-down menu.
      Published Version: Lists the publication status of existing workflows.​
      Last Saved VersionLists the publication status of the latest saved versions of existing workflows.
      Last Run Time: Lists the last run date of workflows, so you can consider deleting them.
    2. In the table view, click a column header, and select a value from the drop-down menu.​ The list updates and displays the results. From this display, you have the following options:​
      To delete a workflow, click delete (X) next to the workflow. In the confirmation dialog, click OK.
      To add or remove columns in the view, click Modify View. Select the columns that you want to show and click OK.

    View all workflows in a range of days

    You can view all workflows that were run over the last week, month or year.
    In the table view, click the Modified filter option, and specify a date range as shown.

    To change the view, you can sort the list in ascending and descending order.

    View version information
    In the table view, filter by Published Versions and Last Saved Version
    The list shows all the currently published workflows and last saved versions.
    To unpublish a workflow, see Managing workflows.​

    Export workflow inventories to a CSV file
    You can export workflow inventories to a spreadsheet for further review​.
    1. Click Export table to CSV on the Workflow Inventory page.
    2. From the downloads prompt, open the file. The data opens in a tabular format.
    3. Save the file to a location​.

    View statistics

    You can view the statistics of a particular workflow.
    1. Click View statistics on the Workflow Inventory page.
    2. Select a workflow.
    3. View and interpret the statistics, such as Total Runs and In Progress.​

    View all workflows for the site collection

    (Site Collection administrator only.) You can view workflows for the entire site collection.
    1. Click View workfows for entire site collection on the Workflow Inventory page.
    2. In table view, specify the desired values, and filter by Site Name, Workflow Name.​

    Determine the status of your workflows

    You can open a workflow preview, evaluate the status, and track issues.
    1. In the table view, click the workflow name.
    2. ​In the workflow preview, view the workflow and determine the status.
      Scrolling over each workflow action provides information on how the workflow action is configured.
      From this view, you have the following options:
      Export a workflow: Exports the workflow to .nwf which can be reused in another site.
      Edit a workflow: Displays the workflow in Workflow Designer, ready for editing.
      View history: Displays the history of the workflow such as Total Runs, In progress, Cancelled, Max. Duration.
      View statistics: Displays the statistics of the workflow executions. (Displayed after the workflow has run.)
      Workflow Schedule: Configures workflows to run automatically at a certain time. After selecting this option, click Add Schedule, and configure the fields as appropriate.
      External Start URLs: Configures External Start endpoint URLs to automatically start your workflows in response to external events (applies to Site workflows). 

    Take an inventory of your workflows

    You can take an inventory of the workflows that exist in the site, site collection.
    1. In the table view, click the Last Run Date filter, and specify a date range, for example, > 365 Days​ (more than).
      The list displays all workflows that were run more than a year ago.
    2. Review and delete unused workflows.​ You can have lists open in another tab while looking at the inventory list.

    5.25 Workflow Action Common Settings

    Common settings can be configured for each workflow action.
     
     
    To configure the Common settings:
    1. In the workflow action, left-click the title bar and select Configure from the drop down menu options.
    2. In the Configure action dialog, within the Ribbon, click on Common.
    3. The following options will be presented:
      • Message to log on completion: Setting a value here will log a message in the workflow history when the action has completed. To view workflow history, refer to Viewing workflow history.
      • Note: For a message to be logged on completion, the Enable custom history messages must be selected for the workflow. Refer to Workflow settings.
      • Expected duration: Set the expected length of time for this action to complete.
      • Note: This is typically used in actions that require human interaction. The expected duration will be recorded in the database for reporting purposes.
      • Hide from workflow status: Checking this option will cause this action, and any child actions, to be hidden from the workflow history or graphical progress view. This will also cause the action to not be tracked in the workflow database.
      • Note: The 'Request Approval', 'Request Review' and 'Request Data' actions can be hidden from the graphical status view, but will still be displayed in the workflow history and logged in the database.
      • Run as workflow owner: Checking this option will cause this action, and any child actions, to run using the credentials of the user who published the workflow instead of the user who started the workflow.

    Note: The Run as workflow owner option will only appear when the action is in the root level of the workflow. If it is embedded in a "Run If" action, a branch of a "State Machine", a "Parallel" action, "Flexi Task" action or "Loop" action, this option is not available. This is due to a limitation in SharePoint, all actions inside a parent action must run using the same user.


    5.26 Workflow Constants

    Workflow Constants are globally set values available to all workflows at the specified level (web farm, site collection, or site). Use workflow constants to store credentials, URLs, LDAP paths, SQL connection strings, and any other values that need to be used in multiple workflows.

    Inserting workflow constants into workflow actions

    You can insert credentials and other defined workflow constants into workflow actions. During workflow design, the values contained within a workflow constant are not visible; only the name of the workflow constant is shown. 

    To insert a credential into a workflow action:

    To insert a defined workflow constant into a workflow action (any type other than credential):


    Enabling and disabling entry of manually defined credentials

    As an administrator, you can enable or disable entry of manually defined credentials when defining constants or when configuring workflow actions. This setting affects the entire web farm.

    To enable or disable entry of manually defined credentials:

    1. On the Central Administration Home page, click Nintex Workflow Management and then click Global Settings.
    2. On the Global Settings page, under Allow entry of user credentials, select the desired option and then click OK.
      • Constants page only: Allows entry of manually defined credentials in the Manage workflow constants page but not during configuration of workflow actions.
      • Constants page and action dialog: Allows entry of manually defined credentials both in the Manage workflow constants page and in the action configuration dialog box.
      • Neither: Does not allow entry of manually defined credentials in either the Manage workflow constants page or the action configuration dialog box. 


    Managing workflow constants

    As an administrator, you can create, edit, and delete workflow constants using the Manage workflow constants settings page for the specified level (web farm, site collection, or site). Credentials can be defined through either manual entry (if enabled on the web farm) or the Secure Store Service on SharePoint. For more information about Secure Store Service on SharePoint, see the Microsoft article Configure the Secure Store Service in SharePoint 2013.

    To create, edit, and delete workflow constants:

    1. Access the Manage workflow constants page for the desired level (web farm, site collection, or site).
      • Web farm level: On the Central Administration Home page, click Nintex Workflow Management and then click Manage workflow constants
      • Site collection level: Do the following.
        1. From the top site level home page, click Settings () and then click Site Settings.
        2. Under Nintex Workflow, click Manage workflow constants.
        3. In the Workflow constants ribbon, click Site collection settings.  
      • Site level: Do the following.
        1. From the top site level home page, click Settings () and then click Site Settings.
        2. Under Nintex Workflow, click Manage workflow constants.
    2. To create a new workflow constant, click New in the Workflow constants ribbon, define properties, and save changes.
    3. To edit an existing workflow constant, select the constant and then click Edit in the Workflow constants ribbon.
    4. To delete a workflow constant, select the constant and then click Delete in the Workflow constants ribbon.


    Editing permissions for workflow constants

    You can edit permissions for workflow constants to allow only specified users and groups to see and use the workflow constant when designing a workflow. Permissions are checked when the workflow is published.

    Note: If an existing workflow is modified by another workflow designer who does not have permissions to see and use a workflow constant being used in that workflow, then the workflow will save; however, republishing of the workflow will not be allowed. Only workflow designers who have been granted permission to see and use the workflow constant will be able to publish the workflow. Because this security check is performed when the workflow is published, no currently published workflow using workflow constants can be re-published by someone without permissions to the referenced workflow constants. Therefore, if the permissions for a workflow constant are changed, a workflow that is already using the constant will continue to use the value successfully.

    To edit permissions for a workflow constant:
    1. Access the Manage workflow constants page for the desired level (web farm, site collection, or site).
      • Web farm level: On the Central Administration Home page, click Nintex Workflow Management and then click Manage workflow constants
      • Site collection level: Do the following.
        1. From the top site level home page, click Site Actions and then click Site Settings.
        2. Under Nintex Workflow, click Manage workflow constants.
        3. In the Workflow constants ribbon, click Site collection settings.  
      • Site level: Do the following.
        1. From the top site level home page, click Site Actions and then click Site Settings.
        2. Under Nintex Workflow, click Manage workflow constants.
    2. Select the constant for which you want to edit permissions.
    3. In the Workflow constants ribbon, click Edit permissions.
    4. In the Edit Workflow Constant Permissions dialog box, under Permissions, select an option.
      • Everyone (default value)
      • Administrator for selected level (web, site collection, or site):
        • Server Farm administrators (user must be a SharePoint farm administrator; check is performed by SharePoint)
        • Site Collection administrators (user must be a SharePoint web administrator; check is performed by Nintex Workflow)
        • Team Site administrators (user must be a SharePoint site administrator; check is performed by SharePoint)
      • Specific users
    5. If you selected the option Specific users, then under Users/Groups, specify users and groups to have permissions to the current worklfow constant.
    6. Click OK.


    Fields in the Add Workflow Constant dialog box
    The Add Workflow Constant dialog box contains the following fields. This dialog box is accessed by administrators when adding workflow constants.
    Field Description
    Name ​The name of the constant to display for insertion into the workflow action.
    Type

    ​The data type of the workflow constant. Select one of the following options.

    • String: A value used to replace the constant when the workflow is run.
    • Number: A numeric value used to replace the constant when the workflow is run.
    • Date: A date value used to replace the constant when the workflow is run.
    • Credential: Values for a username and password credential pair. Use this constant type to provide workflow designers with access to external systems needed by workflows while keeping the actual values private.
      Select one of the following options.
      • User Supplied Credential: Manually enter the following values for secure, encrypted storage.
        Note: This option is available only when entry of manually defined credentials is enabled for the web farm.
        • Username: The username value used to replace the Username part of the credential constant when the workflow is run. If entering an AD username, remember to include the domain.
        • Password: The password value used to replace the Password part of the credential constant when the workflow is run. Enter the password corresponding to the above username.
      • Secure Store Credential: Reference username and password values associated with a target application defined in the Secure Store Service on SharePoint.
        For more information about Secure Store Service on SharePoint, see the Microsoft article Configure the Secure Store Service in SharePoint 2013.
        • Target Application ID: The unique identifier of the target application (Target Application ID property in the target application settings).
    • Secure string: A text value for use in workflow action input fields that do not show the value to the workflow designer. The value is also masked in the constant management page. Use this constant data type for security tokens needed to connect to Nintex Live-enabled workflow actions.
    Description ​Additional notes about this constant.
    Sensitive ​(Available for the workflow constant types String, Number, and Date.) When this check box is selected, the value of this constant is encrypted, the value is masked to the workflow designer, and the constant is available only in workflow actions that use sensitive values. For example, sensitive constants are supported in the connection string field of the action Execute SQL but not the body and subject fields of the action Send a notification.

    5.27 Workflow Settings

    ​Use the Workflow Settings dialog to set the workflow title and description, workflow start options, workflow variables and start data, association columns, and select a custom start form. 


    Workflow options 

    Ribbon menu buttons

    Note: Workflows are associated with a library or a list. Folders and sub-folders within libraries are subject to the same workflows as the parent library. Therefore, if a workflow is set to start when items are created or modified, any item, regardless of how many folders or sub-folders down it is stored, will trigger all the workflows that are set to start automatically. ​

    5.28 Workflow Snippets

    The Snippets feature provides the ability to reuse a predefined set of actions in the same sequence easily. For a set of actions which may be reused frequently, the user can choose to save the set of actions as a snippet. The saved snippet can then be used within the current workflow or in other workflows within the same site collection.

    Creating a snippet

    There are two ways to create a snippet.

    1. To save an entire workflow as a snippet:

    • In the Nintex Workflow Designer Ribbon, below the Save, expand the available options by clicking  .
    • Click on Save as Snippet.

    Note: This will save the entire workflow as a snippet.

    2. To save an 'Action Set' action as a snippet:

    • In the 'Action Set' action, click on  the title bar.
    • In the menu presented, click on Save as Snippet.

    Note: This will save the workflow action including its nested workflow actions as a snippet.

    In both ways when a snippet is saved, the Save as Snippet dialog will be displayed.

    Using Snippets 

    Once a snippet has been saved a new section will appear in the Workflow Actions toolbox called My snippets. It is from here that a snippet with all its preconfigured settings can be used in the workflow.

    To add a snippet to the workflow:

    Note: When the snippet is released onto the drop zone, it will be rendered as a set of workflow actions - the snippet icon will not appear on the workflow canvas.

    To delete a snippet:

    5.29 Workflow start data

    Start data is data that must be collected when the workflow is started.  When a user starts the workflow, they will be presented with a form requesting this information. 

    Note: Start Data will only appear if the workflow is set to start manually, if the workflow starts automatically, the start data fields will not appear and if default values are set, they will be used for the variables.

    Start data is configured by creating workflow variables and setting the Show on start form option to 'True' for the variable to be shown.

    For more information please refer to the Workflow variables.

    5.30 Workflow templates

    Workflow templates provides the ability to create a new workflow using the basis of a saved workflow template. By using workflow templates, workflow designers are able to save a considerable amount of time without the need to build a similar workflow already in existence from scratch.

    Workflow templates are associated at a Site Collection level. Saved workflow templates will only be available for reuse within the site collection the workflow was saved from. In order to use a workflow template from a different site collection, use the export workflow and import workflow features. Refer to Importing and exporting workflows.

    Selecting a workflow template 

    To create a new workflow based on a workflow template:

    • Navigate to the site, list or library (depending on the type of workflow to be created).
    • Click on Create a Workflow.
    • The Select a workflow template dialog is displayed.

    Note: Templates shown may differ from those available. Also, depending on what version of Nintex Workflow installed, pre-loaded templates may differ.


    Show template page when creating a new workflow:

    Saving a workflow as a template:


    Deleting a workflow template

    Only an Administrator can delete workflow templates. 


    To delete a workflow template:

    5.31 Workflow variables

    Workflows retrieve data from a data source at run time, workflow variables provides the ability to store data somewhere in order to use it in the conditions and actions within the workflow. Different types of data can be stored in a workflow variable. A workflow variable can also be used to get data from users on workflow start.

    Some examples of when workflow variables are useful:

    • The workflow requires a value for conditional actions which is a combination of values that exist already in the system. For example, these values can be set using the Math operation or Build Dynamic String actions.
    • Workflows developed in a development environment for deployment to testing and then subsequently deployed to production environments. To avoid using hard coded values in the workflow that must be manually updated during deployment, workflow variables can be used to load values from other lists via Using lookups. e.g. a URL to be used in an email may be different for each environment, this can be sourced at runtime from a configuration list within each environment using the Set a variable action. 
    • A workflow may require the creation of another list item that will need to be queried later using a lookup or deleted automatically depending on further logic in a workflow. E.g. a new report requires that a meeting is organised, but during the workflow an administrator has rejected the report. Therefore the calendar event needs to be deleted.

    It is not always appropriate or possible to store some of these values as meta data of the item attached to the workflow. To provide the means and flexibility to handle these kinds of scenarios Nintex Workflow provides workflow variables.


    Managing Workflow Variables

    To create or delete a variable attached to a workflow:

    • In the Nintex Workflow Designer Ribbon, click on Workflow Settings.
    • In the Workflow Settings dialog, within the Ribbon, click on Variables.

    Alternatively:

    To create a new workflow variable:

    To modify an existing workflow variable:

    To delete an existing workflow variable:

    • In the Workflow Variables dialog, select the workflow variable in the list.
    • In the Ribbon, click on Delete.

    Note: Workflow actions that use workflow variables are restricted to specific variable data types. For example:

    Related Items

    Managing Start Variables

    5.32 XPath Query Builder

    The XML Browser is found within the XPath Query Builder.
     
    The XML Browser is used to select an element in the XML structure. If the XML source specified for the action is available and all tokens and references are replaced with actual run time values, then the XPath Builder will use the XML source to display the XML structure within the XML Browser.
     
    If the XML source specified for the action is not available, the XML data that is required to generate the Tree View in the XML Browser must be provided manually. Use the XML Source button in the Ribbon to provide sample XML data. This will provide the XML data required to populate the Tree View.
     
    Sample XML data can be entered by:
     
     
    Or
     
     
    Note: If the workflow is being designed on an InfoPath form library, the XML Browser will load the InfoPath form template that has been uploaded to the form library in the Tree View if the action’s XML source selected is Current item.
     
    To select the node to be used within the action:
    1. Once the sample XML is available, select Tree View in the Ribbon. 
    2. Expand the nodes to select the element or attribute.
    3. Click Apply in the Ribbon.